Hi Stampers:
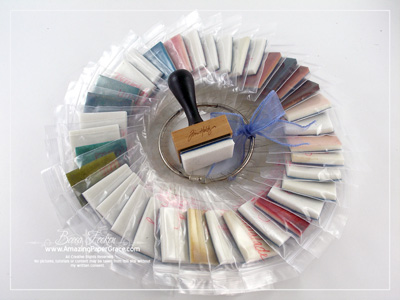
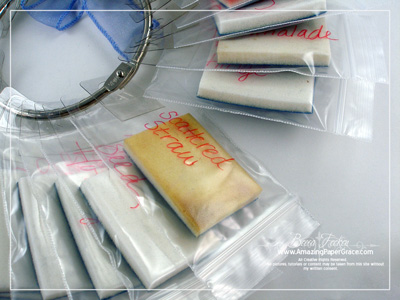
Recently I shared a palette I made using Distress Inks. I was tickled with my solution because I can keep the palette within an arms reach and frequently reach for it to paint images up. In fact, in my work area I like having my most used items within arms reach because I’ve found that anything outside of that radius doesn’t get used frequently. Then again, everything can’t be within that radius. Since I use the blenders frequently and I picked up all 36 Distress Inks, I was in a bit of a dilemma because all 36 take more room that I had available sitting on my table. So I came up with an easy solution – I found a way to put them all together in a way they could hang from the pegboard within an arms reach!
Remember, you can click any picture to make it larger.
Thankfully these are up and off of my desk but hanging close by where I know I will use them!!
Thanks for stopping by, back soon with something crafty!


That is simply brilliant. What a great idea. I’ve a got a peg board right beside where I work and this makes such good sense. I’m on it. TFS
What a Clever idea.
Thank U 4 sharing.
ColleenB.
What a great idea. I am totally with you – if you don’t see it, it doesn’t get used.
Where did you get the plastic hang tags? I’ve never seen them for sale anywhere. Thanks! You are just so dang clever and organized.
TFS!
Thanks for the infro. this will be helpful to a lot of people.
You little fount of information!! Useful info, of course!! As I read this, I realized I can do this with OTHER items…..awesome! Thanks.
WOW!!! SUPER idea!!! I think I’ll follow your lead and do the same!!! You could even do the same thing with sponge daubers!!!! THANK YOU!!! :)
Great idea but I just read somewhere and even more space saving idea. put a piece of velcro under the stampad case itself and attach your blender pad under there. There is just enough room!
Barbara, I tried to do the velcro and the blender underneath and it wouldn’t work for me :( The blender was so thick that the inkpads would not sit level when they were stacked. Maybe I went about it the wrong way?
Becca, this is a marvelous idea…….thanks so much for sharing!!!
Pam
Becca, I have already used a couple of your organizing tips and here is another brilliant one! Not only are you incredibly talented, but obviously very busy thinking up creative ideas for organization! Thanks so much for sharing with us!
I love your creativity and organization Becca. I’m a neat freak, but crafting kinda goes against the grain there. You always have great ideas for keeping your toys neat yet convenient and best of all well cataloged. My kind of gal. Although it does take time to do all of these things. It is worth it in the long run.
Marcie
LOVE this idea, your brain is just wired to be so organized. Hoping I might even “catch” it someday! :) It’s so helpful to learn from your tutorials (PLEASE keep those coming–I can very rarely get out to classes because of being disabled in a car accident, so these online tutorials are my classes), and I love your artistry in your cards. You always think of a new way to use materials, especially paper punches.
Blessings to you, and thanks again for this latest gem of an idea!
Joanne
I think your attention to detail (making sure all the names were in the same direction; having the opening of the bag at the bottom) transfers easily to your designing of cards – the beauty of a card is often in your details.
Thank you, Becca!
Terrific storage idea. I’ve never heard of Hang Ups. I’ll have to look for them.
What a great idea Becca, and thanks sooo much for sharing it too. I think, that´s the problem, we all face every single day, how to store everything and still keep it inside reach. This is really an aexelent idea and can definately be trnsferred to many other things as well, so I hope, you don´t mind me “borrowing” the idea for some things here, cause I can see amny new possibilities in this system.
Thank you sooo much for your always soo terrific ideas hun, and hav a wonderful week-end with your family.
Biiiig hugs Maryann
I really enjoy your “Becca Bits” I have learned so much. Thank you for taking the time to put them together. Oh, your cards are amazing!
O.K. so are you saying that you inked your pad, then enclosed it in a bag, attached it to the hanging ring? Does this stay moist enough to use? I too never get to things out of reach.
Great idea for the stamp blender pads, I like that idea. I have the ring stand that holds the tools but the pads hummm need to do this and I can just attach it somehow to the standing ring. Thanks for sharing.
Becca, I love all your storage and organizing ideas. These are great too. I just sorted all my inks and reills also. You have inspired me to get my studio in shape. I now have all the reinkers with the inkpads.
I also just did my ribbons the way you did. I do have a question though – what did you do with the wider ribbons. You use the wider ribbons frequently in you cards so I am curious as to how you store them. I have all the others in the drawers. Also, how about ones that you have more than 4 yards or so.
Thank you for all your card and storage ideas.
Great idea, you are so talented. I would love to have your creativity and talent for just one day. Thanks for sharing your ideas they are brilliant!
Becca you are just too organized for me…could you come and do my room? LOL…
I love all your punchouts with the MS corner punches. Have you been using them with different circle sizes as well? I’ve tried the ladybug punch along the outside edge of a circle and it is so cute and hilarious.
You have got the BEST organizing tips! Thank you for sharing.
I too like distress ink pads but have not found a supplier for the reinkers. Got any ideas to share.
Oh Becca!!!
I LOVE this idea!!! I too did not like the Velcro on the bottom…my stacks were all wobbly with the foam on the bottoms. Now this…I see it working out.
So glad that you honey is doing good!!!
Blessings,
Valerie
I love this idea. but I love all your ideas so whats new.
What a clever idea Becca. I store all of mine in a plastic bag and I’m always digging in there if you know what I mean. I’m laughing at your word [neatnik], it just tickled me. I have organized chaos. As always Becca, TFS!!!
:-D
Great idea thanks.
What a great idea, thanks.
Can’t wait to incorporate this into my craft storage
great idea, I only have a small amount of them right now, but will be investing in more
Thanks for the superb tip Becca!!
Hugs
Becca,
What a WONDERFUL idea!
Can you tell us which section of the Michaels store you found the Hang Ups. I’ve checked several stores and without looking all of the sales associates have told me that they don’t have them.
Thanks
Becca,
You are brilliant! Thanks for sharing this great idea. You are always such an inspiration.