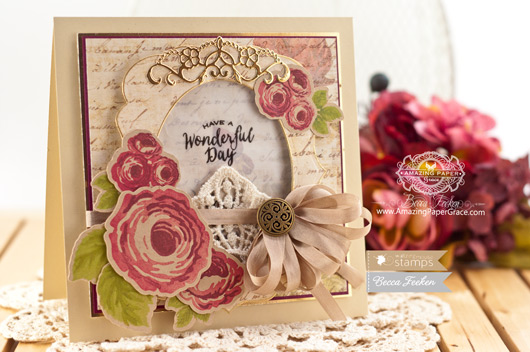 
Hi there sweet blog friends! Today is Day One of the new releases for Waltzingmouse Stamps – you’re gonna swoon over the new sets! By the way, the previews all lead up to release day which is Tuesday, December 2nd – at which time all of the products we’re showing will be available on the Waltzingmouse Stamps website. Today I’m sharing a card made with Country Roses – oh.my.goodness! This set is a piece of magic (let me explain). I’m more of a precise kind of crafter, letting it all hang out doesn’t come quite as easy as you might imagine. I drive myself crazy when decorating a Christmas tree because sometime I try just a little too hard to balance instead of just going with the flow. To my delight, you can’t help but go with the flow with the Country Roses set. After trial and error, I discovered that you simply cannot mess it up and believe me – if anyone could do that – it would be me, lol. There are three layers to each image and you select three inks to use. As long as you land in the same general area the results are stunning :-)
 
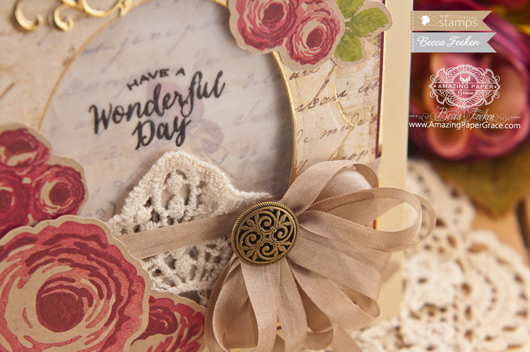
For my 6″ x 6″ card I layered gold and burgundy followed by this vintage Prima Design Paper – Stationers Desk and my sentiment stamped on vellum. On top of that I layered Spellbinders Labels Thirty Nine and Spellbinders Classic Ovals LG #5. The Country Rose set has a set of digital cutting files that makes them easy to cut, stamp and embellish – but no worries, it’s just as easy to fussy cut them. I cut my roses and anchored them around the frame along with their leaves. I finished off with a gold embellishment using Spellbinders Corners and Accents One, a bow, lace and button. I just couldn’t resist kraft and deep reds for a vintage look but these roses will look spectacular in any color!
| SUPPLIES I USED |
Stamps: Waltzingmouse Stamps – Country Roses (Available 12/2)
Paper: PTI Fine Linen, Fine Line Poster Board (Gold) – Hobby Lobby, Kraft, Bazzill – Razzleberry Dark, Prima Stationers Desk, Vellum
Ink: Versafine Onyx Black and Clear Embossing Powder; Fresh Ink – Merlot, Cocoa, Tuscan Olive; Amuse Studio – Cranberry, Grass, Fern
Accessories: Spellbinders Labels Thirty Nine, Spellbinders Classic Ovals LG #5, Spellbinders Corners and Accents One, May Arts Silk Ribbon, Button, Lace, Krylon Gold Pen |
The other ladies have come up with some awesome samples. Be sure to stop by and have a peek!
Thanks so much for stopping by, I’ll be back tomorrow afternoon with more goodies!
 
Question Parking Lot:
Desiree Young on comment #2 asked if I cut flowers then stamp or if I stamp then cut flowers. Great question! I cut flowers first then stamp them. It’s helpful to have clear stamps because you can line things up quite well but I must admit that to me it is just as easy to do with a stamp positioner. You get a feel for centering them; I have the first couple that I stamped while experimenting and they are not quite on center but are still quite usable :-)
 
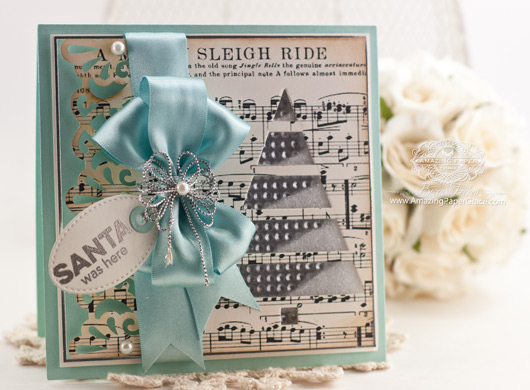
Good morning blog friends! I have more My Favorite Things goodies to show today so, I’m over on the My Favorite Things blog as well with another Christmas card to add to the stash!! My card today uses the darling cut out Christmas Tree from the Christmas Tree Cut-out Die-namics. That sweet tree absolutely begs to made into a shaker card, so who was I to argue? The only challenge I had was deciding which of the many beads, sequins and glitter from my stash, to put inside! Score!! 
I snagged the music paper from my Free Printables Board on Pinterest – HERE. I created a tag from Stitched Oval Staxx Die-namics and stamped it with the Santa Was Here sentiment from the Gifting Fun Clear Stamp Set. It hangs just to the left of my bow using silver wired cord – I used the same cord to polish off the card with a little silver bow.
This is my very first shaker card and I have to say that it is surprisingly easy! If you’re curious how it is made and want to see the magic behind the scenes; go —–>HERE. I describe how it is made as well, show you how to stack up the insides of the card, as well as give you shaker card making tips over on the My Favorite Things blog :-)
| CRAFT SUPPLIES I USED |
Rubber Stamps: My Favorite Things – Gifting Fun Clear Stamp Set
Craft Paper: Neenah Classic Crest – Natural White – Smooth 80lb, Silver Metallic Poster Board – Hobby Lobby, Printed Music Paper from Pinterest, Papertrey Ink – Aqua Mist
Ink: Versamark, Brushed Corduroy Distress Ink
Accessories: Christmas Tree Cut-out Die-namics, Stitched Oval Staxx Die-namics, The Paper Studio Pearls, Silver Wired Cord, Twinklets Diamond Dust by Floracraft, Silver Embossing Powder, The Paper Source Satin Ribbon – Pool, Martha Stewart Border Punch – Fans and Flourishes, The Paper Studio Gemstones |
Thanks again to the sweet ladies over at My Favorite Things for letting me try something new!! They are rock stars and have me totally spoiled now from their sweetness and charm. For you readers, thanks so much for stopping by today – I hope you found something here lately that you’d like to give a try!! I’m planning to give away some dies this week so stay close!!
 
Question Parking Lot:
Dottie on comment #14 asked how to download the sheet music I used, a to z. Dottie, some situations are different, but if you are on Windows computer I’ll walk through what I did here (I’m on a Windows 7 computer using Chrome).
1. Pop over to my pinterest page —->HERE and you’ll see the music I used.
2. Click on the sheet music thumbnail in pinterest and it will select it and bring it to its own page. At the top of the page select “Visit Site”
3. That should take you HERE
4. Click on the picture of the sheet music. That will select it and bring it to its own page – in your browser, with the name up top – usually will have .jpg on the end.
5. Right click on the picture of the music, then select “save image as”
6. Enter to accept the name and location already given or navigate to where you want to save on your computer and give an appropriate name.
7. Once it exists as a .jgp or .png on your computer – print it out!
8. If on a Windows computer you can navigate to where the file lives, right click on it and select print and choose the size you want – otherwise, use a software such as Photo Shop Elements.
Posted in >Best of 2014, *Oval Bliss, *Twisted Metal Tags and Accents, *Victorian Medallion Three, -Christmas, -Holiday Cards, :Brown, :Cream, :Gold, Quietfire Design, Stamping
|


A wonderful card here again as always Becca. Sooo beautiful work in every detail and love your colorchoise here too.
I have a question for you. Do you cut the flower shapes and then stamp? Or do you stamp and then cut? I’m having a tough time understanding how it works. I understand how the machine works etc….but how do you get your images to be centered so perfectly? Such a silly question! :-) I assume it’s the first part, but I thought I would just ask!
Of course lovely card as usual. I love to visit your blog for what new stuff you’ve shared.
Lovely card Becca. I love how the flowers still have a 3D effect without the bulk. I like the look of rolled flowers on a card, but the bulk is a problem when mailing cards overseas. This stamped flower might just be the answer :-)
Gorgeous card. I always love to see the layers and how you make them blend together. You are truly my inspiration.
Thanks Becca for your beautiful cards.
I have had a very busy month so I have not had a chance to leave a comment. But I always look at your emails.
Love every thing you do.
How beautiful Becca with the gold filigree at the top of the frame, the lovely lace and ribbon!
Beautiful, Becca! I hear you on random sets, but this one looks like a winner. :-)
This IS BEAUTIFUL Becca! LOOOOVE those roses!!! They are GORGEOUS! If you can’t mess them up after 3 layers, they MUST BE WONDERFUL! LOL :D
Stunning, vintage creation – the roses look gorgeous! Love the layers and dimension that you can create with these stamps.
Beautiful Becca. Love the colours.
OH I knew you’d do something amazing with the roses. They are so romantic and dreamy – a perfect fit with the lacy die cuts you used.
Not your usual style Becca, however i just love the 3D effect of your flowers
well done .
God Bless
Elaine H X
Hi Becca
Another beautiful card you have given us today
You know I have lots of beautiful papers and have never used them
Your card has inspired me to have a go
Thank You
Theresa x
Love the card!! Esp the little accent of lace. Elegant!
Beautiful, Becca!! Love the vintage-y look of this card. So lovely!
Becca – This card is so awesome. The country roses are so very pretty. Thanks so much for sharing your talent.
Simply stunning!
Love those roses and the card is really lovely.
WOW – your card is simply stunning Becca, I love it! The vintage style with this classic, English country garden roses is breath-taking ;) Rx
Hi Becca. A lovely card, it is so pretty. Take care.
Hello Becca
Love the simplicity of this stamp looking forward to it being available from Claire !
You have made a beautiful card and I love Cabbage roses ….yours are so pretty with the lace!
Take care
Becca
Love Marg
Hi Becca, What a beautiful card, full of detail all finished off in your unique way – gorgeous x x x
Absolutely beautiful!
So elegant!
Good morning Becca,
How gorgeous is this. I can almost smell the scent of an old-fashioned cabbage rose. x
Pretty card, very vintage looking.
Gorgeous card, Becca. Three layer stamping! Must try!
Hugs
Anne (UK) x
Gorgeous and elegant as usual! Those roses look amazing!
Beautiful, love the sentiment on the vellum, and you have such lovely backgrounds for your cards in these pictures!
One word: stunning!
Such beautiful cards. I love the subtle colors, they work together very well. Thank you for sharing.
Another lovely vintage card!
Pretty like the colors u used and the card of course. The stamps r a good buy too.
K