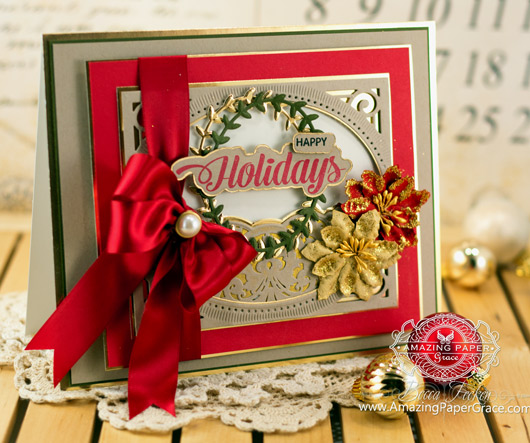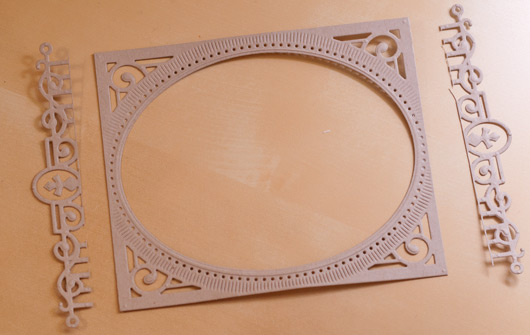 
Good morning friends! Today is the last day of new releases from JustRite Papercraft and today we’re showing Extra Grand Holiday Sentiments a series of bold saluations for the holidays along with an add-on SVG set for those who have digital machines. As you might imagine today I’m sharing a Christmas card and I decided to go the traditional way. I used Spellbinders 5 x 7 Heirloom Legacy but I trimmed the ends off this time so that it looks like a different die (visual at the end of this post). Inside the oval of the Heirloom Legacy piece I added the Spellbinders Belgian Lace die. Last of all I added the oval laurel from the Spellbinders In’spire Silhouette set.
 
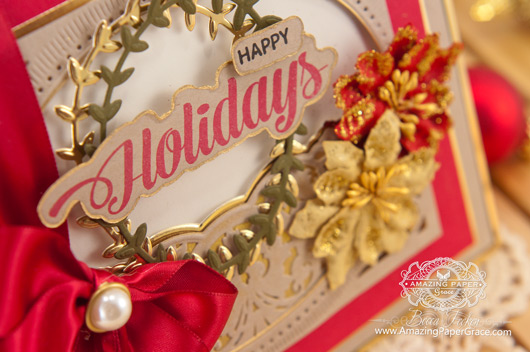
Once I had everything set, I cut my sentiment from the Extra Grand Holiday Sentiments Digital Cut File Download for CR-02133 which comes with a cut set and a matting layer. Since I already had rimmed other elements in gold, I rimmed the sentiment in gold as well then adhered in the center of the laurel.
 
Here is how I trimmed Heirloom Legacy, – what a different look, all from the same die!!
| CRAFT SUPPLIES I USED |
Rubber Stamps: JustRite Papercraft – Extra Grand Holiday Sentiments, Extra Grand Holiday Sentiments Digital Cut File Download for CR-02133
Craft Paper: Neenah Classic Crest – Solar White – 80 lb, PTI Pure Poppy, Stampin Up – Crumb Cake, Bazzill (Green), Gold – The Fine Touch
Ink: Versafine – Onyx Black, Memento Luxe – Love Letter
Accessories: Spellbinders 5 x 7 Heirloom Legacy, Spellbinders Belgian Lace die, Spellbinders In’spire Silhouette, Satin Ribbon, Flowers, Pearl Brad |
Be sure to pop in and visit the other designers who have creations to show today:
JustRite Inspiration • Becca Feeken • Heidi Blankenship • Darsie Bruno
Have a wonderful day – me? I’m going to play catch up and serious thinking about spending a chunk of the day outdoors! See you soon!!
 
Question Parking Lot:
 
Good morning sweet friends and happy weekend! You’ll be relieved that I’m going to give gold a rest for today. In fact, this card is all dies and even with all the frills it’s a very crisp card – I hope you like it. Behind pink and gold, this green/blue is my color – I chose it for a birthday card today. This week JustRite Papercraft has been showing new releases for the month of September so the bold sentiment I’m using is from Extra Grand Birthday Wishes (psst, svgs are available for this set – HERE) and I’ve used the Garden Trellis Cling Background Stamp.
 
I used lots of dies for this card but encourage you to use this only as inspiration and substitute what you have. I made a point to use Spellbinders 5 x 7 Matting Basics A and Spellbinders 5 x 7 Matting Basics B because they are coordinated to stagger layers perfectly and makes it easy so out they came! Don’t have them yet? Optionally you can cut your own layers. I mixed elements from Spellbinders A2 Scalloped Borders One and Spellbinders A2 Scalloped Borders Two– I love the look. For my focal panel I used Spellbinders Labels Twenty Five and Spellbinders Classic Ovals Large and finished off with a tiny accent from Spellbinders Corners and Accents One.
Here’s how I made it – step by step:
- Create a card base with cream card stock that measures 5-1/2″ x 7-1/2″. (Card base is made with two pieces of 5-1/2″ x 8-1/2″ paper scored and glued as in this Hinge Video.)
- From aqua mist card stock, cut/emboss 5 x 7 Matting Basics B #7.
- From white card stock, cut/emboss 5 x 7 Matting Basic A #7, adhere directly to aqua mist panel.
- Stamp Garden Trellis background stamp onto aqua mist card stock, emboss with white embossing powder then cut/emboss with 5 x 7 Matting Basics #5 adhere to previous panel with one layer of foam tape.
- On two separate pieces of 3″ x 5″ cardstock emboss/cut two panels using A2 Scalloped Borders One (scalloped/dotted edge) butted up agains A2 Scalloped Borders Two (filigree element with heart motif in center)
- Adhere two scalloped pieces with scallop on outside, adhere to previous panels with one layer of foam tape.
- From aqua mist cardstock, cut/emboss Labels Twenty Five #4, adhere to previous panels with one layer of foam tape.
- Attach a 9″ piece of ribbon vertically to stack of panels adhering ribbon in back with tape. Attach stack of panels to card base using one layer of foam tape.
- Cut/Emboss Classic Ovals LG #5. Stamp with Extra Grand Happy Birthday. Attach to card base using one layer of foam tape.
- Cut/emboss small scroll piece from Corners and Accents One and attach to end of oval.
- Add bow, button and pearls.
| CRAFT SUPPLIES I USED |
Rubber Stamps: JustRite Papercraft – Extra Grand Birthday Wishes, Garden Trellis Cling Background Stamp
Craft Paper: Neenah Classic Crest – Solar White – 80 lb, PTI Aqua Mist Card Stock
Ink: Versamark and White Embossing Powder, Fresh Ink – Pool
Accessories: Spellbinders 5 x 7 Matting Basics A, Spellbinders 5 x 7 Matting Basics B, Spellbinders A2 Scalloped Borders One, Spellbinders A2 Scalloped Borders Two, Spellbinders Labels Twenty Five, Spellbinders Classic Ovals Large, Spellbinders Corners and Accents One, The Paper Studio Pearls,Silk Ribbon, Button |
Be sure to pop in and visit the other designers who have creations to show today:
JustRite Inspiration • Becca Feeken • Debbie Olson • Heidi Blankenship • Eva Dobilas • Darsie Bruno • Kathy Jones • Marisa Job • Michele Kovack • Kristi Schurr
I’ve taken time to stay as caught up as possible on adding to the Question Parking Lot. I’d love it if you all would circle back to these couple of posts linked below to see the answers. The Question Parking Lot is at the bottom of each post and I use it for extended education based on the questions asked. I hope you find the tidbits useful . . . updates on these posts:
https://www.amazingpapergrace.com/faith-is-the-daring-of-the-soul/
https://www.amazingpapergrace.com/introducing-a-flower-for-your-thoughts/
https://www.amazingpapergrace.com/waltzingmouse-stamps-august-2014-release-day-2/
You all have my heart, thank you so much for stopping by :-) Everyone is always so supportive and I’ve been so blessed lately to have received some lovely messages and comments from you. For that I sincerely thank you! See you tomorrow!!!
 
Question Parking Lot:
Posted in *Classic Ovals LG, *D-Lite - Corners and Accents Two, *Labels (25) Twenty Five, *Matting Basics A - 5 x 7, *Matting Basics B - 5 x 7, *Scalloped Borders One - A2, *Scalloped Borders Two - A2, -Birthday Cards, :Green, :White, Retired Products, Stamping, |Many Layers
 
Good morning sweet friends! This week JustRite Papercraft has been showing new releases for the month of September. I love an elegant card that doubles for both wedding and anniversaries so today I’m sharing a card made with Wedding Wishes. Cream and gold are my favorites so I layered up the Vintage Labels Eight Background stamp by cutting the center part out with Vintage Labels Eight then added Spellinders Divine Eloquence, Spellbinders Elegant Ovals and Spellbinders Classic Ovals SM.
 
I’m in a phase that I’ve been using my Krylon Gold marker on everything lately. Someone told me they make a pen in red so I’m on the hunt! It’s such an easy way to add embellishment!
Here’s how I made it – step by step:
- Score a cream 5-1/2″ x 11 panel at 5-1/2″ and fold in half to create a card base.
- Stamp background stamp on cream paper and trim close to stamping. Mat with a piece of gold paper leaving under a scant 1/8″ around each edge.
- Stamp a second background on cream paper, cut and emboss Vintage Labels Eight along the appropriately stamped line. Rim with Gold Krylon Marker and attach to stamped/matted background with double layers of foam tape.
- On left side of panels attach a vertical oriented piece of ribbon, tape behind. Attach all to card base using double foam tape.
- Cut/emboss peaked piece from Divine Eloquence using cream paper, rim with Gold Krylon Marker and color filigree with marker.
- Cut/emboss oval from Elegant Ovals from gold paper. Adhere to card base using foam tape.
- Stamp sentiment and emboss with gold embossing powder. Use Classic Oval die to trace around shape and manually cut making sure not to cut off horizontal pennant. Adhere to card base using foam tape.
- Stamp ‘Celebrating Your Day”, manually cut pennant shape and rim with Gold Krylon Marker.
- Attach bow, pearl button, pearl pins and pearls to card.
Be sure to pop in and visit the other designers who have creations to show today:
JustRite Inspiration • Becca Feeken • Darsie Bruno • Marisa Job • Eva Dobilas • Kristi Schurr
Thanks so much for stopping by!
 
Posted in *Classic Ovals SM, *Divine Eloquence - A2, *Elegant Ovals, *Vintage Labels Eight, -Wedding Cards, :Cream, :Gold, Retired Products, Stamping, |Elegant, |Many Layers
|


No way. My goodness, if this was mine, I’d keep it and put it out every year as a featured Christmas decoration! This is way over-the-top beautiful, Becca! Outstanding in every way!!
What a beautiful card. I would have never thought of cutting a die and love it. You are so clever.
Oh my , Becca what a gorgeous card and a beautiful shade of red ,so clever to cut the die i would never have thought of that .x
God bless .
Elaine H X
Another beautiful card! Glad to hear you will be in joking the outdoors, hope you experience sin shine and blue skies. I will split my time between the outdoors (with my cute two little puppies) and wrapping a wedding gift (from my sister and husband to his niece and fiancé). I wrap the dish boxes separately, layer like a wedding cake, use lots of tulle as ribbon and bow, then add roses and begonias at the top (either on or under the tulle bow). It is like making a very big card! Enjoy the day!
So sorry.. My note should read ‘hope you will be enjoying sunshine’ . For some reason my iPad changes my spelling…..
Stunning – just stunning! Your brain and dies – amazing~
So beautiful card here again Becca. I always love to watch your work, as there´s always something new to learn here, which is awesome.
You are amazing with your card creations. Thanks for sharing with us.
Hello Becca
Thanks for showing how you cut the Die…can’t wait to see the next card!
Beautiful as always!
LoveMarg
So beautiful. I would hang this on the wall. Thanks for the tip about trimming the die cut.
Hi Becca,
The first thing I thought when
I’ll try again.
First thing I thought when I saw this beautiful card, was that I didn’t have the die which you used and cut. BUT..couldn’t you use YOUR A2 Filigree Delight, think they look quite a bit alike. Of course since it has your name on it, I have that one. LOL This is absolutely stunning and a definite keeper. Hope you are enjoying your day and hopefully sunshine. We are here on the central eastern part of Florida. Hope it soon cools off!
Hugs
Mstgane
Ann
Beautiful as always Becca, love the new stamps.
Love & Hugs
Jacquie J xxx
wow! This is stunning Becca. I know, I say that about all of your cards :).
Oh my goodness!!! Brilliant!!! I LOVE this card!!! I love the colors, I love the layers, I love the creativity!!!! Thank you so much for the inspiration! This is just a fantastic piece.
This one is just LOVELY Becca! It is amazing what you do with these dies! :) JUST BEAUTIFUL!!!!!!!!!;D
Becca , this is really beautiful!
I really like the way you have put it all together , especially the belgian lace die. I have one and don’t use it enough , so this has now given me some inspiration, thank you!
XxxRuth
Spectacular! Becca, your creations never cease to amaze me!
Hugs
Anne (UK) x
Becca,
Another amazing card. So, so, gorgeous, a present in itself. Amazing job.
Good evening Becca,
Oh my word, everything I was going to say about this has already been said, but I would put this in a box picture frame and hang it on the wall all year round. It’s too beautiful just to keep for Christmas!!!
Thank you for your hard work, love xx
Gorgeous, gorgeous, gorgeous and lush- anyone receiving this card would feel extra special.
This is a stunning, beautiful card. You are so talented Becca. I just love your creations.
This is just so breathtaking Becca, I had to come visit and say how much I enjoy it!!! As I do whenever I see a gorgeous creation of yours–you are very inspiring my friend. Thanks for sharing your beautiful gifts with the world. Hugs!
You are just too creative, now I will be going through my dies and seeing them in a whole new light, this card is just Beautiful!!
I am not being successful when clicking on “Question Parking Lot:” at the bottom of your post. User error, I’m sure… guess I need more instruction. Here is my question: I always love the red satin bows when you use them on one of your gorgeous cards. It always gives me a little internal “groan” because I can’t seem to make one, however. I have your bow maker and your CD so I know how to make the loops but I can’t get mine to look tidy like yours. Perhaps my hands aren’t strong enough to pull the bow tight? The slippery satin justs slides apart before I can get any glue on it and get it dried. I thought about using Fabric glue but still have the issue of holding things in place ’til dry. Help?
what a C Card – it’s got all the festive elements for me – love it! thanks for sharing and inspiring