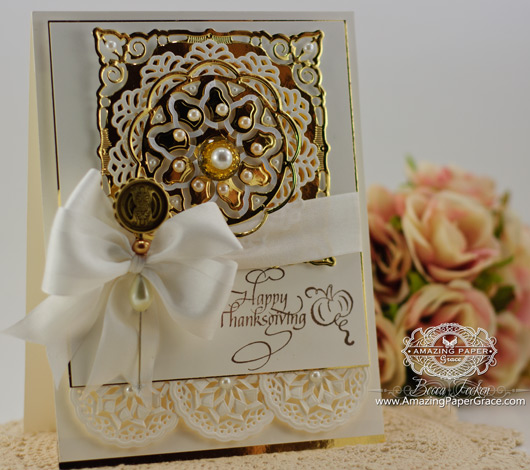 
Blessings to you sweet blog friends. The weather is turning and it’s one of my favorite times of the year. I love the bit of chill in the air and the pristine blueness of the sky when I step outside in the mornings. I’ve had a lot of commitments the past several days but amidst all the “‘have-to-do’s” I”m amazed how the forces converged to give me just what I needed and when I needed it. I’ve had my head buried in work and for the past couple of days I’ve crossed paths with very good friends – those friends that balance me with the positive spirit that filled my heart just as it seemed to be approaching “E”. After encounters like that I have to wonder to myself, how can you ever be too busy for friends when they have such a good and profoundly positive effect on your life?? Ah, but those are my musings – tho’ I be old, I’ll never, never be too wise…this much I know. I’ve found to be creative and continue to love it, I have to find time to stop at the friend ‘gas station’ and often. Which brings to me to today’s card which harkens an upcoming season of gladness; one of giving heartfelt thanks. A Thanksgiving – To Give Thanks set in the mailbox from Quietfire Design was right on time!! Not sure of my plans this year but I have a couple of invites and if I’m able to take one, I’ll send this ahead to grace the elegant table. I know my hostess will welcome the decoration.
 
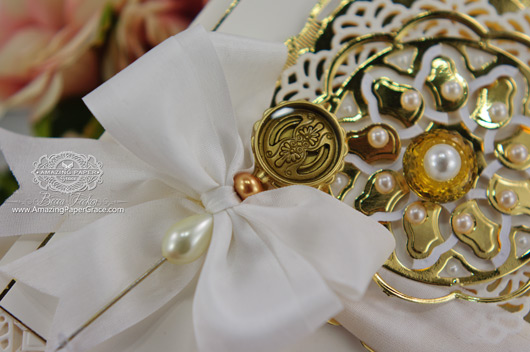
This is a simple stack ’em up card and it features one of the new Spellbinders Circle Hat Pins, designed by Susan Lenart Kazmer. My hatpin was already gold but since I was using bright gold on my card, I sprayed the hatpin bright bold to match. I swear by Krylon Short Cuts, because I can get most things in one coat and I’m ready to use the item within 15 minutes. I spray painted a button from my bin also, dropped it into the round bezel and filled it up with Ice Resin and set it aside to dry. Once dry, I popped it on my card with pearls and finished the end off with the clear backing from an earring (found at craft stores that sell jewelry supplies).
 
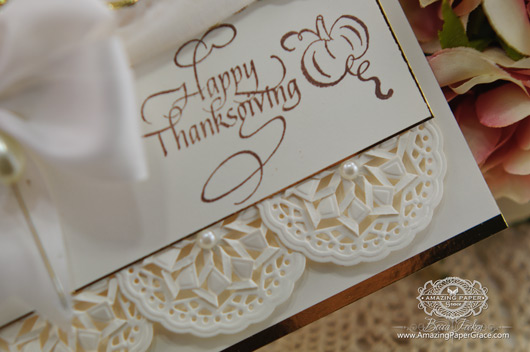
Here’s your Step By Step Recap of die cuts and layers, from the bottom up: Start out with a Card Base 5-1/2″ wide by 7-1/2″ tall* Foam Tape. Cut a gold mat 5-1/8″ x 5-3/4″, follow with a cream layer cut to 5″ x 5-5/8″. Attach three circles cut from Spellbinders Whirl About along bottom of panel. Foam tape. Die cut panel using Spellbinders Adorning Squares. Foam Tape, Die cut panel using Spellbinders Vintage Lace Motifs. Foam tape. Die cut layer using Spellbinders Fascination. Add pearls and ribbon.
*(Hint: You get oversized card bases by cutting a 8-1/2″ x 11″ sheet in half at 5-1/2″ then glue the panels together. Position the seam on the inside of the top flap – check out my Hinge Technique video to see how.
| CRAFT SUPPLIES I USED |
Rubber Stamps: Quietfire Design – To Give Thanks
Craft Paper: Neenah Classic Crest – Natural White (80 lb), Gold Foil Paper (Hobby Lobby Poster Board section)
Ink: Amuse – French Roast
Accessories: Spellbinders Whirl, Spellbinders Adorning Squares, Spellbinders Vintage Lace Motifs, Spellbinders Fascination, Spellbinders Circle Hat Pins, Bazzill Button, Sewology Pearl Button, Recollections Pearls, Silk Ribbon, Krylon Short Cuts Spray Paint, Ice Resin (Hobby Lobby), Grand Calibur Die Cut Machine |
From someone who frequently forgets and has no place to preach, please stop to smell the roses. Fill up with family and friends — all else can wait :-)
 
Posted in *Cut, Tuck and Fold - Fascination, *Cut, Tuck and Fold - Whirl, *Spellbinders - Adorning Squares, *Vintage Lace Motifs, -Thanksgiving, :Cream, :Gold, Stamping, |Elegant, |Many Layers
 
Hi there blog friends is it Friday again? I was fortunate to get my hands onto a set of baby stamps – I honestly don’t have many in my stash, so I took to opportunity to pull together a baby card. I’ll love having that card at the ready! It was made using a newly released set from JustRite Papercrafts called Special Delivery and Bundle of Joy Labels Five. The dies I pulled for the project were Spellbinders Labels Twenty, Spellbinders Twisted Metal Tags and Accents and Decorative Labels Eight along with Spellbinders Scalloped Borders Two.
 
Start out with a cream card based 6″ wide by 5-5/8″ tall. Cut bottom of upper layer of card base using Spellbinders Scalloped Borders Two, foam tape, cut a matching matting layer 5-5/8″ wide by 5-5/8″ tall from gold and cut bottom using Scalloped Borders Two, cut matching layer from design paper 1/8″ smaller, foam tape, diecut layer using Labels Twenty, foam tape, die cut layer using Metal Tags and Accents combined with Decorative Labels Eight. Add bow, pearls and stamped rattle.
| CRAFT SUPPLIES I USED |
Rubber Stamps: JustRite Papercrafts – Special Delivery, Bundle of Joy Labels Five
Craft Paper: Neenah Classic Crest – Natural White (80 lb), Pink Paislee
Ink: Amuse – French Roast, Memento Rich Cocoa, Tattered Rose Distress Ink
Accessories: Spellbinders Labels Twenty, Spellbinders Twisted Metal Tags and Accents, Decorative Labels Eight, Spellbinders Scalloped Borders Two, Recollections Pearls, May Arts Silk Ribbon, Copic Markers, Krylon Gold Leaf Pen, Grand Calibur Die Cut Machine |
Have a wonderful weekend friends! I’ve had my head in the computer the past week or so designing stamps and dies – CHA is on the horizon. By the way, I’m happy to report that my sweet girl received her card – the one mailed in the clear box – in pristine condition! It wasn’t scuffed or smashed but thoughtfully handled and cheerfully delivered. That made me very, very happy!!
 
 
Hi, it’s me again!! I have a teeny tiny three step, three minute tutorial for you today. In my wanderings on the internet I’ve seen the cutest paper bows. On closer introspection, the shape of one caught my eye, but it was flat and I didn’t have the items they used. Light bulb moment!! I wanted it in 3D it with common dies from my stash, turned out to be easy. In fact, it was the inspiration for my card today that almost feels naked without a stitch of ribbon, but squeaks by with a plump paper bow that’s just begging for a box to go along with it :-)
 
 
The tutorial steps are listed below. Click HERE to go to the pin on Pinterest.
 
Here’s your Step By Step Recap of die cuts and layers, from the bottom up: Start out with a Card Base made using 4-3/4″ x 6″, foam tape, gold matting layer cut to 4-1/2″ x 5-3/4″, burgundy matting layer cut to 4-3/8″ x 5-5/8″, design paper layer cut to 4-1/4″ x 5-1/2″ and embossed with Spellbinders Whimsy M-Bossabilities, foam tape, die cut layer using Spellbinders Labels Thirty Three, foam tape, die cut layer using Spellbinders Font One – Uppercase for the ‘N-E-L’ and Spellbinders Create-A-Flake 5 for the ‘O’, embellish with flourish from Spellbinders Jewel Flowers and Flourishes, and bow described in tutorial above using Spellbinders Charmed I’m Sure and Spellbinders Classic Ovals SM.
If you’re curious about the box, it’s an easy one made using Spellbinders Filigree Delight. I have a video to show you how to make the box HERE. The box in the video is 5-1/8″ tall while my box today is 3″ high – I simply trimmed it down until it was just the right size to go along with my card. Plunk a bow on top, and you’re in business :-)
As you know, I love boxes, if you’re interested in giving another box a whirl, here’s one you might have a go at https://www.amazingpapergrace.com/as-promised-filigree-box-tutorial/. (I’m hanging my head, as I know I owe you a tutorial on a box I did in August – it is coming :-))
| CRAFT SUPPLIES I USED |
Rubber Stamps: None
Craft Paper: Recollections – Holiday Shimmer, My Minds Eye- Lost and Found Christmas, DCWV Foil Cardstock
Ink: None
Accessories: Spellbinders Whimsy M-Bossabilities, Spellbinders Labels Thirty Three, Spellbinders Font One – Uppercase, Spellbinders Create-A-Flake 5, Spellbinders Jewel Flowers and Flourishes, Spellbinders Filigree Delight, Spellbinders Charmed I’m Sure, Spellbinders Classic Ovals SM, Recollections Pearls, Grand Calibur Die Cut Machine |
So, in my wanderings through Facebook, Pinterest or somewhere, someone said “only 10 more Saturdays until Christmas”. Lol, my post today is a panic response to that statement! I know there’s still time but please keep telling me things that will light a fire under me okay? It’ll be here before I know it and I’m lollygagging :-)
 
|


Your card is beautiful and inspiring to not forget Thanksgiving in all the preparations for the Christmas holidays! Crafters (such as me) are usually driven to do things to feel like we accomplished something every day. But, my hubby, also, occasionally has to remind me that when all is said and done, my cards, though pretty, will not last. Friends and relationships will endure and are the most rewarding investment. Oh how I, also, need to be redirected from time to time. Thank the Lord for these wonderful balancing people. I have heeded your comment today, obviously!
Thanks, Becca.
You must stay up aalllll night thinking what s up next…Becca. Thank you for sharing God’s gifts with us…..thanks margie v
What a sumptuous offering today! Just love it!
Hugs
Anne (UK) x
Gorgeous use of dies and that fab Gold.
WAUW this is soo gorgeous Becca, and I´m totally speachless with all the beauty. I really run out of words to describe, how gorgeous I find this, really really beautiful.
Hi Becca, Stunning, Stunning, card, I love the gold, and the circle cut-fold-tuck die-cuts are gorgeous, the hatpins are ‘to die for’, I love ‘everything’ you make.
Lots of love from Patricia xx
Love your work, and combined with the Quietfire stamps, gorgeous! This is just lovely. Thanks for sharing!
Such a lovely card! Thanks, Becca!
Oh WOW Becca stunning card , you are so talented thank you so much for sharing
Hugs May in Scotland x
GORGEOUS Becca. The colors, the design & the Occassion – all
wonderful
Hugs
Georgiagal
Thank you Becca for a beautiful card. Thank for the video on how to make a hinged card.
Sorry I have not been around for a while. I have been making my christmas cards to send to misssionaries & they need to be mailed by the middle of Nov. All your work is so beautiful.
OH MY!!! TOTALLY LOVELY BECCA!!!!!!!!:) STUNNING!!!!!!!!!!!:) (LOOOOOVE ALL the gold!) :)
Just an absolutely beautiful card. Nice way to end our week with another Becca beauty!!
Hugs
Mstgane
Ann
A stunningly beautiful card!! Gold and white absolutely make a gorgeous combination. Wow, this card makes my heart sing.
So GORGEOUS Becca, love the gold! GF you can grace my table any day of the week!
Love the gold. This design is stunningly elegant. I love it. Thanks for sharing. Hugs, Lisa.
so very very pretty
Very opulent – love the hat pin
Love the card, but I’d have to change the sentiment, as I live in Ireland!
A stunningly beautiful card again Becca and I could read your musings over and over.
Oh to awake to your pristine blue sky and not our English grey.
Good Morning Becca from a very dark, wet U.K. Oh I just love this card. Stunning as well as elegant. What a talent you have. Have a great day. Jan.
Don’t let yourself get to “E”. We are all out here supporting you and wishing you happy thoughts! You can never get enough friend “gas”.
You have a gift of using the dies just beautifully, Gorgeous!
BEAUTIFUL!!!!!!!
Thanks for sharing God’s gift to you with all of us!
wow, just gorgeous!
May all the blessings you give us readers be returned to you this holiday season. Each time I click on any of your projects I find myself smiling and feeling in the presence of love. You and your work radiate healing and love even to strangers from afar. May your craft always be handy. Sending you prayers of thanksgiving at this moment. Patsy in Tallahassee, Fl.
Good evening Becca, What a beautiful card that anyone would be very grateful to have. Here in Scotland the trees are turning and the leaves are lying on the ground. I love the colours at this time of year as they are all so very different, and so beautiful as they paint the landscape around you. Living at the top of the valley looking on to the Ochil Hills is amazing sight, as the very plants and shrubs on the hills make their own pictures up.
I maybe can’t ever be as good as you Becca at your wonderful craft but i hope you like my “pictorial walk” around my rainbows end. Have a lovely thanksgiving when it comes and will you please give thanks on my behalf while your there please as we don’t have a thanks giving day here in Scotland.
Take care,
Norah
From across the water
Your card is pure elegance! I give thanks that I discovered you and Amazing Paper Grace. Plus, I feel blessed that you share your abundant talent with us. With gratitude, Francie