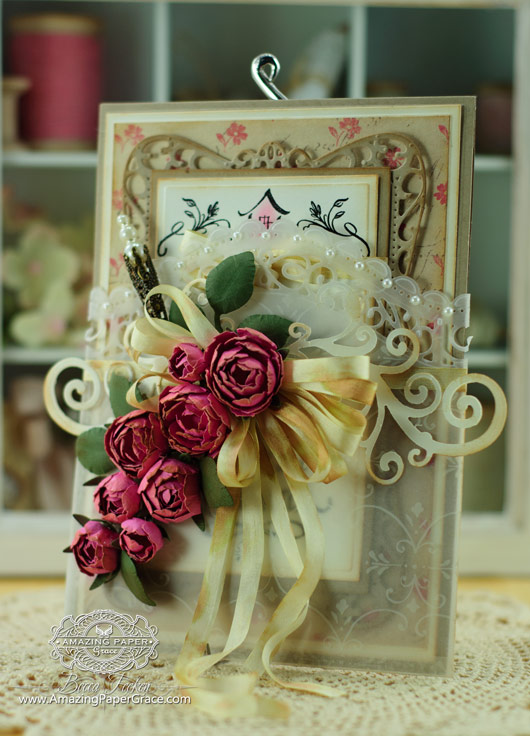
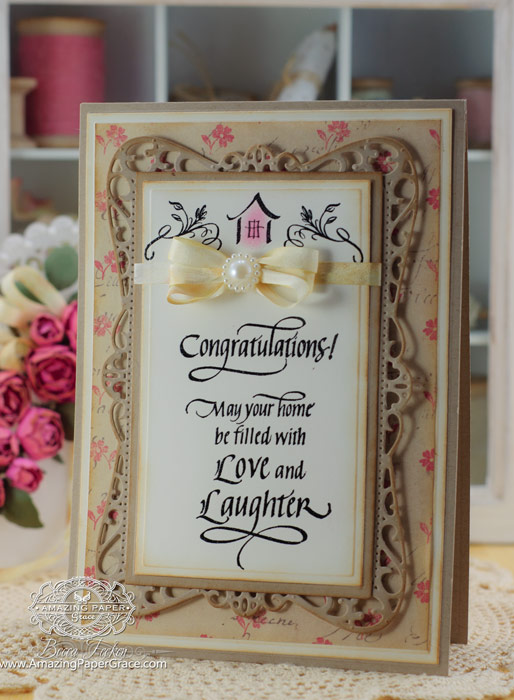
New Home Pocket Card created by Becca Feeken using Quietfire Design Stamps and Spellbinders dies

Card inside its vellum pocket

Sweet sweet blog friends, please forgive my absence of late and thanks so much for hanging in there with me.  I’ve had some health issues lately and weeks of tests that I made headway with this week.  At any rate I’m tickled to be posting today and can’t think of anything I’d like better to share than a card for my sweet daughter who has moved into a new (to her) house and a blog hop occasion that I’m really excited about.  Pop on in and visit with me so I can tell you all about it.

WRBF-3943-2013

Card outside of Pocket

As you know, for the the last five years I’ve been a member of the Spellbinders Blog Team.  I’ve been blessed to work with this group of fabulous designers for that long and it’s been a wonderful experience…each of us has our own style and I’m always amazed to see their take on the same dies we all handle day to day.  So without further ado, we’re pleased to welcome you to the first Design-abilities blog hop!  As the Spellbinders Blog Team, we wanted to do something fresh, fun and creative to bring our team together so we’ve pulled together a blog hop (in the spirit of disclosure I should mention this is not sponsored by Spellbinders Paper Arts, it’s something we wanted to get together to do :-)).  Starting this month, we are doing a Blog Hop every other month (on the 16th) and we’ll have a link list to all of the Blog Team Designers.   You will find all kinds of ideas for die cutting, papercrafting, mixed media, DIY projects, jewelry, home decor, lots of tutorials and techniques.  As designers we are always inspired by each other and we hope to inspire you too.

WRBF-3942-2013

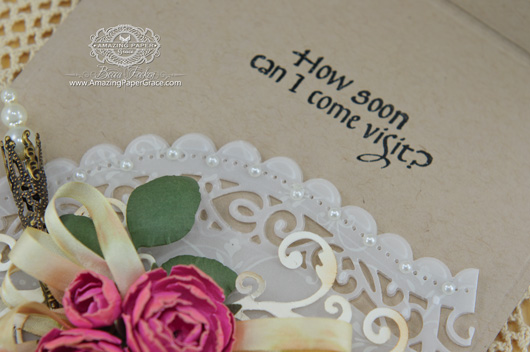
Inside of card (isn’t that sentiment so cute!!)

For my first project, I wanted to do something that was right smack dab in the middle of my style wheelhouse.  Pocket cards are at the top of my list of favorites and I haven’t shared one in a while.  The reason I love them is because of the peek-a-boo effect, plus it’s so easy to enclose a simple card while on the outside it can be gussied up to your hearts content.  So my daughter just moved and is totally in love with her house ; I’m going to surprise her with a housewarming card.  Home – Congratulations from Quietfire Design is perfect for the task!!

WRBF-3940-2013

Ready for shipping!! I love clear boxes!

Lol, I don’t have her new address yet, so I’ll be sending this to her work address and I wanted it to hopefully be a pleasant surprise so I put it into this clear box and have my address label ready to go.  Once inside, I’ll securely tape the edges so that it can’t be pried open.  I hope she likes it!!

WRBF-3945-2013

Backside of box – lined with design paper

Here’s your Step By Step Recap of die cuts and layers, from the bottom up:  Start out with a Card Base made using Spellbinders Matting Basics A #7 using my Filigree Hinged Card Technique, die cut layer using Spellbinders Matting Basics B #7, design paper layer cut to 4-3/8″ x 6-3/8″, die cut layer using Spellbinders Timeless Rectangles, die cut layer using Spellbinders Matting Basics A #4, die cut layer using Spellbinders Matting Basics B #4.

For the pocket you can look at my video HERE to learn how to make it so that it fits the dimensions 5-1/8″ wide by 5-1/2″ at the peak after cut with Spellbinders Curved Borders Two.  Next, layer two flourishes from Spellbinders Jewel Flowers and Flourishes and build a bed of flowers made using using the four smallest Spellbinders Rose Creations and the leaves are from Spellbinders Foliage.  (Hint:  The calyx on the roses was made using the smallest flower from the brand new D-Lites called Spellbinders Blooms Two, I simply snipped off every other petal).

You can see my other pocket cards at these posts – https://www.amazingpapergrace.com/news-to-share-and-a-card/https://www.amazingpapergrace.com/becca-bit-putting-together-pocket-card/ and https://www.amazingpapergrace.com/success/,

CRAFT SUPPLIES I USED
Rubber Stamps: Quietfire DesignQuietfire Design
Craft Paper: Neenah Classic Crest – Smooth – Natural White, Kraft, American Crafts, Coredinations, white print vellum
Ink: Versafine Onyx Black, Brushed Corduroy Distress Ink, Antique Linen Distress Ink
AccessoriesSpellbinders Matting Basics ASpellbinders Matting Basics BSpellbinders Timeless RectanglesSpellbinders Curved Borders TwoSpellbinders Jewel Flowers and Flourishes, Spellbinders Rose Creations and the leaves are from Spellbinders FoliageSpellbinders Blooms TwoRecollections Pearls, clear embossing powder, silk ribbon,  Becca’s Bow MakerGrand Calibur Die Cut Machine

My fellow designers are hopping too, hope you can peek in on them too!

Debbie Olson
Heidi Blankenship
Linda Duke
Seth Apter
Sherry Cheever
Becca Feeken (that’s me)

By the time you read this, my little box will be on its way to her. What’s your guess, it arrives in one piece or scuffed and smushed?? I’ve sent these boxes before but have never asked the person about the condition it arrives in. Since it’s my girl, she’ll give us a full report – I’ll let you know :-)


pinTHIS SHAREthis TWEETTHIS EMAILthis
  • Colleen HowellOctober 16, 2013 - 6:21 am

    Very pretty, love all the special décor on top of the card. Wanted to see you video on how to make it but for some reason it did not work. I will check back later, thanks for the beautiful cardReplyCancel

  • Donna wannellOctober 16, 2013 - 6:22 am

    Inspiring, thanks for sharing your boundless creativity .????ReplyCancel

  • margaret driscollOctober 16, 2013 - 6:33 am

    Hello Becca
    I hope you are well!
    This was a surprise to see a new card!
    This is so beautiful…… your daughter will be thrilled when it arrives.
    I had to re-read as I couldn’t believe you had created the flowers( mine never look like that)
    So lovely Becca!
    LoveMargReplyCancel

  • Lynette SadowyOctober 16, 2013 - 6:45 am

    Beautiful card. I love the clear box idea! Wonder where to get those and can you actually mail them? Thanks for your inspiration every day. I just finished up several projects from your — now cancelled :( — kit club and must say, I was really impressed with every one, and so were the recipients of my handiwork and your ideas! God Bless and hope you are back to good health soon.ReplyCancel

  • Ann RobbinsOctober 16, 2013 - 7:03 am

    We were just talking last night at Scrappin’ Tues. night that we had not seen anything from you in a week or so ~ glad you are doing better. I don’t think I would ever mail anything that beautiful in a clear box; it might get lifted period! My friend did a countercross stitch piece and made the mistake of packing it at the post office ~ it never made it to it’s described destination!! Your daughter is going to love it!!! God Bless her in her “new” home.
    This blog hop should be fun! Thanks for doing it.
    Hugs,
    Mstgane
    AnnReplyCancel

  • Vicky SchmidtOctober 16, 2013 - 7:11 am

    Becca, That is so sweet to send your daughter a new home card. It is hard to say if you box get there in one piece. Sometimes what I send my daughter gets there in one piece & sometimes it does not look too good.
    Hope you get to visit soon.ReplyCancel

  • lisa808October 16, 2013 - 7:17 am

    Gorgeous! Hope it arrives safely.ReplyCancel

  • Gayle in CanadaOctober 16, 2013 - 7:42 am

    I just truly love everything you make and when I think “this is the best” you keep making other “Bests”
    God has certainly given you the ultimate design skill
    Love GayleReplyCancel

  • Dottie DavisOctober 16, 2013 - 7:54 am

    Beautiful card and vellum envelope. I love your idea of putting all our embellishments on the slide envelope. It did surprise me that you mailed it in the clear box. Never thought of that as I always thought you had to put it in some brown paper or such! LOL. Yeh, I’m thinking this may be too much temptation for some people. But, I am hoping it will get there all the same and your daughter will be absolutely delighted!ReplyCancel

  • Lorrayne IngramOctober 16, 2013 - 7:58 am

    I love this card. I hope and pray you are well.
    I have not had good luck sending flowers (raised up) on cards to my mom, heading out into “out” state200 miles away. (She told me the envelope was smashed and ripped) But 25/40 miles away seem to fare better. I had not thought about plastic boxes. Thank you for your point of view with spellbinders and for this blog hop today.ReplyCancel

  • Clare WOctober 16, 2013 - 8:13 am

    Lovely card – I have not seen a pocket card before I dont think – love the fancy cut vellum pocket and the lovely flowers. Not sure about clear boxes – to give by hand yes but to send in UK mail, I think they would get ‘lost’ in the post if you know what I mean! Best wishes and hope all is well with you.ReplyCancel

  • Diane Lynne ClemenOctober 16, 2013 - 8:16 am

    Love your card. I hope it arrived safely, but knowing the post office, I’d be surprised if it was not a little dented. Let’s hope this is not true. I love all the Spellbinders dies you used and I am just crazy about the flat pearl on your bow. Where did you get it? thanks for sharing.ReplyCancel

  • LageneOctober 16, 2013 - 8:18 am

    Beautiful, I love the sleeve & great box for the super dimensional card!ReplyCancel

  • SherryOctober 16, 2013 - 8:36 am

    Beautiful! Where did you get the clear box? Do you cover it or send like that?ReplyCancel

  • SethOctober 16, 2013 - 8:37 am

    What a beautiful card! There is so much to love about it — including the pocket. And I have to say that I am always thoroughly amazed by the care you take on every detail — including presentation. That clear box for mailing is the perfect touch!ReplyCancel

  • Karen MOctober 16, 2013 - 8:39 am

    What a beautiful surprise for your daughter. I bet it will arrive perfectly.ReplyCancel

  • MaryannOctober 16, 2013 - 8:44 am

    An absolut stunning card, and I´m very sure, it´ll arrive in perfect condition, as anyone can see, what a beautiful project this is and treat it with lots of care hopefully. I´m sure, your daughter will be surprised and thrilled, when she gets it and My guess is, she´ll be on the phone to you 2 minutes after it´s arrived right? ha ha haReplyCancel

  • Yvonne GavinOctober 16, 2013 - 8:48 am

    I have to say Becca, you are a cut above, I always know when I receive an email from you, inside is going to be something stunning…thank you for sharing :) xReplyCancel

  • MargieHOctober 16, 2013 - 9:07 am

    Hey, Becca! Had to pop in here and say how much I love this sweet card for your daughter! She’s going to love it! Thanks for the reminder of making those wonderful pocket cards – haven’t made one in ages! Hope that card got to her in one unscratched condition! Have a great day xoReplyCancel

  • Teresa HornerOctober 16, 2013 - 9:54 am

    I just love everything that you do!! Lots of hugs across the miles :)ReplyCancel

  • PoojaOctober 16, 2013 - 10:12 am

    Ohh that cabbage roses are just heavenly !! I loved the velum pocket a lot and the card is fantastic !ReplyCancel

  • June MetcalfeOctober 16, 2013 - 10:14 am

    Your daughter will be delighted with such a work of art! Hope your health is now improved.ReplyCancel

  • Beth JonesOctober 16, 2013 - 10:17 am

    Becca, what a lovely idea and so beautifully presented! Your daughter is
    a lucky girl!!ReplyCancel

  • Jean E.October 16, 2013 - 10:37 am

    Gorgeous!! Thank you for sharing.
    Hope you’re well.ReplyCancel

  • Judy BOctober 16, 2013 - 10:46 am

    Your cards are just so beautiful! Every time I see one, I am so in awe of the beauty of them. Thanks for sharing your lovely cards with us.ReplyCancel

  • Yvonne WeberOctober 16, 2013 - 10:47 am

    Love the card, as I do all of the ones you make. I keep hoping that some day I will be able to create one as lovely as yours. I’m sure your daughter will love it as will all the people who handle it along the way.ReplyCancel

  • EllenOctober 16, 2013 - 11:24 am

    Hi Becca,
    All the cards are amazing…i love it!
    Hugs EllenReplyCancel

  • Becky GreenOctober 16, 2013 - 12:05 pm

    OH MY BECCA!!!!!!!!!!!!!!!!!!! This is GORGEOUS!!!!!!!!!!!!!!!!!!!!!!!!!!!!!!!!!!!!!!!! Your daughter & EVERYONE at work will LOOOOOOOOOOOOOE THIS!!!!!!!!!!!! (AND EVERYONE at work will be wanting YOU to make them one too!!!!!) :) SIMPLY GORGEOUS!!!!!!!!!!:) Where do you get your little clear boxes???? AND DO let us know how it arrives?????????? :) It’s a TREAT for the postman to deliver such a WONDERFUL GIFT TOO!!!!!! :)ReplyCancel

  • Dolly LaBelleOctober 16, 2013 - 12:18 pm

    Such a nice way to “wrap things up”. Beautiful!ReplyCancel

  • QuietfireOctober 16, 2013 - 12:52 pm

    lol, Becca! It never would have occurred to me that you would use the “How soon can I come visit?” part of that set! But now I see who it’s going to I get it! Thanks for the chuckle and of course your beautiful creative inspiration! Best wishes to your daughter in her new home.ReplyCancel

  • Anne BOctober 16, 2013 - 1:08 pm

    Gorgeous card! And what a great idea to put the card in a see through box! I’m sure she (and the postman!) will be thrilled with the card!ReplyCancel

  • ReisaOctober 16, 2013 - 2:29 pm

    I love your cards but I do have 1 question what do you use for an envelope on some of your cards that have the flowers etc that make the card deeper than most envelopes? Thanks in advanceReplyCancel

  • Regina M. HamiltonOctober 16, 2013 - 2:42 pm

    Wow.. That is one beautiful card. Your daughter will love it. I hope it arrives in good condition.ReplyCancel

  • AshleyOctober 16, 2013 - 3:03 pm

    Gorgeous work! Hope you’re feeling better!ReplyCancel

  • Terri WOctober 16, 2013 - 3:28 pm

    I know she is going to love this Becca!
    Hope all is well.
    HugsReplyCancel

  • Sherry CheeverOctober 16, 2013 - 6:32 pm

    Becca this is absolutely gorgeous! I just love that long floral spray down the front and once again, you amaze me with the dies that you can put together! Wishing your daughter well in her new home!!ReplyCancel

  • CynthiaOctober 16, 2013 - 7:16 pm

    This card is so very gorgeous and I know your daughter will appreciate it. Your cards are works of art, so I’m sure all of your relatives and friends are eager to receive them. Many blessings to you and yours! CynthiaReplyCancel

  • RoseOctober 16, 2013 - 7:21 pm

    Hi Becca,
    so sorry to hear you’ve had health issues and hope that you are on your way to good health.
    Your pocket card is absolutely beautiful – your daughter is so lucky to have you. I also wish her well in her new home.
    Hugs, RoseReplyCancel

  • Marilyn ClarkOctober 16, 2013 - 8:57 pm

    WOW. Like your creation. Praying for blessings for you and family.ReplyCancel

  • Jean BullockOctober 16, 2013 - 9:10 pm

    Oh, Becca, I always love your work. You are such an inspiration. Thanks for the instructions!ReplyCancel

  • BonnieGOctober 16, 2013 - 11:58 pm

    A very special card indeed! Stunning as usual and obviously made with lots of love. I don’t know how rigid the clear box is but I would have concerns about it being too tempting for “sticky fingers”! As always, I LOVE your creations.ReplyCancel

  • Lesley ThomasOctober 17, 2013 - 12:43 am

    It’s a stunning card – I hadn’t seen your ‘pocket’ designs before, and I love the idea of using the vellum (partly because I’ve just got some!).ReplyCancel

  • Mrs BOctober 17, 2013 - 1:19 am

    Hi Becca. Sorry to hear that you haven’t been in the best of health, I hope you are on the mend now though. Your cards just get betterand better! The flowers are to die for….beautiful. The clear box is great but I don’t think I would mail it uncovered, it might be too tempting for some people. I am off to look at the others Spellbinders on the blog hop now. Take care.ReplyCancel

  • Kelly FlahertyOctober 17, 2013 - 3:41 am

    I missed you Becca and was hoping that everything was all right. You are such a bright spot in everyone’s day, that missing more that one or two is cloudy! Your pocket card is so beautiful and very delicate looking. Much happiness to your daughter in her new home!!ReplyCancel

  • ElaineOctober 17, 2013 - 4:01 am

    Hi Becca, sorry to hear you have not been well i hope you are on the mend now ?

    Your card is beautiful as always ,i do hope it arrives safely and not damaged

    I hope you find time to have a rest in your day take care

    Elaine H XReplyCancel

  • Francie in MontrealOctober 17, 2013 - 5:09 am

    Hope you are feeling better, Becca. When you don’t feel up to snuff, everything is difficult. Hang in there. Your pocket card is a delight and thanks for the step by step instructions. They’re so helpful. Be well.ReplyCancel

  • ChelseaOctober 17, 2013 - 1:04 pm

    Lovely, Becca!!! She will be so delighted to receive your artistic gift! It is a wonderful way to celebrate her new home!ReplyCancel

  • Linda DukeOctober 17, 2013 - 1:11 pm

    Oh my friend I’m speechless… there are no words to describe the beauty of your card. I’m sure your daughter will LOVE it, and wishing her well in her new home. HugsReplyCancel

  • Laura O ConnorOctober 17, 2013 - 4:05 pm

    great card to come back with ,love the colours and the design of this card .Laura OReplyCancel

  • Rosy NewlunOctober 17, 2013 - 5:32 pm

    I wish you the best of health, Becca ?

    Your card is simply amazing, and yes, I love the sentiment inside! She will, too! I never would think to use vellum as a card holder, and esp decorated up beautiful enough to be a bridal bouquet! Very best wishes ~ RosyReplyCancel

  • Debbie OlsonOctober 17, 2013 - 10:24 pm

    Ohm Becca–those flowers are stunning! i can’t imagine how long it took to make this bit of loveliness. Great job!ReplyCancel

  • Olga JewellOctober 18, 2013 - 7:51 am

    Absolutely gorgeous!!!! I love looking at your creations!ReplyCancel

  • Norah McPheeOctober 18, 2013 - 10:28 am

    Good afternoon Becca,
    What a beautiful card you have made for your daughter welcoming her to her new home. I just love the flowers you have made for it as they look so real because of the colour you have chose.
    I thought it was just across here in Scotland that our most precious of parcels and gifts get ruined by delivery services whether it be Royal Mail or parcel delivery vans, anyway i’m sure that we all wish her much happiness in her turning her new house into a home.
    Love and crafty hugs
    Norah from across the waterReplyCancel

  • Janet L.October 18, 2013 - 10:41 am

    Simply lovely and I’m sure your daughter will ooh and aah when she sees it.ReplyCancel

  • Starr TimmonsOctober 19, 2013 - 5:54 am

    Becca, as always your projects are amazing. I adore everything that you do. Thanks for sharing your tips and techniques!ReplyCancel

  • Ann RobbinsOctober 20, 2013 - 10:31 am

    Becca
    I didn’t read all the blogs but just wondered where you buy the clear boxes. This would be a great way to ship cards with lots of embellies and ribbons (to not crush them). Then I would put in a bubble envelope but I would be afraid someone might just lift the whole card if it is exposed. Things like that happen. Could you let us know where you get the boxes.
    Hugs,
    Mstgane
    AnnReplyCancel

  • Linda MageeOctober 21, 2013 - 9:03 am

    You always inspire me to create!ReplyCancel

  • ConniecrafterOctober 21, 2013 - 6:01 pm

    She will be just thrilled with this card it is quite lovely! Your flowers are just beautiful!ReplyCancel

  • Heidi BlankenshipOctober 24, 2013 - 10:02 am

    Gorgeous card Becca!! I am sure your daughter loved it! I hope she is loving her new house too. Beautiful flowers!! Hugs?ReplyCancel

WRBF-3929-2013Hi blog friends!  I guess you can say that my desperation took over and out of frustration comes order :-)  I am serious though, I’m not showing you this so you can do it, I’m just showing you what I did; I get requests to show this all the time.

For the past year my studio has been in a constant state of chaos.  I have a studio that’s detached from my house that is in need of repair and pretty much has to be emptied so I took over a space inside the house.  Mine is a working studio that probably doesn’t really rate for prime time; it’s tidy, but I leave things out so that I can be inspired by them.

Slowly but surely I’m putting things into place, so in the only vertical space I have available in the room I employed these wonderful cubes from Michaels that I’ve seen everywhere.

Although not within arms reach, I can roll my chair over to sort through colors.  I use a sharpie to write on the spine and sort by manufacturer.  My solid cardstocks are in cubes on the left side and design paper in cubes on the right side and I put a red dot on Christmas papers.  These are my current papers – my older papers are still in my other workspace waiting to be sorted so they can go to a local entity that will use them :-)

(Disclaimer:  I can only take responsibility in my own environment and although this works in my environment with the anchors I’ve put in place, be safe and check with the manufacturer for safe stacking guidelines with your brand in your environment). 

Are you in a space where you have to make every inch count?  How are you storing your papers – inquiring minds want to know!


pinTHIS SHAREthis TWEETTHIS EMAILthis
  • Karen WeddingOctober 9, 2013 - 12:44 pm

    I have those same cubes, but I have them turned the other way so the papers lay flat. I also use them as a base for a counter top. Did you try to see if they would fit side-by-side laying the other way? Probably short by a fraction, huh! Looks great for now. Just keep telling yourself, “It’s only temporary. It’s only temporary!”ReplyCancel

  • MickieOctober 9, 2013 - 12:50 pm

    Oh to have such a space for papers. Mine are stacked on shelves and in boxes. My craft room is a total disaster but I can usually find most things, lol. I also “leave things scattered” so as to be inspired AND to be able to see them. In my case if it is out of sight it is out of mind and I sometimes forget what I have and upon finding something I have often wondered where and when I got it and for what!ReplyCancel

  • Dottie DavisOctober 9, 2013 - 12:54 pm

    So glad to hear you leave stuff out to be inspired. That’s it in a nutshell. I do better if I can see what I have, not put into closets where I have to open and close doors; that stuff will be left untouched! I have cubicles too, but turned sideways as I have room for them. But I would like to hear how you and others store clear stamps and such; again if I don’t see whats there I don’t use them. Thanks Becca for starting this ball a rollin’!ReplyCancel

  • DebraK in FloridaOctober 9, 2013 - 12:54 pm

    ‘Love the organized look! Currently my paper is in a tower thing that my husband made. Some is horizontal, some vertical. I can’t decide which way I prefer. Vertical is easier to remove, but horizontal keeps the paper flat. My new craft room is just about finished, with the counter tops arriving tomorrow morning. The tower is still in another room and I think I just want to keep it there and maybe refurbish it a bit–not sure yet. It takes so much space for paper. But it would be great to have it within arms reach. I have a couple are areas not fully finished, that I still have to figure out my punch storage. So it will be a battle for space between paper and punches… how do you store your punches? I will search your blog–maybe you already have covered that. Thanks for putting your Neenah paper weight on your projects–I am thinking about trying it… :)ReplyCancel

  • Liz S.October 9, 2013 - 12:55 pm

    Looks great! I have some of those storage pieces from Michaels too. I got lucky a few years ago and found some magazine storage boxes at a really low cost and I have my papers sorted by color in those lined up under a table I use for Cricut cutting. It drives you crazy if you can’t keep your scrapping stuff sorted when you have an overabundance of supplies. Guess I am a scrapping addict which I am seriously trying to break. Happily, now I do more looking than buying.ReplyCancel

  • MelindaOctober 9, 2013 - 1:10 pm

    Becca, I am inthe process of cleaning out my space also. I moved into the front porch with no intention of having full blown paper crafting take over my leather studio. Well, we all know where the best intentions lead! So now, after cleaning out the two upright, store bought closets we are ready to move them out and put in shelves where the closets were. I have looked all over and find I really like the Ikea Billy System shelves and corner unit. I believe that will be the new home for all my “paper people” goodies. I hope to take photos as I go along and will post as soon as my blog is set up! There is always something! ;)

    Don’t forget to dream,
    MelindaReplyCancel

  • LindaOctober 9, 2013 - 1:26 pm

    I can but dream – if only I had this much space. As my space is so tight I am extremely organised with my goodies. My card stock is in a similar box to yours which I keep on my work bench thats where I keep the colours I use the most – the rest I keep in the TV unit, my wardrobe and………. !ReplyCancel

  • Judith MoranOctober 9, 2013 - 1:30 pm

    My dear Becca. I don’t know whether it is appropriate to ask my question here but your display of delicious card stock prompted me to ask. Like your many blog followers I am spellbound by your inspired creations , in particular your clever layering of various die cut shapes. When trying to work in a similar manner I find that my cards become really thick and heavy and unbalanced. Do you use all card for your layers or a mix of card and paper ? I send all my best wishes from here in the UK and thank you for your continued crafting inspiration and your kind words and thoughts. Bless you. JudithReplyCancel

  • Becky GreenOctober 9, 2013 - 1:36 pm

    My papers are the ONE THING I am working on too Becca! I don’t have anything SPECIAL to put them in! Just doing THE BEST I CAN, with what I have! I do have a little thing with drawers & that’s it. It’s not even big enough! So, like I said, doing the best I can with what I have! No plans to add anything “new” at the moment! LOOOOOOOVE how organized you are!!!!!!!! LOOKS GREAT!!!!!!!!!!!!!:)ReplyCancel

  • Anne (UK)October 9, 2013 - 2:01 pm

    What an array of papers you have – and how beautifully organised!
    I stack my card horizontally which does make it harder to retrieve, but it stays flat. I use IKEA Expedit cubes for static storage and have various racks for paper and card (Costco) for my A4 sheets. My A3 sheets are kept on a shelf in a cupboard and I keep promising myself that I will make some dividing sections so that it doesn’t sit in one large pile! One day……
    Hugs
    Anne (UK) xReplyCancel

  • Stephanie WOctober 9, 2013 - 2:32 pm

    I want my paper stored closer to my desk and I’m gradually transitioning it that way but like many “it’s a work in progress.” Currently I have the most used solids right by my desk. I have the 12 x 12 papers in the Michael’s cube filing drawer unit. The 8.5 x 11 solids are in a cube like you have. I also store vertically because laying my papers flat drives me a bit nuts. I can’t go thru it easily enough. My patterned papers are in Cropper Hopper magazine style thingys stored a couple steps away. Other solids 8.5 x 11 are stored in a regular filing cabinet. It’s working but could definitely be tweaked for better efficiency.ReplyCancel

  • Dottie DavisOctober 9, 2013 - 2:35 pm

    I hope I’m not overstepping my bounds by responding to a question of storage here and please forgive me, Becca, if I have. Someone asked about storage of punches and paper when I thought of my Iris carts for most small stuff; I have 3 -small and one large one for my wooden rubber stamps. They work beautifully and can roll around. DH built me a long 3 shelf thingy to set on my 6ft table for stuff I grab for with every card. My cardstock is horizontal shelving unit I got made of very durable cardboard like my scrapping store uses. They are awesome; easy to find from a big box store or Office Depot etc. Hope this helps some of the gals.ReplyCancel

  • Laura O ConnorOctober 9, 2013 - 2:37 pm

    great use of space .Laura OReplyCancel

  • Beth EllisOctober 9, 2013 - 2:38 pm

    I too am trying to reorganize my stash! I am currently using some vertical files from CropperHopper for my paper. I have a walk-in closet with shelves that my dear Hubby made for me several years ago. That is where I keep all of that paper! I have card stock divided by colors and printed papers by Designer/Manufacturer and also some by subject matter i.e. Christmas, Boy, Girl, etc. This has worked well for me for several years but I really need to get in there and cull the accumulated stuff! I need to be kept somethings, others need to be given to a local charity for their projects. My winter project is going to be getting things REorganized. It is never ending. I am always looking for new ideas on how to store all my things. Thanks for your inspiration, Becca dear. Blessings to you and lots of hugs too.ReplyCancel

  • Ona MarquesOctober 9, 2013 - 2:51 pm

    It is always great to see how you organize things…..When I look at the storage units you have for your papers I notice that you have a lot of light that seems to be in that corner. Do you have any problem with fading of the edges of the paper? I have had this problem in the past so now keep my paper on shelves in a closet so I can shut the door to keep the light out. Just wondering????ReplyCancel

  • Charlotte ZweigoronOctober 9, 2013 - 2:58 pm

    Such tidiness!! Just a suggestion, Becca, because I have stored my papers the same way and had a little problem. The papers in pads are fine (until the pads get pretty empty) but the single sheets did better being stacked flat. I think it would only require that you turn the box once to have some of the slots running sideways. Over time, that curve in the paper gets harder to flatten and can create a bend in the paper.

    Enough about that… I would be in quite a state if I had to move my crafting area! Youch… what a job! Little by little, right?ReplyCancel

  • Vicky SchmidtOctober 9, 2013 - 3:55 pm

    I have one of the cubes you have with paper, In the top I have color papers, the middle has white paper & the bottom has background paper & I also have a file cabinet with paper sorted by colorin it.ReplyCancel

  • ChelseaOctober 9, 2013 - 3:58 pm

    I love how you’ve organized this!! It’s wonderful to have things where you can get to them easily. You challenged us – oh, almost 2 years ago now – to organize the work space and I took that to heart! Now my papers are stored horizontally in some narrow shelves my DH made for me. You are always an inspiration, Becca. Even when organizing your work space!ReplyCancel

  • Heather S.October 9, 2013 - 6:35 pm

    I found that using magazine holders work for me. I have my papers tabbed out by color so they are easy to find. Also plain old cardboard boxes for other papers with tabs work well too.ReplyCancel

  • CarolynOctober 9, 2013 - 6:44 pm

    Just a slight diversion, something that has simmered since joining Pinterest, and that’s the desire for neat opposed to creative stimulation: It seems I can’t have both! My craft room/area is now lovely i.e. contained to a fare-thee-well but the zing-n-zip that flowed non-stop when looking at my goodies has slowed significantly.
    It is a real dilemma and I wonder: how do others cope? It took much time, effort and money to pretty up the space but it just isn’t working this way……. HELP!ReplyCancel

  • Dorothy HarrsionOctober 9, 2013 - 6:50 pm

    I love the look – but wow! You have so much organization and many are in wrappers to keep them so neat!!! I store mine in an office paper/file (actually 2 of them) with the paper laying flat. I have come to put large scraps in with the block of paper (I use a lot of Stampin Up) but spent a couple nights last winter sorting through all the “Scraps”… long skinny in small Iris set, patterns scraps in another drawn, those little pieces you just can’t toss in one plastic tray, with larger scraps in a basket – all by color! Now if I would just find what I needed and USE them it would be great! 8-) So many pieces so little time! Thank you for sharing Becca – it was also great to read other people’s ideas. We all share a common thread, one of which is no matter how much space we start out with – we manage to fill it! 8-) Happy crafting!ReplyCancel

  • RoseOctober 9, 2013 - 7:28 pm

    Congratulations on your tidiness, I also have all my card and papers stored neatly, as I have virtually all the other products. Dies, embossing folders, masks, stamps all catalogued. Smaller items like pens, stamp pads, glues etc also stored in drawer unit.
    BUT………. I fall down when it comes to offcuts/scraps. Can’t bear to throw them away and consequently have absolute mounds in boxes, all separated into colours, whether patterned or plain. Problem is that that pile is growing all the time……… and my craft table seems to be a never-ending chaos. But hey, one cannot make an omelette without breaking eggs.
    Happy crafting to you all
    RoseReplyCancel

  • Marilyn in E-TownOctober 9, 2013 - 7:28 pm

    Great picture and write up. . . I am in the process of out with the clutter and in with the make-over. . . . love my book cases from Ikea, they look great with all kinds of recycled (yard sale items) glass wear, from snifter to etched crystal all to hold embellishments and ribbons, and what a bargain they are, haven’t paid more than $1.00 for any of them. . . . I store my card stock and decorative paper in milk crates, sorted in colors for card stock and like colors/patterns, holidays!
    My dies are all stored in the wonderful plastic/magnetic containers that you Becca recommended, they work wonderfully!!!
    Now to get my craft room back in order, I am having with drawls cause I can’t get in and work, soon hopefully!!!
    P.S. Glad to hear I am not the only one with clutter and reorganization issues.ReplyCancel

  • Juanita BraunOctober 9, 2013 - 7:55 pm

    I also have two craft rooms and no matter how many things I buy I still can’t keep neat. When storing your papers as shown in the photo does the paper get too bent? I bought a stacking rack and each shelf has its own color and seems to be working.

    There is nothing more detrimental to creativity than tidiness.Clutter is part of the creative process. If you stop to clean your mess it will totally destroy your creativity. Ladies feel good about your craft mess!ReplyCancel

  • MarcyOctober 9, 2013 - 8:41 pm

    I store 8 1/2 x11 papers in a horizontal organizer that I liberated from the curb. I turned it vertically and store papers of similar colors in manila folders (one color per folder) in one of the four sections. I also use a music storage unit for specialty papers of that size. My designer papers are stored in Cropper Hopper vertical storage inside a 3′ cabinet I bought at Lowes. My clear stamps or stamps that I converted with EZ mount, I store in 3 ring binders on the sheets from EZ Mount. I tried other sheets, but these work the best for me. My DH built a punch rack for me from a description I found on Splitcoast. It works wonderfully. My hardest issue is storage of dies. I’d love to see how you deal with all the labels, squares, circles, medallions, etc., Becca. Love your use of layers and, of course, ribbon.ReplyCancel

  • Marilyn ClarkOctober 9, 2013 - 9:06 pm

    My craft room is in the basement. Card stock is stored on shelves, envelopes in plastic containers, decorative papers in wire magazine rack and Isis carts. Ink pads are stored in old cassette shelves, stamps are stored in plastic picture frames from Michaels in tall bookcases.

    Because I work in the basement…….I have a terrible habit of leaving STUFF out, not a pretty picture.

    PS. My Becca Bow Maker has a very special place all its own!ReplyCancel

  • gwennyOctober 10, 2013 - 12:38 am

    Dear Becca,
    I have a similar storage system here but l have placed the dividers in a horizontal position rather than vertical. You will find that after a short period of time your papers/card
    will sag and go out of shape if you store them like that making some of your stock impossible to use after a period of time. If l were you l would rotate your boxes.
    Love your work, it inspires me greatly.
    I always look at your site first thing every morning for inspiration.
    Love and light, Gwenny.ReplyCancel

  • Clare WOctober 10, 2013 - 1:47 am

    Love those cubes – great idea. I store my card/paper on IKEA bookshelves. I also have some 4 drawer filing cabinets with clear drawers – they are fab for storing things in and you can see what’s in them without opening them. Would love more space and more storage – but what do they say – stuff expands to fill the space allotted – that’s certainly true in our shed and garage! I keep my craft room under control though, clearing up and tidying after each project. I have started the gatefold card for our 25th wedding anniversary!! The outside is done – just the inside to do. Really pleased with it so far – might send you some pics when its finished. Great design and looks even better in real life than it does in photo.
    Thanks for the inspiration.ReplyCancel

  • Patricia HowarthOctober 10, 2013 - 2:35 am

    Morning Becca, Your piccie looks lovely, and what a fabulous stash of card and paper pads you have, although I have to agree that stored vertically the papers may start to distort if the cubes are not ‘full’.
    I have lots and lots of papers and card that I store in 12 x 12 plastic boxes, but they are also stored in cupboards, so not good as I have to sort through them all to find something ha ha. My A4 paper and card is stored in stacked paper trays that I got from work when my office closed, and they are really good. I store my dies on magnetic sheets in concertina files. I store most of my stamps in Martha Stewart plastic pockets in MS 4-ring folders.
    Lots of love from Patricia xxReplyCancel

  • Norah McPheeOctober 10, 2013 - 2:41 am

    Good morning Becca and all your lovely crafters,
    Can i just say how lucky you are if you have a craft room anywhere as you then don’t get a moanin’ minnie or minnies not letting you play anywhere because you’ll mess it up. My home has been turned into a house because of my lot as i don’t have any where that i can craft except at the dinning room table which is a fault. See if i leave home, can i share someone else craftroom, please?
    I have my papers and card in A4 plastic boxes and 12×12, but i’d not like to count how many of them i have, but they are kept flat wherever i can as upright they just buckled on me and were no use. Although i’ve solved that problem by making sure my boxes are jam packed so there is no room for them to buckle.
    Love and crafty hugs
    Norah
    from across the water in ScotlandReplyCancel

  • margaret driscollOctober 10, 2013 - 3:08 am

    Hello Becca!
    Nice to see some organisation…. but I have tried then a day later and its all out again!
    My Calibur is never away, and my glass cutting mat stays on my craft table!
    I lay papers flat, and all my pens lay on their sides too!
    I don’t have a craft room just a CRAFT HOUSE!
    Its a good job I’m retired then I don’t have to put it all away when family call!
    My Grand children all play with stuff, and are creative and love it!
    I wish I had a cellar or a loft conversion, then it would all be put away, and I would have a nice tidy house LOL!
    But that would be so boring!
    Keep crafting Becca !!!!!!
    LoveMargReplyCancel

  • Lesley ThomasOctober 10, 2013 - 3:57 am

    Wow, dead envious of how tidy your stash is, and dead envious of how much you have! Boy, could I have a field day playing with all of that! Well done for getting so tidy.ReplyCancel

  • ElaineOctober 10, 2013 - 4:07 am

    Wow Lucky you ,with your craft room
    Mine is my walk in wardrobe ,i have more craft boxes ,than clothes lol .

    Elaine H XReplyCancel

  • IreneOctober 10, 2013 - 6:22 am

    I keep my paper in cardboard magazine holders that I got from IKEA and stored in a bookcase. I keep them sorted by color so I can just grab that holder and try out the different colors.ReplyCancel

  • mary anneOctober 10, 2013 - 9:56 am

    Love seeing how others organize. I’m always looking for the best way to organize my paper. Still searching.ReplyCancel

  • FreddieOctober 10, 2013 - 12:26 pm

    Hi Becca,
    As we make do with european DIN sizes, I switched to 13″ pizzaboxes for storing my papers in IKEAs Expedit/Bonde shelves.
    Thankfully there are different spinesizes for more or less content so I can adapt. My Pads go the same way as your: Title on back like a book….
    Looks great in your space!!ReplyCancel

  • Debbie G.October 10, 2013 - 2:35 pm

    I love how organized your papers are; I actually thought the spines with writing were magazines or books! I do have to agree with others though that if the bin isn’t fully, the papers do bend unless you have someway to secure them together, i.e., book ends? You’ve given me some ideas though to improve with. Love your creativity!ReplyCancel

  • Maggie BrinkleyOctober 11, 2013 - 3:18 pm

    If only I had enough room in my craft hovel for this wonderful idea! Alas, I only have a 3-drawer chest, which is getting dangerously full. The answer, of course, is to use up my stash by being crafty lol! I can certainly say that your lovely blog inspiration helps a lot! :)

    love Mags B xReplyCancel

  • randellynbOctober 11, 2013 - 3:33 pm

    OMG…I can totally relate to the distastrous mess of the office/crafting space because of re-doing it. I’ve been working since March to replace furniture in my ‘area’ which resides in my dining room. It’s been slow because I’ve been buying the Martha Stewart Craft Furniture when it goes on sale. I just got my last 2 pieces this week. Once those are in place, then I can actually organize all this stuff. Through it all, I was still in a quandary about how to store my papers. Well, I removed all of my old VHS from a hutch and am storing most of my 12×12 papers there, which fit perfectly and can be behind closed doors (my crafting area is in my (no walls) open kitchen/dining/livingroom areas); and the newest Martha Stewart cubby hutch fits 6×6 paper pads perfectly…perfect for cardmakers! Of course, a paper swap with friends is definitely on the horizon too. I have overflow crafting stuff in one of my bedroom closets too. Thanks for sharing your idea with the cubes…if I had wall space, I’d consider those, but alas I don’t. I’ve amassed a lot in a very short time, so I can only imagine those who’ve been doing this hobby much longer than I have, and appreciate any ideas for storage and organization.ReplyCancel

  • TammieOctober 12, 2013 - 7:43 am

    I love a good organization tip. Thanks.ReplyCancel

  • Juliann HerronOctober 13, 2013 - 9:25 pm

    Thanks for sharing your organizational ideas. How or should I say what are you organizing your 5 x 7 spellbinders dies in. Just when I thought I had everything organized and under control I can’t seem to come up with an idea to store these new dies.ReplyCancel

  • Dottie DavisOctober 14, 2013 - 5:26 pm

    After reading Juliann’s question I thought I would crowd in here and give my input. One English lady I saw on YouTube leaves all her dies in the original folders they came in and just puts them like that in a plastic shoebox or bin. I use large plastic cd’s as Becca does also. They work beautifully but there is a cost to organizing this way as you also need magnetic sheets applied in them to hold the metal dies from slipping all over the place. Hope this helps.ReplyCancel

  • Dottie DavisOctober 14, 2013 - 5:29 pm

    Forgot to add that the English lady put magnetic sheets inside these folders as well. So the only expense would be the cd cases and half as many magnetic sheets. One awesome benefit of doing it this way is you have a pic on the front of the die inside without having to open it. I like that and am coming up with a way to put a pic in or on my case fronts as well. I threw away all my folders the dies came in. Ug.ReplyCancel

  • CynthiaOctober 15, 2013 - 5:44 pm

    Being organized is the best thing a crafter can do for her/himself. I get so much more accomplished when my studio is organized. I had an art studio built into my home before retirement and it is my solace away from everything and everybody. I can spend hours upon hours in my studio when it is organized. Now, the key is to stay organized! Smiles and joy!ReplyCancel

  • Some wishesOctober 19, 2013 - 10:47 am

    wooow
    please please please put the ” link ” of store which you take the Craft Paper from itReplyCancel

Filigree Corner Basket and Box Gift Ensemble Tutorial on  www.amazingpapergrace.com
Hugs Blog Friends!  I should probably explain that when I sit down to create a new tutorial, I make lots of samples and try things many different ways.  Recently I shared a tutorial on the Filigree Corners Basket but I experimented with a couple of different shapes and configurations and this was one I really liked.  In truth, I’ll probably use the smaller version more than the larger version so I definitely wanted to share it with you.  It’s much like the previous tutorial but with a couple of different option twists :-)  Lots of you encouraged me to give you more card making and project ideas with Filigree Corner Dies and I’m happy to oblige!

WRBF-3928-2013
This is what I put inside the box – a decorated candle.   I have to make an admission here, this is the first time I’ve tried one of these candles.   I’ve seen people make these candles and I blundered through this blindly and think that ultimately I didn’t do it right although it turned out okay for me.  I used Versamark Ink  and gold embossing powder to stamp Filigree Leaves onto white tissue paper.  The tissue paper is then heated with heat gun so that it melt embeds ever so slightly into the candle.  I freaked out when wondered if my embossing would stay intact and I’m happy to say that it did.  Google ‘Stamped Candle’ if you’d like to try it – the right way :-)

To save the tutorial simply right click and save image as – it is one large picture.  Or, if you participate in Pinterest, I have the tutorial saved to my tutorial page HERE so you can easily repin :-).

Mini Filigree Corners Basket Tutorial and Mini Filigree Corners Box Tutorial by Becca Feeken

You all are the best!!  Thanks for visiting, I so appreciate you!!


pinTHIS SHAREthis TWEETTHIS EMAILthis
  • Maggie BrinkleyOctober 7, 2013 - 5:28 am

    Thank you for the tutorial! You always explain everything so well. And the candle looks beautiful!!

    love Mags B xReplyCancel

  • Gloria NunnOctober 7, 2013 - 5:46 am

    Again and again—-gorgeous work! I love everything that you create,Becca!ReplyCancel

  • Clare WOctober 7, 2013 - 5:54 am

    Love the box – so pretty.ReplyCancel

  • Margaret CrawfordOctober 7, 2013 - 5:55 am

    Hi Becca,
    These are just so beautiful and delicate. You are so creative, just love evrything you do. Thanks for being so generous and sharing with your followers. I avidly await your emails
    Regards
    Margaret (Scotland)ReplyCancel

  • MaryannOctober 7, 2013 - 6:22 am

    WAUW this is soooooooo gorgeous as ever Becca, really beautiful work and so elegant. Your candles looks just perfect to me, and you did it just right. I´ve made many of these over the last couple of years, and they´re always a very welcome gift, any time you use them, and pretty easy to make too. I really like, how you embossed yours with just gold, it looks awesome.ReplyCancel

  • NADINE ILLINGWORTHOctober 7, 2013 - 6:38 am

    FABULOUS AND SO SIMPLE. WONDERFUL JOB BECCA. XXXXReplyCancel

  • Ann RobbinsOctober 7, 2013 - 6:48 am

    How very awesome! We are having a tea as a fundraiser and these would be so elegant on each table with the chocolates. Each table could have a winner as a door prize and who wouldn’t like to take one of these home. Thanks for sharing your lovely creations with us, Becca. Have a blessed day.
    Hugs,
    Mstgane
    AnnReplyCancel

  • Susi KOctober 7, 2013 - 7:08 am

    Wow … such an easy tutorial to follow and with such beautiful results! Thanks so much for sharing this, Becca!ReplyCancel

  • Francie in MontrealOctober 7, 2013 - 7:49 am

    So delicate and feminine. Beautifully done!ReplyCancel

  • BethEOctober 7, 2013 - 7:59 am

    Once again you have wowed me,Becca. I am not usually very fond of this kind of handmade boxes but this one is certainly an exception. I am also encouraged to try making the candle. What a great idea for a small Chrsistmas gift for a dear friend or two.ReplyCancel

  • Marlene IacuzziOctober 7, 2013 - 8:04 am

    your generous sharing of your talent and time is so appreciated. In spite of my aversion to spending so much on a die, I will have to make an exception with this one. beautiful. MReplyCancel

  • loftylassOctober 7, 2013 - 8:34 am

    Wonderful Becca… thank you. I can see these gorgeous boxes/baskets making up a lot of gifts this Christmas. tfs.
    Hugs
    Heather (UK)
    xReplyCancel

  • Charlotte ZweigoronOctober 7, 2013 - 9:18 am

    I love all things filagree so this is perfect for me to use as a gift box, etc. I am wondering how you did the plastic top or if you used a premade box and trimmed it out? And, I would like to join the ranks of those that have asked for tutorials… love ’em!! Thank you for being so responsive…ReplyCancel

  • SherryOctober 7, 2013 - 9:52 am

    YOU’RE the best…keep posting your beautiful work! I look forward to it every day!ReplyCancel

  • ConniecrafterOctober 7, 2013 - 9:56 am

    such a beautiful gift set, I haven’t tried the candle thing yet but may have to for some gifts this yearReplyCancel

  • MarisaOctober 7, 2013 - 10:16 am

    These are fabulous!! Great tutes too :)ReplyCancel

  • Jan CastleOctober 7, 2013 - 10:22 am

    Simply Beautiful Becca….TFSReplyCancel

  • Patsy EcclesOctober 7, 2013 - 10:41 am

    Thank you so much for this tutorial. You make what looks very hard, very easy. Everything you make is always so elegant. Thank you for helping me “think” I can make elegant items also!ReplyCancel

  • RoseOctober 7, 2013 - 10:46 am

    Becca,
    you are wonderful – I shall be making ALL , the box and the baskets. They are all so beautiful. I love that die.
    Thanks for showing us how it’s done and creating those lovely dies of yours.
    Hugs, RoseReplyCancel

  • LageneOctober 7, 2013 - 10:49 am

    Beautiful projects! Thanks so much for the tutorial!ReplyCancel

  • Mona_63October 7, 2013 - 10:53 am

    Delikatne… wow…ReplyCancel

  • Joanne M.October 7, 2013 - 11:16 am

    Becca,
    This makes such a wonderful gift set and is absolutely stunning! Thanks so much for sharing your creativity with us.ReplyCancel

  • Julie BlakeOctober 7, 2013 - 12:38 pm

    Quite gorgeous!ReplyCancel

  • ChelseaOctober 7, 2013 - 12:44 pm

    Fabulous, fabulous, FABULOUS!!!!! What a beautiful project! Thank you so much, Becca!ReplyCancel

  • Becky GreenOctober 7, 2013 - 12:46 pm

    WOW!!!!!!!!!!!!!!! GORGEOUS, AS USUAL BECCA!!!!!!!!!!!! :)ReplyCancel

  • Norah McPheeOctober 7, 2013 - 12:47 pm

    Good evening Becca,
    What a beautiful basket, box and card. It just shows that it your corners are not just corners, but the sides to a box and basket. Imagination is a wonderful thing Becca as you show that this and creativeness combined comes up with the most beautiful creations.
    Love and crafty hugs
    Norah
    from across the pond in ScotlandReplyCancel

  • mary anneOctober 7, 2013 - 1:15 pm

    I have to say, I like the smaller basket as well. The box is very pretty too. Thanks for the inspirationReplyCancel

  • SheilaOctober 7, 2013 - 3:19 pm

    Thank you much again, Becca. So is there a trick/tip to align the edger punch side-to-side when punching both sides for the handle?ReplyCancel

  • margaret driscollOctober 7, 2013 - 4:07 pm

    Hello Becca!
    The candle is beautiful ..I have yet to try this technique, even though I have seen it demonstrated several times. I will one day lol!
    I love all the ideas you show on your blog, and the different uses of the Dies that I have not yet thought of!
    Thank you Becca!
    Love MargReplyCancel

  • Carol SouthernOctober 7, 2013 - 5:04 pm

    Another gorgeous basket idea. Love your inspiration and your blog.
    I made the first one that same day you posted it and it is lovely. Going to make this one today….on second thoughts I will make two.
    Thanks for all the effort you go to, to give us such beautiful projects.ReplyCancel

  • Marilyn in E-TownOctober 7, 2013 - 6:36 pm

    Becca, you are quite impressive! I wish I had one tenth of your talent! Love your project.ReplyCancel

  • Chris ROctober 7, 2013 - 7:27 pm

    Love the baskets. 2 questions. What are those clips you mention? And on the handle for the bigger basket – what are the dimensions of the paper for the handle? I ordered the dies last week and just waiting for them to be mailed out.ReplyCancel

  • Chris ROctober 7, 2013 - 7:40 pm

    Oh on the handle I’m asking about the width of the paper not the length.ReplyCancel

  • MickieOctober 7, 2013 - 8:56 pm

    Thanks for the tutorial, going to try the candle thingy, hope I can make a bunch for Christmas. Beautiful, as always!ReplyCancel

  • Patricia HowarthOctober 8, 2013 - 3:13 am

    Morning Becca, You always give us these fantastic tutorials, I love this, and I will be trying this out, as these would be lovely for our Church Christmas Fayre.
    Lots of love from Patricia xxReplyCancel

  • ElaineOctober 8, 2013 - 4:29 am

    You Becca are the best !!
    Thank you for the Tutorial i will be having a go of this

    Take Care
    Elaine H XReplyCancel

  • Mrs BOctober 8, 2013 - 2:00 pm

    Hi Becca. Thank you for all of the gorgeous goodies and tutorial today. I haven’t done any candles but after seeing yours I must have a go. Take care.ReplyCancel

  • Laura O ConnorOctober 8, 2013 - 2:47 pm

    even my 7 year old daughter think this is the best she has seen.Simply beautiful.Laura OReplyCancel

  • Rose CurtisOctober 8, 2013 - 7:51 pm

    This gift set is so gorgeous… I love how delicate it looks! Brilliant creation!ReplyCancel

  • Anne (UK)October 9, 2013 - 1:49 pm

    Such a beautiful ensemble Becca. Thank you for your generosity in sharing the instructions. You deserve the best.
    Hugs
    Anne (UK) xReplyCancel

  • John PetersenOctober 9, 2013 - 2:05 pm

    Becca- LOVE this idea for gifts for the Holidays this year!!!ReplyCancel

  • Crafty NannaOctober 10, 2013 - 11:31 am

    beautifulReplyCancel

  • Pet73October 12, 2013 - 7:29 am

    Stunning!ReplyCancel

  • Debbie BOctober 14, 2013 - 6:34 am

    The box is beautiful. The tutorial makes it doable. Thank you Becca.ReplyCancel

  • Jen (Jennifer Swandells)October 16, 2013 - 6:21 am

    Absolutely beautiful, something else I would love to have on my dressing table. Inspiration, there is plenty here. Thank you, Hugs, Jen x
    ReplyCancel

I N F O