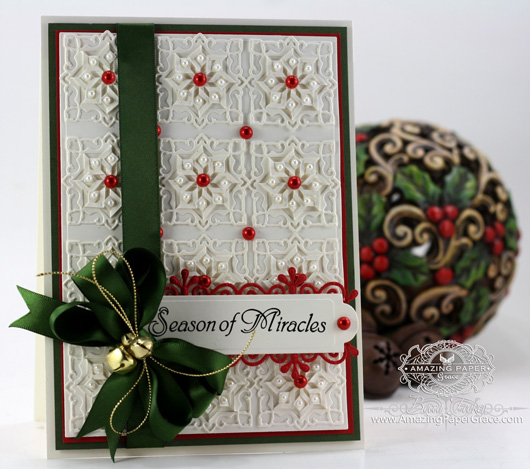 
Hi there blog friends! Popping in to share a quick post with a Christmas Card. You know how there’s always that small die in a die set that you never used? You know the one, it’s in the set but you wonder how you’ll use it and pass over it until next time :-) For my card today, I used *that* die. I had all twelve cut out for some time; I wanted a textured background so I cut and embossed the same motif 12 times and adhered them spaced out on the front of my card base (that motif almost reminds me of a quilt). Lining them up was a cinch and I glued them down with Ranger Glossy Accents. The sweet sentiment is from Justrite Papercrafts Heritage Christmas Ornaments LG.
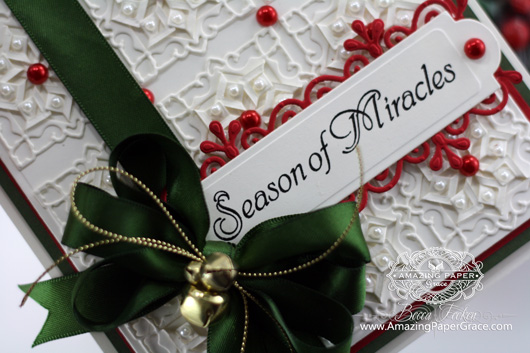
The background is made using Spellbinders Folded Lace and the largest size of 5 x 7 Matting Basics A. The sentiment is stamped on Spellbinders Back to Basics Tags and embellished with the flourish from Spellbinders Frosty Forms.
 
Here’s your Step By Step recap of die cuts and layers, from the bottom up: Start out with a Card Base – 5-1/2″ x 7-1/2″, foam tape, mat layer in green cut to 5-1/4″ x 7-1/2″, foam tape, mat layer in red cut to 5″ x 7″ , die cut layer using twelve of the small motifs from Folded Lace, foam tape, die cut Frosty Forms (cut in half horizontally), die cut layer using Back to Basics Tags. Add ribbon, bow, and pearls.
Speaking of Christmas, JustRite Papercrafts is having a sale of 20% off on all Christmas stamps until September 29th. So good to see you today! Thanks so much for stopping by – see you soon!
 
Posted in *Back to Basics Tags, *Folded Lace, *Frosty Forms, *Matting Basics A - 5 x 7, -Christmas, :Cream, :Green, :Red, Retired Products, Stamping, |Elegant
 
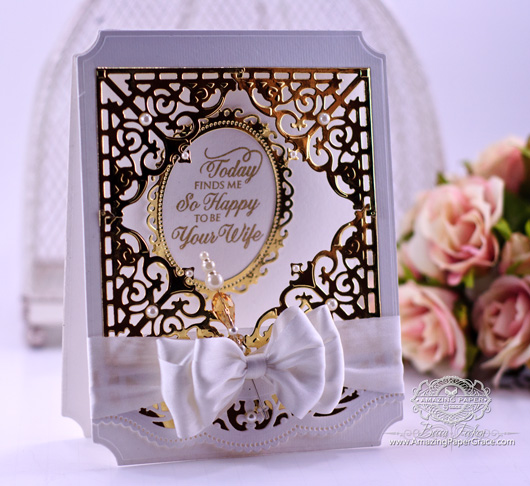
Dear friends, I hope your week is going well!! Someone asked me about anniversary and wedding card making ideas so I wanted to pop in with this card that I made recently. It’s one of the batch that went to the UK but since it’s so easy and makes a unique wedding/anniversary card I thought I’d show it here. By the way, a picture would be lovely in the frame with the sentiment stamped below – just sayin! Oh, and hello wedding invitation, right?
 
The basic card includes Spellbinders Grand Large Labels made into a card base. I have two tutorials that show you my method to do this Spellbinders Hinged Card Bases. They come in handy with this card because you get a clean window on the front when the front and back are cut separately, then the window cut (using Spellbinders Grand Squares), then front and back joined. I also used JustRite Filigree Corners with Mix and Match Sentiments, Spellbinders Floral Ovals (hollowed out by Spellbinders Classic Ovals LG) and Spellbinders Scalloped Borders Two. It is simply a window card and the floral oval with sentiment inside is glued to the inside of the card (see below) :-)
 
Here’s your Step By Step recap of die cuts and layers, from the bottom up: Start out with a Card Base cut using Grand Labels as described above – 5-3/8″ x 6-7/8″ , die cut layer using four of the small corners from Filigree Corners adhered to front of card, foam tape, die cut layer with Scalloped Borders Two on lower end of card. Floral ovals glued to inside of card. Add bow and bling.
| CRAFT SUPPLIES I USED |
Rubber Stamps: Justrite Papercrafts – Mix Mix and Match Sentiments
Craft Paper: Neenah Classic Crest – Solar White, DCWV – Gold Foil
Ink: Versamark
Accessories: JustRite Filigree Corners, Spellbinders Grand Large Labels, Spellbinders Classic Ovals LG, Spellbinders Grand Squares, Spellbinders Floral Ovals, Spellbinders Scalloped Borders Two, May Arts Silk Ribbon, Recollection Pearls, Becca’s Peg Bow Maker, Grand Calibur Die Cut Machine |
Thanks as always for peeking in!! I’ll see you soon!!
 
Posted in *Classic Ovals LG, *Filigree Corners, *Floral Ovals, *Grand Large Labels, *Grand Squares, *Scalloped Borders Two - A2, -Wedding Cards, :Gold, :White, Retired Products, |Elegant
 
Hi there blog friends!! How about an easy card making idea today? I’m still quite in the Christmas mood and looking forward to checking another card off my list for my Christmas stash. Today I decided to create a card that’s white on white. It’s actually hard trying *not* to slip a layer of color in there! I reached for a classic sentiment by Quietfire Design by using the sweetly penned Christmas is the Day set.
 
I used one my favorite new embossing folders, Spellbinders Roman Romance for the background here. The round treatment at the top is done using Spellbinders Curved Borders Two. Last of all, the sentiment is placed on Spellbinders Fancy Tags Two. Believe it or not, I’m down to two layers in this card….here goes!!
 
So to recap the layers I used from the bottom up, my card base is 5-1/2″ x 7-1/2″, matting layer cut to 5-3/8″ x 7/38″, foam tape, white layer cut to 5-1/4″ x 6-1/8″ – embossed with Roman Romance and adhered toward bottom edge, die cut layer using two cuts of Curved Borders arranged so that open end of curve are facing, die cut layer using Fancy Tags Two. Attach ribbons, bow, pearls and sentiment on appropriate layer.
You have my thanks always for you thoughtful observations! So happy you stopped by for a moment today!!
 
|


I’m in love with this card. It is gorgeous, Becca!
Hugs
Anne (UK) x
FAB CARD , GREAT DESIGN, WONDERFUL CHRISTMAS CARD.
What a cracker! Sorry – no pun intended. Love the dimension.
Beautiful card Bekka xx
Another beautiful card Becca. I love the attention to detail you put into all your cards…..on this one the little seed beads must have taken a good bit of time to put on but that is just a typical Becca trait. Whoever receives this card is blessed.
LOL Eileen
Absolut stunning card here Becca. I soo love this and the traditional red and green with the gorgeous white die cuts. Simply amazing work and what a great way to use these small dies, that we quite right almost never ever use at all, so it´s just fabulous, that you´ve taken this up. An awesome idea and loved by many, I´m sure.
Have a wonderful day sweetie and lots of fun.
Oh my gosh, I know EXACTLY what you mean about how there’s always that small die in the set that you never quite use…
Thanks for sharing this great example of how to use it! I’ll look at all my little “runts of the litter” with a new eye now.
Beautiful card. But then, all your cards are beautiful. You are so generous to share with us. Thank you.
Very pretty and Christmasy!
Beautiful background and love the color you have given to it with the gems!
Hello Becca
Not until I read your instructions again did I realise that it was a little Single Die, and not an Embossing folder that made up the background!
So beautiful and I love the Olive Green ribbon!
LoveMarg
Gorgeous!
Absolutely beautiful. How do you get such a small die-cut cut so perfectly? Do you have to poke each cut-out out by hand? Such beautiful work and the beads add the color and richness with the lovely ribbon. Thanks for sharing.
Your cards are “amazing” Becca. Everyone of them is like a small work of art. Thanks for sharing.
Another work of art!!!
Hugs
Mstgane
Ann
Oh, Becca, that is such a beautiful Christmas card!! The red and green are certainly highlighted by the white background. I love the lace! (as usual)
Thank you for the inspiration of such a beautiful Christmas creation!
What a gorgeous card! Fantastic idea using the wee die cut pieces. I have a whole iris box full of those unused dies…may not be so full anymore!
Thank you for sharing your clever idea!
This is absolutely fabulous Becca!! Certainly will make me look closer at some of my dies. Christine xx
Very BEAUTIFUL card. Thank you for the Inspiration!
Brillant, love this design!
Superb thinking outside the box! Those little dies seemed almost useless– until now…
Luv it! Luv it! So imaginative and inventive. This will make me look at ‘those’ dies from a different perspective! Thanks for sharing one again.
Regards
Margaret (Scotland)
Every time I think I have seen it all you out do yourself. This card is just stunning I am going to have to try to make this card this year. Thanks Becca I love all your ideas
Oh so beautiful and the background is a must have. Love this card!
Gorgeous and it does look like a quilt!
Absolutely stunning Becca ! What else can one say ?xx
Hmmmm, I have some others that would do that also – thanks for great ideas Becca
I know I can never make a card look as good as yours so I have to use the idea as well as I can.
Mine never look as good as yours. I just love the one today but hard to pick favorites as I LOVE all you do
I don’t know if I’d like to walk a mile in your shoes, or spend 10 minutes in your brain. It doesn’t stop, does it? Great card and clever use of the little die.
WOW BECCA!!!!!!!!!!!!!!!!!!!!!!!!!!!! :) THIS IS GORGEOUS!!!!!!!!!!!:)
Again such a beautiful card, love it to pieces
Becca you are a genius just love this idea. Thanks for this.
Hug sTrish.
This is an outstanding card. Love the lace overlay as it makes the card look elegant. Thank you so much!
Becca, this is absolutely stunning! I need to check out some of my smaller Spellbinder dies to see I I have something that would work! You never cease to amaze me with your wonderful creations! Thanks for such lovely examples for us to enjoy!
Another spectacular creation! Thank you for sharing your gift!
Hi Becca, beautiful card, I like the way you have kept it to mainly white with just a splash of Christmas colours with the bow, bells and pearls, it’s a very elegant card.
Hugs Lynn
Hi Becca,
What a lovely elegant Xmas card – I love the colours and design. White, red and green are right up my street!
I shall unashamedly adopt your idea, have got a couple of “those dies”.
Thank you for sharing
Hugs, Rose
Absolutely LOVE this card! It’s truly a work of art.
Gorgeous, love the white & red!
Becca, amazing! Love all of the layers and the beautiful details.
How clever of you! Your mind must always be dreaming up new ideas! Love it!
Hi Becca! I really can’t choose a favorite card of yours since they are all stunning, but this card is truly the most beautiful Christmas card I have ever seen! Love it and so appreciate your sharing it!
It’s a stunner! Love it to bits, now I want that die.
Morning Becca, Stunning !! I love this card !! I need this set of dies, you are my inspiration.
Have a lovely day.
Lots of love from Patricia xx
This is a truly stunning card and has given me the impetus to sort through my dies and find one which will work. Thank you for sharing your wonderful ideas.
Oh how lovely is your card.
Phil D
Your card is stunning, i have not got this die ,so it is another on my wish list
Elaine H X
Good Morning Becca from “across the pond”. What a stunningly beautiful card to start the day with. I don’t currently have this die but it looks as if I may have to add it to my “wish list”! Thank you so much for sharing this and I hope you enjoy the rest of your day.
Morning Becca – love, love, love your card….the colours, the detail, the ribbon and pearls…stunning. At first I thought it must be a new embossing folder. Because you are so meticulous in your detailed list of the dies I was able to see at a glance that I had all of them(!!) …. they are all lined up ready to play…. so I’m off now to make my first Christmas card this year. Thank you so much for all the inspiration – enjoy the rest of your day – I will!!
Hugs
Heather (UK)
x
fab card ,love the way you used all these small dies .Laura O
Hi Becca,
So, so beautiful. Really stunning – love it. Thank you for sharing.
Have a lovely week-end everyone.
Much love,
Shirley T. (U.K.) xxx
I loved the base with lovely n delicate diecuts on it ! The card is gorgeously beautiful !
Absolutely stunning! A special card for someone.
So very gorgeous!
Good morning Becca,
Oh i just love this card that you have made, as it is so beautiful. Being honest i really don’t know which part is the best. Oh i must, must try this card. Thank you so much for this nugget of beauty,
Love and crafty hugs
Norah.
Hi Becca. What a fantastic card. It is just gorgeous. I will have to get those dies as I don’t have any that will work and I must make it! Take care.
This is so beautiful!
I’ve got a lot of those “little things that I don’t know what to do with!” I’ll go check them out and see what might happen! Thanks Becca!
Only you can inspire me so much that I’m still reading your wonderful blog at 3:30 in the morning! I can’t wait to buy the dies you used in this card, because without you Becca, I would never understand how to use most of the dies! Thank you so much for your inspiration and the time you give to helping others. I blog and understand the incredible amount of time you invest and the work you put into each and every post. God bless you!