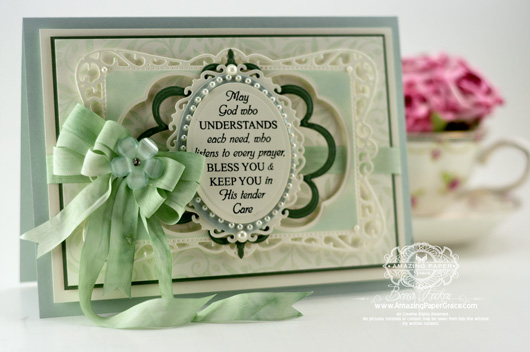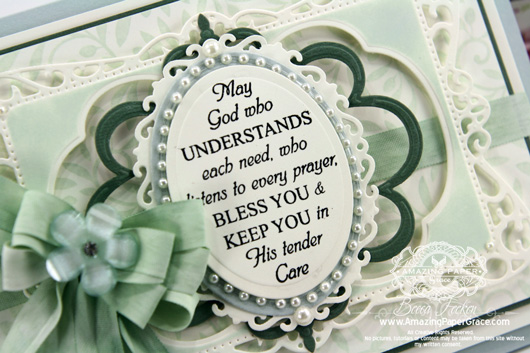 
It’s a brand new day and an brand new week – I hope it’s a happy one for you friends. Spending many blissful hours in the craft zone this weekend, I have a card to share with you today to get my week off to a crafty start. I love it when I have enough time to play that I make a happy discovery. This for some will seem minor but it’s the little things after all, right? You know how much I love seam binding and I love it even more when I take the time to dye it to match my card. Just by scrunching and spritzing and manipulation you can get splotches and stains and such. The ink I used for my card is a chalk ink and I could not find an ink to match it so I threw up my hands and used my chalk ink re-inker. Never in a million years would I have tried that but you know . . . desperate measures! I loved the result. Although it is hard to tell in the photo, the effect of using a chalk re-inker takes the sheen off of the seam binding and makes it look powdery soft giving it an opaque color. On to my card, the inspiration for the card was this Leafy Background Stamp by JustRite Papercrafts and the sentiment is from the Get Well Labels Twenty set. I wanted to show the background by having bits of it pop through the die cuts and around the border. I picked Spellbinders Timeless Rectangles and Spellbinders Labels Fourteen to make my frame, highlighting the frame using Spellbinders Twisted Metal Tags and Accents. To seat my sentiment I used Spellbinders Floral Ovals and Spellbinders Classic Ovals SM. The green is quite pale but you can get a better view by clicking on the picture to enlarge.
 
So to recap the layers I used from the bottom up, I started with a card base from light green paper cut to 5-1/2″ x 7-1/2″. Foam Tape, cream matting layer 5″ x 7″, foam tape, dark green matting layer 4-5/8″ x 6-5/8″, Cream background stamped layer 4-1/2″ x 6-1/2″, foam tape, Timeless Rectangles/Labels Fourteen die cut layer, foam tape, Twisted Metal Tags die cut layer, Floral Oval die cut layer, Classic Oval die cut layer, foam tape, Classic Oval die cut layer. Ribbon, bow and pearls set on appropriate layers.
| SUPPLIES I USED |
Stamps: JustRite Papercrafts – Leafy Background Stamp, Get Well Labels Twenty
Paper: Neenah Classic Crest Smooth Natural White 80lb, EK Success Cloud, Coredinations
Ink: Versafine Onyx Black, Amuse – Pistaschio
Accessories: Spellbinders Timeless Rectangles, Spellbinders Labels Fourteen, Spellbinders Twisted Metal Tags and Accents, Spellbinders Floral Ovals,Spellbinders Classic Ovals SM, White Seam Binding, Sewology Button, Recollections Pearls, Becca’s Bow Maker, Spellbinders Grand Calibur Die Cutting Machine
|
The other ladies on the design team are also previewing June sets today, here’s where you’ll find more inspiration:
JustRite Inspiration • Becca Feeken (here) • Darsie Bruno • Michele Kovack • Sheri Holt • Eva Dobilas • Angela Barkhouse • Marisa Job
Don’t forget, JustRite is having an awesome sale on dies – 20% off. Thanks for stopping by to visit today, I’ll see you soon.
 
Posted in *Classic Ovals SM, *Floral Ovals, *Labels (14) Fourteen, *Timeless Rectangles, *Twisted Metal Tags and Accents, -Religious Cards, :Cream, :Green, Retired Products, |Elegant, |Many Layers, |Stencilled Cards
 
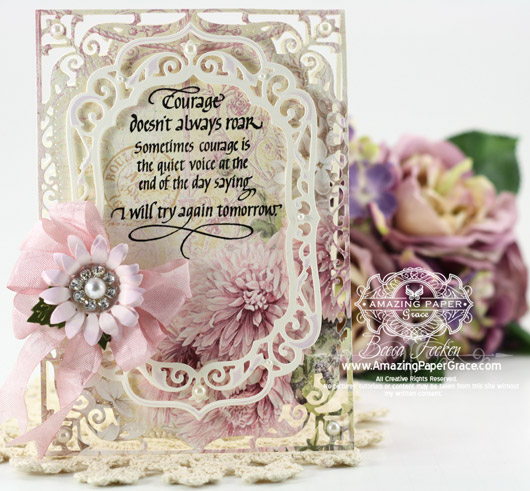
Sweet day blog friends. I hope today finds you well and full of adventure. June is here, can you even believe it? So, for my card today I reached in the stash for a little bit of inspiration. It’s so true that courage does not always roar, indeed trying again is an act that is brimming with courage and faith. It was such a blessing that Suzanne with Quietfire Design turned one of my very favorite quotes, Courage Does Not Always Roar into a stamp. I know you’re with me on this, sometimes just the act of stamping, preparing this for someone else and reading the words over in my head makes it resonate in my heart. This goes into the stash for the next time someone (or me) needs lifting – there will be one, but I will be ready :-)
 
The card measures 4-1/2″ x 6/1/2″ and uses Spellbinders Elegant Labels Four. The second layer is made by cutting Elegant Labels Four and Spellbinders Labels Four at the same time – it creates the perfect matching opening for the frame. A flower made using Spellbinders Jewel Flower and Flourishes for an embellishment finish the front and the second part of the sentiment for the inside of the card. I took a little creative license and stamped the quote’s author on the inside of the card with the inner sentiment so that it wouldn’t be covered up. The paper (ByDigitalPaper – Flower Lady) that I used for this was so pretty that I dare not cover it up. So today, with two layers, it’s truly a simple card.
A Note About Printing:
No recap today because the card is so simple but I’ll walk you through my workflow for printing and hopefully answer a couple of the questions that have been coming in to me. I’ve had notes from several people about printing digital paper and as this was a full size sheet, printing could not have been simpler. I copied the .jpg file to my desktop and on my Windows laptop, I right clicked the file name and a menu comes up. To use the picture printing resident in Windows I selected print from the menu. Because it is a .jpg file the program assumes I’m trying to print pictures and gives me a choice on size and a multitude of other settings. I simply said to print full sheet to my small Epson XP-300 Inkjet printer. I printed it out on the Georgia Pacific White Cardstock that can be purchased at Walmart. Although I’m very happy with the printer, it was not a purchase I researched thoroughly as I picked it up at Walmart when I was visiting my daughter and we needed an inexpensive printer, quickly. So there you have it, I did no cropping or resizing (this time) because I needed a big area to cut from this delicious collage paper.
Savor the day! I’ll see you tomorrow :-)
 
 
Happy Friday sweet friends! What are your crafty plans for the weekend? Or perhaps you’ll make us all jealous by heading to the beach or the mountains. No beach for me — I have work to do this weekend…. Earlier this week I started a birthday card for a friend and I finished it off last night to post today. It’s a simple shaped card using Spellbinders Labels Twenty Nine. Ahem, I think this is the first time I’ve used that particular die template – and it was a sweet discovery – I’m not sure how I missed using it! The filigree border I used is from Spellbinders Gilded Gate Two – I simply cut the gate four times and discarded the parts I didn’t need – the decorative top of the gate is stellar. I framed the top of the card with Spellbinders Radiant Rectangles and topped it off with Spellbinders Classic Ovals LG for my sentiment. The sentiment is from JustRite Papercrafts Birthday Vintage Labels Four.
 
So to recap the layers I used, I started with a cardbase cut using Labels Twenty Nine – largest size (#6), foam tape, cut four Gilded Gate Two and glue to Labels Twenty Nine #5, foam tape, oval from Radiant Rectangles, foam tape Classic Ovals LG. Ribbon and bow set on appropriate layers.
The other ladies on the design team are previewing June sets today, you can catch all of their inspiration at: JustRite Inspiration
Oh, I forget to enable mention, JustRite is having an awesome sale on dies – 20% off. It’s a great time to get all those you’ve been adding to your wish list, just sayin’ :-)
 
 
|


Awesome card, very elegant, love the colors!!!
This is really beautiful Becca ,Its a shame I can`t get your stamp set here in UK .and it would really be expensive to get it shipped for USA
Boo Melanie UK
This is soooo gorgeous Becca, and I abasolutely love the soft green color, you´ve used on this one too. It looks soooooo beautiful and elegant, and you always makes such gorgeous bows on your cards too. Really awesome creation hun, I just love it.
Another gorgeous card, Becca – thanks for the tip about using chalk ink on seam binding, the result looks fabulous!
This is gorgeous! I just love that sentiment.
Being a green addict I would naturally fall for this card..as I do for all your cards…but this one is so special and so beautiful. One question, where can one purchase the light green paper/cardstock ? Thanks so much for sharing Becca, your a special person !
I love it so very pretty, you always do a awesome job. thanks for all of your beautiful cards.
Becca, you are back into your sweet profound mode. You may not see it but your card designs show your changing emotions as your thoughts change over time. I love this moment in your time and thought!
WOW….absolutely awesome sentiment. I love it! Very beautiful. Green’s are one of my many Fave color’s; but, I struggle to combine the right one’s. Yours are spectacular! The darker green really makes it pop. I never heard of Chalk Ink before. Very interesting….I will have to research this! I love to learn and I can never get enough. Thank you so much for sharing this gorgeous card.
Absolutely love the color of this card. Beautiful.
What a beautiful card Becca! I love the muted colourscheme and the dyed seambinding. That leafy background stamp is stunning too and I can’t wait to be able to buy it in the UK!
Oh my what a beautiful green!! And your seam binding is truly amazing – nice touch with a perfect match! Girl, you done it again – “AMAZING.”
Hugs,
Mstgane
Ann
Like the rest of your fan club, I too love the colours – so soft, muted and just plain beautiful. The layers are perfect and it’s simply a lovely card.
Good gracious, Becca. What a gorgeous card! I love the way you have layered the elements to create dimension. Why don’t I ever think of making an opening so the background shows through???? You are just brilliant. So magical with the tools at hand.
Gorgeous Becca! I love de color combination you made. You are soo creative and smart.
Oh wowzers! I am in love with this card! And the sentiment is wonderful! Definitely another for my collection :o)
Hugs
Anne (UK) x
For the first time ever, I have all the dies you’ve used so I can make this card, well my own version :D love the fab design
Lisa
West Country, UK
Gorgeous card! I love the color! & design!
Dear Becca you used my favorite color GREEN!!!! I was so excited to see this card and love your idea of using your chalk ink re-inker to stain the seam binding! This past weekend I used one of my Distress Ink PADS to achieve the exact color I wanted. It worked well too but I would caution anyone who wants to try it to wear gloves! It took a little longer to dry the seam Like you said necessity sometimes stimulates the mind to be more creative! Blessings for a good week {{{ hugs }}}
Ooops! The last part of the above post did not contain all of the information I wanted to share. My tip is, to dry your seam binding more quickly you can use your embossing heat gun!
SOOOO BEAUTIFUL!!!!!!! :)
You are the Queen of layering! I am so inspired by you! I’ll have to try out that technique with the chalk reinkers…some of my inkpads dried out and I need to order some reinkers for them. What a great idea!
Another fantastically GORGEOUS card Becca. Just love the mint dp and cardstock, and EVERYTHING about the card.
Really fresh and classy – I too love that background stamp – very William Morris in style I am thinking.
Another beauty!! Thank you so much for the new “recap” feature to your cards… makes it so much easier to “copy”, I mean “case”!!
Lovely Becca. Isn’t it funny how need sparks creativity sometimes?
Becca, I love this card & I really like the color. So soft & nice.
Morning Becca, A truly beautiful card, loving the subtle green colourway and I really need the leafy background stamp, it is beautiful.
Lots of love from Patricia xx
so gorgeous…what a pretty colour tooo yummy
I love the card. The vintage look is just my style. You inspire me to get out my dies and create!