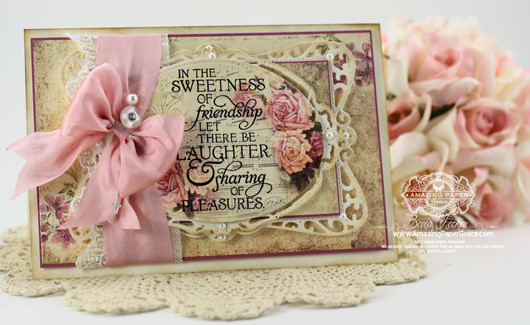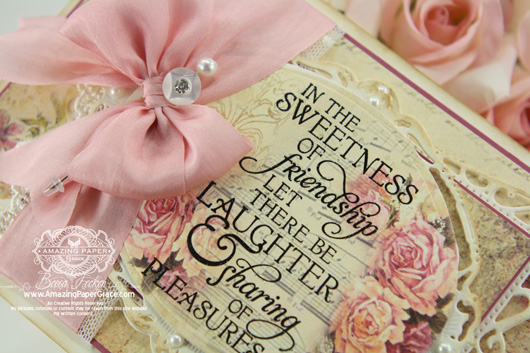 
Sweet friends, popping in to say hello. Just a note, the tu-tu went in the mail and I’m working diligently on a tutorial for you. Today I’m back to roses and want to share a spectacular sentiment about the sweetness of friendship. This was sent to me by a dear friend last year and I came across it while shifting some supplies in my room. No time like the present, I decided I would put it off no longer and sat down to fiddle away with a card. The Sweetness of Friendship sentiment is from Flourishes and the rose paper is from ByDigital – the oval is Flower Labels, and the background is Elegant Paper. (Keep in mind I tend to shrink and enlarge papers to suit my need.) I cut my plain oval using Spellbinders® Grand Ovals and stacked it on top of a cream panel cut with Spellbinders® Opulent Ovals. For the next layer I chose Spellbinders® Timeless Rectangles.
 
So to recap, here are the particulars from the bottom up – cardbase 5″ tall x 7.25″ wide, foam tape (optional), matting layer 4-1/2″ x 6-7/8″, design paper layer 4- 3/8″ x 6-3/4″, foam tape (optional), Timeless Rectangles, foam tape (optional), matting layer 3-1/8″ x 4-3/4″, design paper layer 3″ x 4-5/8″, foam tape (optional), Opulent Ovals, foam tape (optional), Grand Ovals #1. To make this on your own, you only need to cut and stack!
Whew, that seems like a lot of foam tape, right? I love the depth and dimension it brings to a card but for sure it can be overdone. I use a very thin 1/16″ foam tape but this card looks just fine without the tape. More and more I get emails to identify the items I’ve used. The stars and moon aligned and I had everything right where I needed it – I hope you’ll give it a try :-)
| CRAFT SUPPLIES I USED |
Rubber Stamps: Flourishes – Sweetness of Friendship
Craft Paper: Neenah Classic Crest – Natural White – 80lb Smooth, ByDigital – Flower Labels, Elegant Paper
Ink: Versafine Onyx Black, Brushed Corduroy Distress Ink
Accessories: Spellbinders® Grand Ovals, Spellbinders® Opulent Ovals, Spellbinders® Timeless Rectangles, May Arts Silk Ribbon, Recollections Pearls, Lace, Becca’s Bow Maker, Grand Calibur Die Cut Machine |
Thank you so much for stopping by. Shout out if you like my mini recap, I’m trying diligently to adjust my blog posts to answer questions before they are asked. How’s that for being a mind reader? If you’re reading my mind now, you know how very thankful I am, to you :-)
 
Posted in *Grand Ovals, *Opulent Ovals, *Timeless Rectangles, -For A Friend, :Cream, :Pink, Digital Paper, Flourishes, Stamping, |Elegant, |Vintage
 
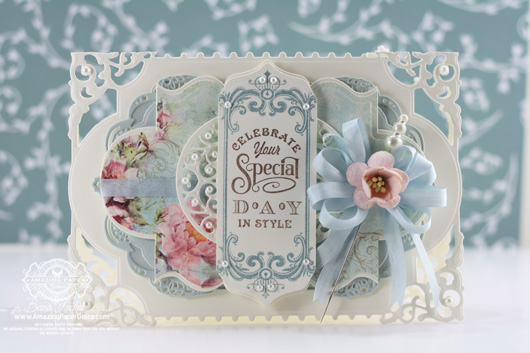
Hi there sweet friends — how about a card that will celebrate any special occasion? I had a craving to do a filigree card so I started with a card base made from Spellbinders® Enchanted Labels Twenty Eight – one of my favorites. For my card base I was able to cut two layers at once – there are not too many chads so it was relatively easy to get clean cuts. If your die cut machine balks with two layers, you can try the technique I show in this —–> video, for a polished look. On top of my base I layered Spellbinders® Gold Labels Four followed by Spellbinders® Labels Thirty which is cut from some sweet rose paper at ByDigital called Romantic Time. (My rose design paper layer is backed up by a cream layer of Labels Thirty simply cut in half horizontally.) The top element is cut using Labels Thirty as well, then trimmed down to the sides of the stamped frame from JustRite Papercrafts set – Birthday Vintage Labels Four.
 
I felt like I needed something to create some texture within the design so the two half round circles are a little piece of serendipity – I used Spellbinders® Die D-Lites Window Two.
| CRAFT SUPPLIES I USED |
Rubber Stamps: JustRite Papercrafts – Birthday Vintage Labels Four
Craft Paper: Neenah Classic Crest – Natural White – 80lb Smooth, EK Success – Cloud, ByDigital – Romantic Time
Ink: Amuse – Eucalyptus, French Roast
Accessories: Spellbinders® Enchanted Labels Twenty Eight, Spellbinders® Gold Labels Four, Spellbinders® Labels Thirty, Spellbinders® Die D-Lites Window Two, May Arts Silk Ribbon, Recollections Pearls, Becca’s Bow Maker, Grand Calibur Die Cut Machine |
I’ve been savoring the amazing weather that has been coming my way. A new glider on my porch has become my favorite hangout with morning coffee and I’ve been drinking in the morning air with a thirst that surprises even me. Two new plants found their way into my new spot even though I can in no way claim a green thumb. These are blissful, blessed days and as much as I savor my little oasis, I equally savor the time spent here with you. Thank you and bless you!! P.S. I’m trying to answer email these days . . . perhaps my computer needs to come out to my new spot, what do you think?
 
 
Good morning blog friends, I have a couple of projects to share today with my new sets from JustRite Papercrafts. If you missed my post last week I have two new sets Filigree Journal Covers and Mix and Match Sentiments. This project is tagged as quick and easy on my calendar for frugal Christmas gifts and (snicker) I have one down for me. I have gobs of journals sitting around, but none of them match and for the life of me I can never remember which one I use for what. So, I made a matched set of journals using Filigree Journal Covers – of course the Filigree frame works well on cards too. Coincidentally, it matches the other filigree stamps I designed earlier. The Vintage Alphabet Soup Background works out well as a background on the journal covers because it’s easy to line up the non-overlapping background for a continuous pattern. These will be easy to find in a crafting frenzy – one is titled Stamp Journal, Technique Journal, Quote Journal and Ink Journal.
 
I purchased four economical composition notebooks from Walmart for $1.50 each and covered them with the stamped paper on the front, back and solid paper on the spine. For the holder, I recycled a cereal box and covered the sides with paper and used stamped panels for the short sides of the box. The Filigree Frame is stamped on a square cut using Spellbinders™ Classic Squares LG and mounted on a panel cut using Spellbinders™ 5×7 Matting Basics A and the bottom shaped using Spellbinders™ A2 Bracket Borders One. The books are roughly 7.5″ x 9.5″
 
My next card is very simple :-) Starting with a pink card base I layered the Vintage Alphabet Soup Background stamped onto pink cardstock onto a black panel. With ribbons in place, I cut two of the oval frame motifs from Spellbinders™ Jewel Framed Sentiments and cut each of the motifs in half so that I could make a symmetrical horizontal frame. On top of the frame I layered one of the sweet new Die D-Lites™ called Ornamental Tags Three. To break up some of the roundness and pull the pop of black down into the card I picked out a small embellishment piece from Spellbinders™ Vintage Lace Motifs.
 
I pulled two phrases from Mix and Match Sentiments for a small two line sentiment. The card size is 5″ x 6.5″
 
My last card combines the Filigree Journal Covers with some Mix and Match Sentiments. I used Spellbinders™ Classic Squares LG to cut the panel I stamped the frame on then stamped the sentiment on the smallest motif from Spellbinders™ Timeless Rectangles.
 
The fluffy white flowers are made using Spellbinders™ Rose Creations and the gift wrap type of tissue paper. The card is 6″ x 6″.
| CRAFT SUPPLIES I USED |
Rubber Stamps: JustRite Papercrafts – Filigree Journal Covers, Mix and Match Sentiments
Craft Paper: TPC Black, EK Success Pink, Prima Tea Thyme
Ink: Colorbox Pigment – Cocoa
Accessories: Spellbinders™ Classic Squares LG, Spellbinders™ Timeless Rectangles, Spellbinders™ Rose Creations, Seam Binding, Corsage Pins, Recollections Pearls, Becca’s Bow Maker, Grand Calibur Die Cut Machine
|
The other ladies on the design team have made some truly wonderful creations from the new sets. I hope you’ll pop by and see them. Don’t forget, there is a JustRite Spring Fling Sale going on until May 12th. Have a truly wonderful day!
JustRite Inspiration • Becca Feeken • Sharon Harnist • Kathy Jones • Darsie Bruno • Marisa Job • Eva Dobilas • Barb Schram
 
|


What a gorgeous card. I love that verse.I never think to tamp on top of DP and yet it always looks great. Thanks for your beautiful card.
Simply stunning!
I like everything you do. Not much help, huh? Love the card!
Hi Becca, been loving your cards, just not had time to comment. Thanks for your recap. It DOES help! Could you please answer what type/make of printer you use to print out these pretty digi papers. I’d love to buy some, but hesitate not knowing how my Epson 514 will handle printing. I’ve learned it does NOT like cryogen paper. Looking for a different one for cardmaking. Thanks if you can help. Hope all is well in your life. Started to watch your video of yes’dy, but then got busy and had to leave for another time. Thanks so much for taking time to provide these video tutorials. They help me so very much. Hugs & Blessings.
You really are an incredible stamper! Just WOW!
Gorgeous!
One last check for Becca News @ 11 before hitting the sheets and WOW, this is fabulous! Love that paper, my friends prints alot of hers. I never got into that. I do like the recap and mostly that you stated all the sizes of the paper. Always wonder about that. Hope you have a blessed day tomorrow and every day.
Hugs,
Mstgane
Ann
Becca, I love the card. And, yes, thank you SO MUCH for the particulars on the dimensions, etc. It really helps if we want to duplicate your glorious creations for one of our loved ones. It saves a bunch of time, since I’m lazy! Your creations are always beautiful.
Another absolutely gorgeous card. Oh…..if I only had a quarter of your talent. Such a talented artist with an eye for color and style, that is you.
Love your tutorials and now showing products used is fantastic.
Thanks Becca for the recap that gives additional details. You’re heaven-sent to me as you really make my cardmaking hobby very interesting and exciting every time you post your brilliant creations. Love you so much.
Becca: This is absolutely gorgeous!! and YES!! I loved the recap and the dimensions you gave for each layer. I know it has to take more time to write it all out for us but thank you sooooo much! I’ve shown your cards to my husband so many times over the years that I’ve been following you that all I have to say now is “you know, that lady whose cards we really like” and he knows I mean you. He was also comparing a card someone made and said, “well it’s REALLY good but not as good as one lady who makes those cards we really like.” :)
How pretty!! So feminine and romantic with roses and ribbon and pink!! I just lo-o-ove it!
Thanks for the recap this really helps .Melanie
Absolutely stunning – love the recipe style instructions – really useful. Thank you.
Another stunner here again today Becca. I absolutely LOVE this one too. So romantic and gorgeous.
Hi Becca – you have such glamorous, elegant ways with your stamping, cutting and layering! This is a delightful card <3
Morning Becca, Gorgeous sentiment, stunning card, beautiful papers, fantastic die-cuts. Thank you so much for the recap, really helpful. This card is so pretty and feminine, I adore it.
Lots of love from Patricia xx
Many many thanks Becca for what you do to inspire those of us who admire your work.
God bless you.
Another beauty Becca – gorgeous papers and a wonderful sentiment. tfs
Hugs
Heather (UK)
x
Love the card and the helpful menu. Amazing is truly your name. You could add wonderful, beautiful and several other words to really define you.
Phil D
Thank you! I do like the recap!
The card is lovely as always!
So beautiful again….love it!
XX Ellen
ANOTHER, “WOW!!!!!!!!” :) GORGEOUUUUUUUUUUUUUUUUUUUS!!!!!!!!!! :)
Becca I just love love love your style. I have been following you for quite some time now. ALL your cards have such an elegance to them. I would love to copy some but I feel I am always missing something.:( and I have a large studio FULL. LOL. You are a great inspiration on each and every one of your posts. Hugs!!!
I love this card and I love the way you now explain how you make them. My mind just doesn’t think this way but your explanation makes it sound so easy. Your cards are always so, so beautiful and feminine and you share so willingly. Thank you so much for your posts.
Awesome card, I love every part of it. When I see this on Pinterest I will be sure to add to my collection, thanks
When you shift things in your craft room again, could you come up with the instructions on how to make those lovely stars and snowflakes I have been asking about since you posted them last winter? Christmas is closer than we think and me, of all people, need a long time to prepare.
Gorgeous! Awesome sentiment too!
Beautiful. Pinning this one too.
Soft, muted colours; beautiful sentiment; pretty background, elegant layering in all the right places, and the signature Becca ribbon & bow… what’s not to love. You knocked this one outta the park, dear mentor!
Ooooh! Love the sentiment. Love the colour scheme. Love the paper. Love the bow. Love the matting.
Hugs
Anne (UK) x
Becca, I love every little detail of this gorgeous card. the stamping on the printed paper is phenomenal….soooooo impressed!
Absolutely Gorgeous!
Becca, just beautiful! Do you realize how big of fan club you have? God must smile with each of your creations.
Fondly,
Kay
Absolutely Gorgeous Becca, you are so gifted I love your work!
Stunning! Wow,, I absolutely LOVE it!
Have a super day!
Sherrie K
Watched a turtorial on You Tube called, How’d She Do That, Fluttering Butterflies” card. I’m looking for the punch you used in that turtorial. Any ideas on what the name of the punch was, who it’s made by or possibly where to buy it? Lots of people are inquiring about this punch. Thank You.
What a lovely card for a dear friend. Thank you for sharing your talents.
As with all your masterpieces, you’ve outdone yourself again! What is that attached to the bow, a stickpin? If so, where did find it?
This is gorgeous. I love this digital paper, and the sentiment rocks!!!!!!!! Perfect sentiment for all those craft buddies. Just love your cards, Becca.
Hugs,
Marcie
Yes, I like the recap! I might try using the digital paper. Love this card! Gorgeous!!!
Absolutely gorgeous. The colors are fabulous and I’m lovin’ that crochet trim. Thank you for sharing your wonderful card with us!
Oh my it is just breathtaking, I love the papers and how you have the sentiment on them!!
Your cards are all so amazing! I love them all!
Love to visit your blog to view your posts and fabb creations. Commenting because the sentiment comes from my favorite poem, “The Prophet” by Kahlil Gibran in the section called “Friendship”. This small book was given to me many years ago and I was told to read the Friendship poem three times and it would begin to sink in….it is available online, Becca so please read the entire verse as it is profound.
Thanks so much for the recap of sizes and layers it makes the process so much easier to follow. I don’t know if I can resize images on my computer will have to get someone more knowlegeable to see if my kodak program will allow me to do it. TFS