WRBF-3819-2013
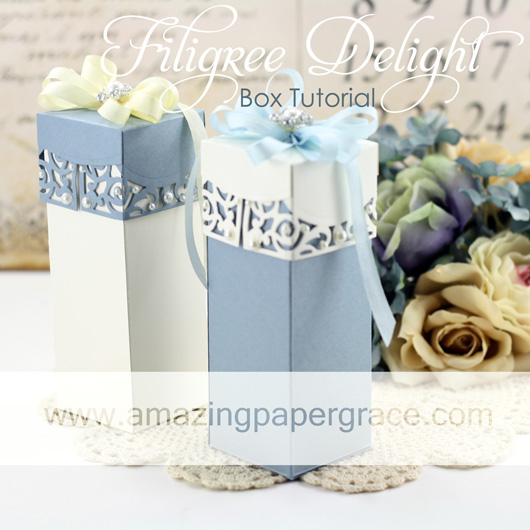
Hi there blog friends! By request, I have a tutorial for you today to show you how to make the filigree topped box!!  If you missed it before, with the matching card, hop over HERE to see the set!!  This makes up quickly and when you see how easily the top is made, you’ll just smile.  Enjoy!


Thank for you sweet comments!  If you’ve asked a recent question in a comment, please check the comment thread for a reply.  See you soon!!

pinTHIS SHAREthis TWEETTHIS EMAILthis
  • Lori mApril 30, 2013 - 3:53 am

    Gorgeous, so elegant, and beautiful, for wrapping gifts to make someone feel special.ReplyCancel

  • JeannineApril 30, 2013 - 5:12 am

    J’admire tout ce que vous faites c’est extrêmement joli et réalisé avec soin et goût. Bravo et félicitations !ReplyCancel

  • Lynn HardyApril 30, 2013 - 5:29 am

    Thank you for the excellent video tutorial. I have this die set now (didn’t you design it?) – it’s so pretty. Now I can make boxes to my hearts content!ReplyCancel

  • MelanieApril 30, 2013 - 5:50 am

    Thanks for this Becca must have a go .MelanieReplyCancel

  • ann robbinsApril 30, 2013 - 6:26 am

    I am working with that very die for my husband’s anniversary card. Just such elegance but guess who was the designer, what else could we expect. Thanks Becca.
    Mstgane
    AnnReplyCancel

  • Jean BullockApril 30, 2013 - 6:39 am

    Beautiful! Thanks for the great tutorial!ReplyCancel

  • Becky GreenApril 30, 2013 - 7:01 am

    THANKS FOR THE TUTORIAL BECCA!!!!!!!!!!!!!! IT’S A LOVELY BOX!!!!!!!!!!!!!! :) NOW, I WANT THAT DIE!!!!!!!!!!!!! :) (I’m SLOW at getting dies!) :)ReplyCancel

  • SusanApril 30, 2013 - 7:07 am

    Sweet.ReplyCancel

  • Evie ShambleyApril 30, 2013 - 7:20 am

    What an amazing, beautiful box. Thanks for the tutorial that was very easy to follow. You are a very gifted lady and thanks for advising that you created the die which is awesome. This will definitely go on my wish list to do for Christmas gifts. Thanks again!!!ReplyCancel

  • colleen howellApril 30, 2013 - 7:35 am

    I love this box it is so pretty!!!!!!!!! You are a fabulous designer, creator, I could go on and on. You motivate me beyond my imagination, thank you for all you do!ReplyCancel

  • Lynn G.April 30, 2013 - 7:56 am

    Absolutely love your video tutorial. Thank you for sharing! I will have to break down and get the A2 Filigree Delight.ReplyCancel

  • EileenApril 30, 2013 - 8:26 am

    Thank you for sharing your work and ideas with us all, it is much appreciated. You are a very talented lady.

    LOL EileenReplyCancel

  • Marilyn in E-TownApril 30, 2013 - 8:30 am

    I’m so excited to give this a try! What a beautiful set. Thank you for sharing with all of us in blog world.ReplyCancel

  • Jean CApril 30, 2013 - 8:34 am

    What a great project! The box is beautiful. Thanks for sharing!ReplyCancel

  • Ann LindApril 30, 2013 - 9:45 am

    Thanks so much Becca I can’t wait to try this. I make jewelry and this box shape will be perfect for presenting bracelets as gifts. Where do you buy your pins for your lovely stick pins?ReplyCancel

  • ChelseaApril 30, 2013 - 9:50 am

    Another wonderful tutorial from your hands of magic! Thank you so much for sharing this with us!ReplyCancel

  • Dottie DavisApril 30, 2013 - 9:50 am

    Thank you so much for the time spent creating and making this tutorial. The box is delightful and beautiful.ReplyCancel

  • EveleneApril 30, 2013 - 10:44 am

    Thank so much Becca for such a wonderful tutorial. I will definitely give it a try.ReplyCancel

  • Diana E. BishopApril 30, 2013 - 11:02 am

    Oh so Beautiful..and a must have Die. Thanks so much Becca, your out of this world!!!ReplyCancel

  • KarenApril 30, 2013 - 2:31 pm

    Thanks so much Becca.I truely LOVE all of your creations and look forward to your emails and tutorials!ReplyCancel

  • Terry BruhjellApril 30, 2013 - 3:51 pm

    Beautiful work and easy to understand. Thanks for all you do to make so easy to followReplyCancel

  • Sharon ApelApril 30, 2013 - 5:20 pm

    Thank you so much for this tutorial. Love having a matching box to tuck some sweets or treats in. Your creativity continues to amaze me. So kind of you to share your ideas.ReplyCancel

  • Rosy NewlunApril 30, 2013 - 5:44 pm

    What a graceful box and lovely video – superb job Becca ?ReplyCancel

  • Valerie MartinApril 30, 2013 - 6:36 pm

    Such a beautiful and elegant box! What a wonderful tutorial! You are just the best teacher. :)ReplyCancel

  • Alice GrahamApril 30, 2013 - 6:54 pm

    Totally amazing and truly fabulous, how do you do it??

    Hugs
    Alice xReplyCancel

  • LageneApril 30, 2013 - 7:56 pm

    Gorgeous lic on your box! Thanks so much for the excellent tutorial!ReplyCancel

  • SusanApril 30, 2013 - 8:42 pm

    Thanks for another wonderful tutorial Becca.ReplyCancel

  • RufusApril 30, 2013 - 9:04 pm

    Another excellent tutorial, Becca. What a pretty box, with of course, a gorgeous bow! Thanks for sharing it. You always do such a great job with filming your tutorials and your directions are clear and precise.
    R/ReplyCancel

  • Marcie SmithMay 1, 2013 - 6:24 am

    Fabulous tutorial as always!!!! Thanks for always sharing your talented manipulations of these wonderful dies Becca. Always coming up with the coolest ideas. Your the best.
    MarcieReplyCancel

  • LenoriaMay 1, 2013 - 9:00 am

    Becca, you make this look so easy – and gorgeous! Thank you for taking time to do these tutorials, I haven’t tried any of them yet but I love watching them and you always have such detailed and simple to follow instructions. Thank you again!ReplyCancel

  • NaomiMay 2, 2013 - 8:12 am

    That is a pretty cool box and you embellished so nicely!ReplyCancel

  • Kristine VencelMay 2, 2013 - 11:49 am

    Beautifully decorated box! I do love your projects, Becca. I am curious about the brad or button on top of your bows. Do you purchase them somewhere special or do you make them? They certainly add a crowning touch of bling.
    Thank you so much for sharing your wonderful ideas!ReplyCancel

  • Rosie WaldtMay 10, 2013 - 12:29 pm

    Becca: I totally love your work and made the cute little box, now am working on the card (thx to you for the tutorial). I’m assuming you folded the cardstock to cut the card & didn’t cut the oval out. Did you cut a separate piece to place over the sentiment part and put the sentimate on that? Thx for your reply in advance.ReplyCancel

  • Patti CMay 19, 2013 - 1:09 pm

    I have just made this…it is so special. Thank you!!!!ReplyCancel

WRBF-3817-2013
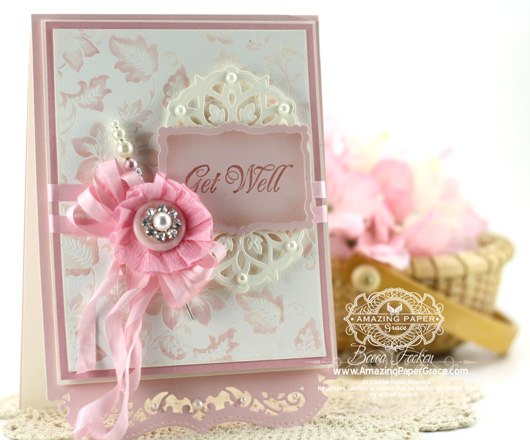
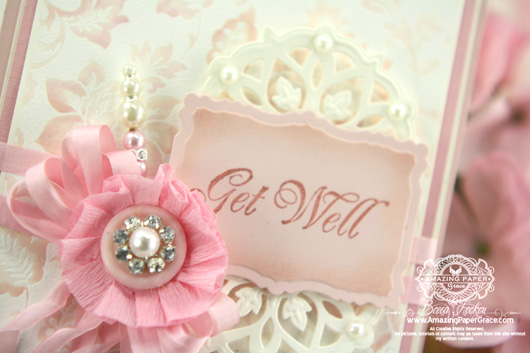
Hello there blog friends!  You’ll note that I’m on a pink and peach kick, I don’t think it’s going to be over soon so I’ve just given in.  No doubt you get in that kind of mood.   Lately, I’ve fallen in step with a clean vintage look and my sewing machine is sitting across the room pouting.   I say go with it because it does wind down and then you fall in love with another color scheme and your sewing machine becomes your best friend again.  Today, a Get Well card for the stash using a phenomenal JustRite Papercrafts background called  Secret Garden Background Stamp and a sentiment from the Floral Thank You set.
WRBF-3818-2013
I heat embossed the background stamp then spread a wash of Victorian Velvet Distress inker to fill the crevices where there was bare paper.  Then, I cut one Spellbinders™ Medallion Eight and cut it in half to layer behind Spellbinders™ Labels Twenty Nine.   The bottom of the card is bordered with Spellbinders™ A2 Bracket Borders One.   Pearls, of course – they’re always the icing :-)

SUPPLIES I USED
Stamps: JustRite Papercrafts – Secret Garden Background StampFloral Thank You
Paper: Neenah Classic Crest – Natural White – 80lb Smooth, Coredinations
Ink:  Colorbox Pigment – Cocoa
Accessories:  Spellbinders™ Medallion Eight, Spellbinders™ Labels Twenty NineSpellbinders™ A2 Bracket Borders One, May Arts Silk Ribbon, Maya Roads Trinket Pin, Recollections Pearls, Becca’s Bow Maker, Crepe Paper, Button

Check back to see what requested video is coming soon!  In the meantime, bask in this glorious weather.  What are your outdoor plans?

pinTHIS SHAREthis TWEETTHIS EMAILthis
  • Anita BraddockApril 28, 2013 - 12:13 pm

    Beautiful card love the background stamp I need some of them. thanks for sharing.ReplyCancel

  • Jean BullockApril 28, 2013 - 12:27 pm

    Love this. The background stamp is great. I thought the peach and pink went very well together. the die cut and the ribbon are so lovely. And I love the big blingy pearl in the middle of the ribbon rosette. Gorgeous!ReplyCancel

  • Lynn G.April 28, 2013 - 12:28 pm

    Gorgeous, as always!ReplyCancel

  • VickiApril 28, 2013 - 12:35 pm

    Hi, Becca,

    I was making a birthday card for my sister yesterday that I thought needed a little more oomph. I remembered that, on another card you had posted, you cut a die cut in half to layer as you have done with the medallion on this card. I tried that and it was just what the card needed. Thank you for blessing us not only with your gorgeous creations but with your ideas and techniques as well.ReplyCancel

  • ann robbinsApril 28, 2013 - 12:35 pm

    There is nothing that you do that I don’t like ~ marvelous!! Waiting for that video; hope it is my request for a 50th anniversary card!!
    Mstgane
    AnnReplyCancel

  • Francie in MontrealApril 28, 2013 - 12:38 pm

    It’s simply lovely! Who wouldn’t feel better receiving a get well card like this.ReplyCancel

  • MelanieApril 28, 2013 - 1:05 pm

    Just love this BeccaReplyCancel

  • Mary H.April 28, 2013 - 1:06 pm

    Most lovely. Great idea on cutting the medallion in half the way you did. Had me hunting to see what the spellbinder looked like. Clever use, and one I’ll try to remember. TFS & Happy Sunday.ReplyCancel

  • MaryannApril 28, 2013 - 1:20 pm

    This is just so gorgeous Becca. I absolutely love this card, it is sooo beautiful and sooo awesome colors on it too.ReplyCancel

  • ChelseaApril 28, 2013 - 1:32 pm

    Love your pink kick! Can’t have too much pink as far as I am concerned. I love how you cut the medallion to frame the sentiment. Lovely!!ReplyCancel

  • KathRApril 28, 2013 - 1:37 pm

    Because , this is an absolutely Beautiful Card, but then all your cards are!….ReplyCancel

  • KathRApril 28, 2013 - 1:38 pm

    It’s meant to say Becca, not because ..lol.ReplyCancel

  • LageneApril 28, 2013 - 1:56 pm

    Gorgeous card, The distress inked background on that stamp is amazing!ReplyCancel

  • Becky GreenApril 28, 2013 - 3:05 pm

    ABSOLUTELY GORGEOUS!!!!!!!!! :) Your card would PERK ME UP if I were sick!!!!!!! ;) No plans for outdoor play today—cloudy & cool & rain on the way!!! :)ReplyCancel

  • Dottie DavisApril 28, 2013 - 4:02 pm

    Love the technique you did with the distress ink in the crevices but don’t know how in the world you did it. The effect is delightful and light. Beautiful work.ReplyCancel

  • Trish AveryApril 28, 2013 - 4:22 pm

    Becca just love all the little extras you put onto your cards. and this one is no exception. love it. Look forward to seeing your new tutorials.
    Hugs Trish.ReplyCancel

  • Carol HintermeierApril 28, 2013 - 6:53 pm

    Beautiful!!!!ReplyCancel

  • Vicky SchmidtApril 28, 2013 - 7:17 pm

    Very nice Becca.ReplyCancel

  • EveleneApril 28, 2013 - 8:06 pm

    You always bring out the best in every card crafted by your gifted hand. Another stunner, Becca!ReplyCancel

  • Michelle CoonApril 28, 2013 - 8:28 pm

    Becca – Beautiful card. I love the CAS look. How beautiful that you embossed the back ground stamp them added color. Love that look. It’s very vintage.
    Blessings,
    MichelleReplyCancel

  • Robyn JosephsApril 28, 2013 - 8:40 pm

    Love the background stamp!ReplyCancel

  • Marilyn in E-TownApril 28, 2013 - 8:48 pm

    Simply adorable! Love everything about this card!ReplyCancel

  • NatashaApril 28, 2013 - 8:48 pm

    oh its beautiful Becca, im sure it will brighten the day of whomever is to receive it xNxReplyCancel

  • Lori mApril 28, 2013 - 11:18 pm

    Very pretty and the pink and peach colors are so beautiful and soothing.

    Hugs, Lori mReplyCancel

  • Rosy NewlunApril 29, 2013 - 12:16 am

    Luscious card Becca. I love pinks peaches whites and ivories — keep ’em coming! As well as your video ?ReplyCancel

  • Deborah ArtliffApril 29, 2013 - 1:12 am

    Morning Becca what a stunning card i love everything about this one. Ive got to make some birthday cards today so if you dont mind id like to make a few like this one. Take care xxxx

    Debs xxReplyCancel

  • Alice GrahamApril 29, 2013 - 2:21 am

    Totally gorgeous card Becca, look forward to seeing the video!
    The weather is still cold and wet in Ireland so only indoors for me today lol!

    Hugs
    Alice xReplyCancel

  • Patricia HowarthApril 29, 2013 - 2:38 am

    Morning Becca, This is a truly pretty and girlie card, I love girlie cards, the pink is gorgeous, and the background stamp is a ‘must have’, it looks so ‘ethereal’, truly stunning.
    It is cold and raining, here in Cheshire, England, please send us some of your sun ha ha.
    Lots of love from Patricia xxReplyCancel

  • Marcie SmithApril 29, 2013 - 4:29 am

    This background stamp is very deceiving. It sure looks a lot bolder as packaged, but really is very suttle when paired with pastel ink. I am really loving it. As for your pink mood, I guess I am in the same mood lately. Must be contagious. Maybe it is the fact that Spring has sprung in my neck of the woods. Whatever the case, I just can’t seem to get enough of it lately. Beautiful Card.
    MarcieReplyCancel

  • conniecrafterApril 29, 2013 - 3:56 pm

    such a lovely soft background, and beautiful embellishing!ReplyCancel

  • SusanApril 29, 2013 - 5:53 pm

    So beautiful and I always love your pins and bows!ReplyCancel

  • Charlotte ZweigoronApril 29, 2013 - 11:08 pm

    As always, you inspire and stretch the limits for all of us lucky enough to view your creations. I’ve looked back over the last few posts and am excited and pleased with what I see and hopeful that I may carry some of that creativity away with me.ReplyCancel

  • AndreaApril 30, 2013 - 7:30 am

    I love it. It is simply gorgeous!ReplyCancel

  • Anne (UK)April 30, 2013 - 2:06 pm

    Oh Becca! Such a beautiful card!
    Hugs
    Anne (UK) xReplyCancel

  • CorrieApril 30, 2013 - 9:54 pm

    That background stamp is stunningReplyCancel

  • irisMay 3, 2013 - 11:59 am

    WOW WOW WOW I just love your designs, they are so clean, Pretty, Beautiful, Ive got to say i have looked at millions of designs, But yours really inspire me, the colours, the way you add embellishments, but they dont look too much. Inspire me with more please, you are so very talented
    Thank youReplyCancel

  • Carol WaltersMay 5, 2013 - 12:23 am

    What a true genius you are. What beautiful cards.ReplyCancel

WRBF-3815-2013
Hi there blog friends!  Not too long ago I received a reader request.  She said she didn’t know what to do with the new Spellbinders Gilded Gate die and asked me to show how I would use it.  Your wish is my command! :-)   I cannot find the original email but I hope you are still out there.  Now, there was only one gilded gate at the time the request was made and I’ve not been able to get my hands on it but I just recently got  Spellbinders™ Gilded Gate Two, and thought that it worked beautifully.   It.is.exquisite!   I started out with a card base cut from Spellbinders™ Grand Labels Twenty Three.  I cut the gate two times and glued them together to form the backing for my sweet sentiment from JustRite Papercrafts from the set called True Friends Vintage Labels Four.  Underneath the gate I layered Spellbinders™ Classic Ovals SM to give the panel some stability and also to frame the final oval I put on top of the design with my sentiment.  The card is 5.5″ wide by 4.25″ tall.
WRBF-3816-2013

Sweet flowers and some silk ribbon cover some of the behind the scenes goings on, like the join from the two gates.  A girls gotta do, what a girls gotta do…

SUPPLIES I USED
Stamps: JustRite Papercrafts – , True Friends Vintage Labels Four
Paper: Neenah Classic Crest -Solar White – 80lb Smooth, Prima Tea-Thyme
Ink:  Versafine Onyx Black
Accessories: , Spellbinders™ Classic Ovals SM, Spellbinders™ Gilded Gate Two Spellbinders™ Grand Labels Twenty ThreeMay Arts Silk Ribbon, Recollections Pearls, Becca’s Bow Maker

Have a request for a die template you would like to see how I might use?  Tweet me!  I’m @AmazingPaperGr on Twitter.  I’ll add it to my list and see what I can come up with.

pinTHIS SHAREthis TWEETTHIS EMAILthis
  • MaryannApril 27, 2013 - 11:16 am

    This is absolutely gorgeous Becca. Sue did something simular with this die on her show on Create and Craft here earlier this month and it looks awesome. I love your beautiful ribbon too and your bows are fabulous as always hun.
    Have a great week-end hun and lots of fun.ReplyCancel

  • Anne (UK)April 27, 2013 - 11:45 am

    Hi Becca
    Hope things are cooling down for you on all fronts now!
    Love your use of the gate. The card is so beautiful.
    Hugs
    Anne (UK) xReplyCancel

  • Diann SApril 27, 2013 - 11:47 am

    Love this card. In reading the instructions, I am not sure how you put the 2 gates together. Could a possible video be made to show us how you did that, and the rest of the card? ???ReplyCancel

  • Nancy LorenzApril 27, 2013 - 11:51 am

    Becca, how Lovely. . . Both the use of the gate and the saying! You always amaze me with your use of stamps, dies and empherma. I have ot seen cards lovelier than yours.ReplyCancel

  • Nancy LorenzApril 27, 2013 - 11:53 am

    I meant to say I have NOT seen cards lovelier than yours! Oh my. . SorryReplyCancel

  • Marilyn ClarkApril 27, 2013 - 11:59 am

    Your cards are amazing!ReplyCancel

  • Lynn G.April 27, 2013 - 12:02 pm

    I know I’ve said this before; but, Your cards and projects belong in an art gallery. Just stunning!ReplyCancel

  • Lynne IbergApril 27, 2013 - 12:14 pm

    I just adore this Becca, looks like I need the Gilded Gate die! Beautiful card, love the colors, appreciate all the work that goes into your creations. You are amazing in so many ways!!ReplyCancel

  • JoAnn B.April 27, 2013 - 12:17 pm

    Wow Becca, this is so gorgeous. Love the Gilded Gate and the pretty colors of your card. Thanks for sharing.ReplyCancel

  • TerriApril 27, 2013 - 12:36 pm

    So elegant! Love that Spellbinder double gate die.

    Ter ;)ReplyCancel

  • Becky GreenApril 27, 2013 - 12:39 pm

    TOTALLY LOVELY BECCA!!!!!!!!!!!!! :) I’m sure the requester IS HAPPY with this!!!!!!!! :)ReplyCancel

  • Lois KennedyApril 27, 2013 - 12:54 pm

    I love this new die from Spellbinders and what you did with it. What is the finished size of this card?ReplyCancel

  • Marilyn in E-TownApril 27, 2013 - 12:58 pm

    Beautiful card! Love the paper, gate, saying, pearls, oh gee the whole card! Once again you have created a master piece!ReplyCancel

  • Paper ProfusionApril 27, 2013 - 1:02 pm

    Beautiful work Becca, Nicola xReplyCancel

  • Jo AnnaApril 27, 2013 - 1:06 pm

    Awesome card as always; you truly inspire me with your creations. Thanks for sharing.ReplyCancel

  • GloriaApril 27, 2013 - 1:11 pm

    Absolutely breath taking—the gate one BUT then again ALL your cards are

    absolutely gorgeous!!! Love all of them!!!ReplyCancel

  • EveleneApril 27, 2013 - 1:26 pm

    So stunning!! This card absolutely beggars description. Your artistic brilliance always amazes me, Becca.ReplyCancel

  • Lynne IngramApril 27, 2013 - 1:31 pm

    Beautifully done, love the gate.ReplyCancel

  • AmandaApril 27, 2013 - 1:34 pm

    Oh Becca this card is beautiful, I have been thinking about getting this gate die but wanted to make good use of it as I cannot afford many dies so the ones I buy I need to get good use out of but could not think what cards I could make from it and this project has given me such inspiration, thank you so much xxxReplyCancel

  • ChelseaApril 27, 2013 - 1:42 pm

    Great. Now I have to get that die. That card is sooooo beautiful!!! Thank you so much for the gorgeous inspiration, Becca.ReplyCancel

  • kathy/NorthCarolinaApril 27, 2013 - 1:44 pm

    Becca, this card is exquisite…one of my all time faves. I love the way you used the gate die…so clever…and the perfect backdrop for that sentiment!ReplyCancel

  • Trish VernerApril 27, 2013 - 2:04 pm

    Hi Becca,
    This card is so beautiful, I love it lots. TFS
    Hugs,
    Trish xReplyCancel

  • Rebekka KApril 27, 2013 - 2:08 pm

    wow, what an awesome idea, this is gorgeous Becca.ReplyCancel

  • Patricia HowarthApril 27, 2013 - 2:23 pm

    Hi Becca, I love, love, love, how you have used the Gilded Gate 2, it looks totally different like this, a brilliant idea, and such a pretty and beautiful card.
    Lots of love from Patricia xxReplyCancel

  • LageneApril 27, 2013 - 3:00 pm

    Another Gorgeous card, I love your style!ReplyCancel

  • JOYCE M ANDERSONApril 27, 2013 - 3:29 pm

    Sooooo BEAUTIFUL…Perfect, again!
    Thank you for this wonderful idea to use the Gate and also this
    tender Sentiment.
    Pray God’s Blessing on you at this time, stay healthy, breathe in & out!
    JoyceReplyCancel

  • Francie in MontrealApril 27, 2013 - 3:52 pm

    This is just gorgeous! Leave it to you to come up with a novel and lovely use for a die. Nicely done!ReplyCancel

  • Trish AveryApril 27, 2013 - 3:59 pm

    Becca love this thank you, we often buy dies and use them once or twice. But its always lovely to see how you use them.
    Thank you.
    Hugs Trish.ReplyCancel

  • MelanieApril 27, 2013 - 4:03 pm

    Beautiful card Becca I have no1 gate no the new one so I may try this thanks for the card .MelanieReplyCancel

  • LisaApril 27, 2013 - 5:44 pm

    I often look at other creative cards but yours fill my need every time. The simplistic elegance is unmatched. Btw what die cutting machine do you use? I find the one I’m using is taking a beating especially when I use the more intricate dies.ReplyCancel

  • FMApril 27, 2013 - 6:29 pm

    As always, just love your interpretation!!!!!ReplyCancel

  • conniecrafterApril 27, 2013 - 6:36 pm

    neat use of the gate, such a pretty idea!ReplyCancel

  • TheresaApril 27, 2013 - 6:49 pm

    Another gorgeous card!!! I really must get that stamp set.ReplyCancel

  • CynthiaApril 27, 2013 - 7:39 pm

    Exquisite! Blessings, Becca!ReplyCancel

  • Rosy NewlunApril 27, 2013 - 7:58 pm

    Amazing. Wish I could think like you ?ReplyCancel

  • Becca FeekenApril 27, 2013 - 8:04 pm

    Lisa, I use several machines depending on what I’m working on and how much cutting I have to do, but hands down the Grand Calibur is my go-to machine :-)ReplyCancel

  • Juanita BraunApril 27, 2013 - 8:59 pm

    As always your card is beautiful. Can you show more cards using this die?ReplyCancel

  • Mary H.April 27, 2013 - 9:52 pm

    Oh WOW! I wouldn’t have had a clue as to how to use this S/B gate either. Whadda way to use it. Ab-so-lute-ly bee-U-ti-ful. TFS & Happy SundayReplyCancel

  • Alice GrahamApril 28, 2013 - 12:18 am

    Wow, great use of this die, I just love how you think outside the box! I have the first gate tho I do think this one is prettier but I will definitely try this idea. I have cut mine up and used bits of it at times but hadn’t thought of this!

    Thanks Becca.

    Hugs
    Alice xReplyCancel

  • loftylassApril 28, 2013 - 4:08 am

    Nice one Becca – I made a wedding card last week with this die – it’s so beautiful and cuts a dream. I like how you joined two together. tfs
    Hugs
    Heather (UK)
    xReplyCancel

  • colleen howellApril 28, 2013 - 7:08 am

    Love it, so pretty and I like the two pieces together it gives such a big presence in the card but yet not over the top.ReplyCancel

  • Debbie BApril 28, 2013 - 7:31 am

    Oh Becca, the card is beautiful. I would not have thought to use the gate in that way.ReplyCancel

  • Dolly LaBelleApril 28, 2013 - 9:35 am

    This is a lovely idea. Perfect paper too. Thank you for sharing!ReplyCancel

  • Robin in WAApril 28, 2013 - 11:22 am

    Stunning Becca!!! Thank you soooo much for sharing your gift of design!!ReplyCancel

  • AnjelikaApril 28, 2013 - 12:05 pm

    You are an absolute genius! Thanks so much for sharing.This is just stunning.ReplyCancel

  • Jo Anna GrimsleyApril 28, 2013 - 12:33 pm

    Beautiful card, Becca. I think you have shared this before, but “I just don’t get it……lol” How do you make your shaped cards using the spellbinder dies. I understand when you don’t put the cs all the way at the top of the die, so you have an uncut portion at the top. But, how did you make this card where it looks like you have the whole die cut out. Sorry to be thick about this! (I don’t use Twitter by the way or I would have asked you there.)ReplyCancel

  • Becca FeekenApril 28, 2013 - 1:51 pm

    Hi Joanna,
    Usually when I have a heavily filigreed die that I’m trying to make a card base from, it’s hard to cut two clean layers at once, so I use the technique shown in this video: https://www.amazingpapergrace.com/filigree-hinged-card-tutorial-and-a-giveaway/

    For the card above, it’s no problem to double my paper and cut through two layers cleanly for the card base. To give it yet a cleaner look, I die cut an additional Labels Twenty Three Layer and simply adhered it to the top of the card base.

    Hope this makes sense…. :-)ReplyCancel

  • EllenApril 29, 2013 - 12:15 am

    stunning creation!ReplyCancel

  • SusanApril 29, 2013 - 5:54 pm

    Wow — this die is beautiful and your card is uber gorgeous!ReplyCancel

  • LoriApril 30, 2013 - 8:00 am

    You’re a genius. Love It!!!ReplyCancel

  • LisaMay 1, 2013 - 10:26 pm

    Thanks Becca for responding to my question. Probably going to need to invest in another die cutting machine!! Love working w/ the dies even if it takes extra time to remove the little pieces. Please design some more cool ones!ReplyCancel

I N F O