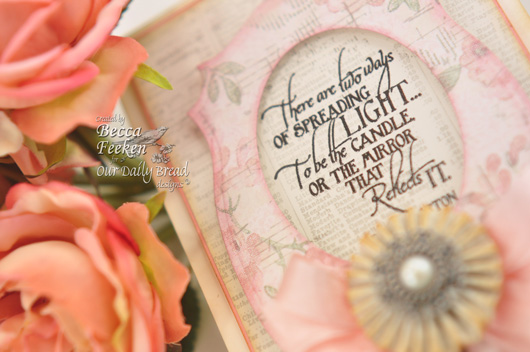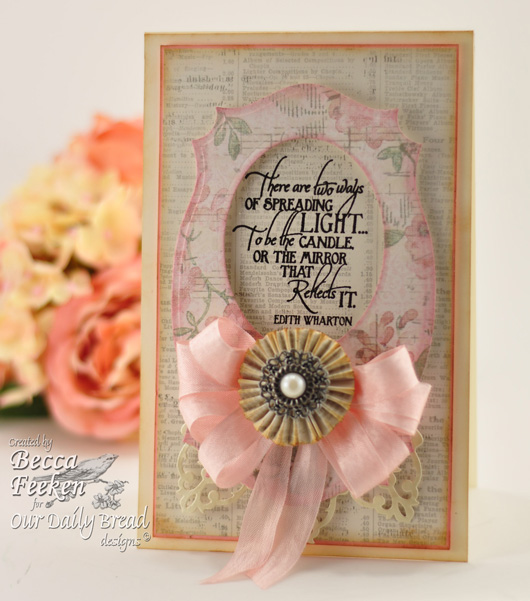
Hello there blog friends!! I’m not blogging from home today — I had every intention of getting this up earlier today but as luck would have it, I don’t have good internet availability today. No worries, I’ve had this card done for a day or two and wanted to get it up. Short and sweet, my inspiration was that I wanted to take Spellbinders™ Labels Twenty Five and make it into a frame with an offset oval. All went as planned except I had to flip my working sketch, that happens some times – I’ll try it the other way around another time :-).

Using Spellbinders™ Labels Twenty Five and Spellbinders™ Classic Ovals LG, I determined where I wanted to offset my frame opening and cut then smudged the edges with Victorian Velvet Distress Ink . On the bottom of my shape I added three elements cut from Spellbinders™ Damask Accents and flared them before gluing. Using a sentiment from Our Daily Bread Designs called Spread Light, I stamped and embossed on the main panel then distressed edges with Brushed Corduroy Distress ink and attached it to my card base. This is a five wrap bow made on the Peg Bow Maker – just like a double or triple wrap but I wanted lots of loops so I boosted it up to five. For my final accent I accordian folded a 1″ x 12″ piece of cardstock, glued it down on a punched circle then added the filigree and pearl on top. This is another easy one that I’ll add to my “get a card done quick list” – in fact I have two variations on this that I’ll share in the coming month.

SUPPLIES I USED
StampsOur Daily Bread DesignsSpread Light
Paper: Die Cuts With a View, Coredinations, Neenah Classic Crest Cream
Ink: Versafine – Onyx Black, Distress Inks – Victorian Velvet, Brushed Corduroy
Accessories:  Spellbinders™ Labels Twenty Five, Spellbinders™ Classic Ovals LG,  Spellbinders™ Damask Accents, Spare Parts Pearl Brad, Seam Binding
Additional Ideas:  Our Daily Bread Designs GallerySpellbinders Blog

Thanks for stopping by, see you soon!!

pinTHIS SHAREthis TWEETTHIS EMAILthis
  • FrancineMarch 24, 2012 - 5:22 pm

    Short and so sweet…with a beautiful détail . I love the rosette. It is perfectly executed.
    Have a good time where you are.
    FrancineReplyCancel

  • YvonneMarch 24, 2012 - 5:24 pm

    This card has made me gasp again. It’s beautiful! Everything you do is gorgeous and so inspirational. Thanks so much for sharing your work.ReplyCancel

  • Becky GreenMarch 24, 2012 - 5:31 pm

    LOVELY Becca!!!!!!!!!!!! :)ReplyCancel

  • Nan GMarch 24, 2012 - 5:34 pm

    Gasp! So beautiful and soft! Cool idea to create an offset frame. I like it! I feel a ‘cased card’ coming on. LoLReplyCancel

  • Nadine IllingworthMarch 24, 2012 - 5:45 pm

    Fantastic spring colours and is that orange round the edge, looks great. Going to have to work on my bows never quite look as good as yours. Loving labels 25 use it for the shape of my cards. Finishing touches are perfect.ReplyCancel

  • Gail L.March 24, 2012 - 5:52 pm

    Just beautiful!ReplyCancel

  • Dianne CMarch 24, 2012 - 5:54 pm

    Very soft but elegant. DianneReplyCancel

  • BernieMarch 24, 2012 - 5:54 pm

    Another fabulous card! It’s beautiful! What a great idea to create an offset frame! Such a simple idea yet I’d never have thought of it. Thanks for the inspiration. I do hope where ever you are you are having a wonderful time and you’re enjoying yourself.
    Blessings BernieReplyCancel

  • Yvonne WeberMarch 24, 2012 - 5:55 pm

    Love the card. Simple but elegant.ReplyCancel

  • SuziMarch 24, 2012 - 5:58 pm

    It is so elegant! Quick? Maybe for the hand of the master cardmaker! :o)ReplyCancel

  • MarilynMarch 24, 2012 - 5:59 pm

    Beautiful card, beautiful sentiment!ReplyCancel

  • mayMarch 24, 2012 - 5:59 pm

    Sooooooooo Beautiful
    your card’s are truly amazing !! can’t wait for next oneReplyCancel

  • Gloria WestermanMarch 24, 2012 - 6:01 pm

    Beautiful card and beautiful sentiment….tfsReplyCancel

  • Francie (Montreal)March 24, 2012 - 6:08 pm

    What a fabulous card! From the sentiment (a Francie favourite) to the colours, to the wonderful ribbbon to the lovely frame, they are all amoungst my favourite things. You continue to leave me in awe.ReplyCancel

  • ColleenB.March 24, 2012 - 6:21 pm

    Beautiful sentiment and card
    ColleenB.ReplyCancel

  • DeniceMarch 24, 2012 - 6:32 pm

    I haven’t written in a while. My mom was diagnosed with cancer and I was going back and forth from my home to my parents home, about ( 140 mile round trip ) since the 8th of Feb. She passed away the begining of March and now I am trying to play catch up with all that I had to leave undone. I finally got around to opening my Amazing Paper Grace e-mails and how nice it was to enjoy such beautiful inspiration. Thank you Becca for sharing the sunshine you share. God bless ……. DeniceReplyCancel

  • Ann robbinsMarch 24, 2012 - 8:49 pm

    Love everything about this card! Truly amazing ~ everyone is different in its own way. I have a friend who makes very pretty cards but for some reason they all seem to look alike. Each one of your has its own diversiveness. (sp) I look forward to everyday and what you will have created. I only wish I had all the dies you have. TFS!!
    Mstgane
    AnnReplyCancel

  • janeyMarch 24, 2012 - 9:11 pm

    I love the subtleness of this card….so guietly beautiful. I received your bow maker weeks ago and I have not had time to play with it…..3 more weeks of tax season and I will be making bows, bows, bows!!

    thanks, Becca

    hugsReplyCancel

  • RebekkaMarch 24, 2012 - 9:19 pm

    This is a beautiful design Becca, love the colors.ReplyCancel

  • Claire SMarch 24, 2012 - 10:20 pm

    Do you CREATE in your DREAMS???. Your designs continue to be extraordinary and flawless. LOVE ALL of them! Thanks for sharing your passion.
    Creative Wishes,
    Claire S.
    ReplyCancel

  • JoannMarch 24, 2012 - 10:44 pm

    Becca this is yet another beautiful card! I love your five loop bow!!! So pretty!ReplyCancel

  • Ursula UphofMarch 24, 2012 - 11:08 pm

    Really like how you did the frame. Totally beautifulReplyCancel

  • ChelseaMarch 24, 2012 - 11:14 pm

    This is very different. I love it! There are so many good ideas at play here. Thank you for such beautiful inspiration.ReplyCancel

  • Lindyloo, South Wales, UKMarch 24, 2012 - 11:43 pm

    Hi Becca,
    Hope you get your internet working better soon.
    A really delicate and feminine card today. I really love the softness of all the papers and colours you have used; it’s the type of card I really love.
    Hope you have a good sunday. All the best LindaReplyCancel

  • Lori AMarch 25, 2012 - 1:31 am

    Gorgeous!!! Thanks for the inspiration…LOVE it :)ReplyCancel

  • MaryannMarch 25, 2012 - 3:37 am

    Just as gorgeous as always Becca. Your work is always so perfect no matter how you turn it around and this loks amazing. I love it sweet friend.ReplyCancel

  • Anne DaviesMarch 25, 2012 - 4:12 am

    Love the way you have off-set the oval. A very pretty card with gorgeous papers and rosette. Welsh AnnieReplyCancel

  • Christine Harrop, Oxfordshire, UKMarch 25, 2012 - 5:06 am

    This is so lovely. I have been making some wall hanging frames lately using various quotes, and this would tie in just beautifully.ReplyCancel

  • AnneMarch 25, 2012 - 5:51 am

    Beautiful card. You have such an amazing eye for color and mixing of colors. The label/oval makes such an eye appealing frame. TFS. Have a blessed Sunday.ReplyCancel

  • conniecrafterMarch 25, 2012 - 6:35 am

    so soft and beautiful, love the paper framing the great quote!ReplyCancel

  • Anne McIntoshMarch 25, 2012 - 7:20 am

    Another beauty from Becca! This is one I could manage with a minimum of frustration. Your layered cards are always beautiful, but when I try them at home, they always look overdone and messy. I guess I just haven’t gotten the knack yet (I’ll keep trying, though!). I have a birthday card to make for my niece today, so I’ll be CASEing later. I’ll let you know how it turns out. Have a blessed Sunday!ReplyCancel

  • JessicaMarch 25, 2012 - 9:26 am

    Beautiful as always Becca. Thanks for sharing your lovely talents with us
    Hugs,JessReplyCancel

  • TheresaMarch 25, 2012 - 2:00 pm

    As always another lovely card with an amazing saying on the front. Thank you.ReplyCancel

  • eveleneMarch 25, 2012 - 4:09 pm

    Another amazing mark of brilliance–the nice combination of dp’s, the medallion over the ribbon, just wonderful, Becca.ReplyCancel

  • Jean CMarch 26, 2012 - 9:51 am

    Love your card. Thanks for sharing.ReplyCancel

  • Barb GhigliottyMarch 27, 2012 - 12:48 pm

    Another GORGEOUS card, Becca! Thank you so much for sharing your amazing talents with us ~ HUGS to you!!!ReplyCancel

  • Colleen HornerMarch 31, 2012 - 2:54 pm

    Becca
    My husband did make me a peg bow maker from your first post as he is a woodworker as your husband was. He has built fixtures for my craft room. Pictures of it are posted on SCS. I am a person long on age and short on memory, so I refer to your tutorial again and again. Now they are gone so I would like to have the DVD that you sell with your bow maker if I may. Please tell me how to purchase it.

    Colleen HornerReplyCancel

  • Carol loveApril 1, 2012 - 12:57 am

    The consistent mastery of your cards is amazing.It would help me a great deal if you would always state the size of each card posted.
    Thank you, I follow your blog every day.

    Carol LoveReplyCancel

Working quietly behind the scenes, I know I haven’t weighed in for many days, but I’m cre8ting!! :-)  So often when we have a bad experience we want to rush out and tell the world and I know sometimes I like having a good rant myself.  But . . .  I’m just as happy when I can tell a good story or something that was sooooo surprisingly good so I wanted to leave you with this little tidbit today. 
 

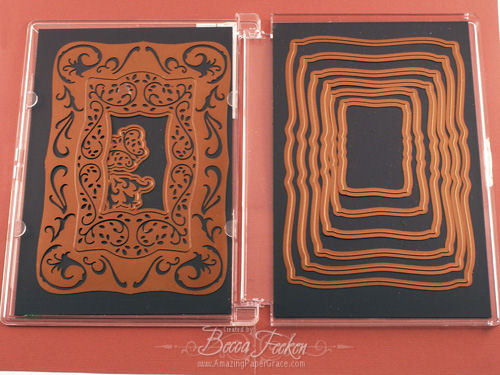
My craft room is a wreck, honestly it is not fit for human viewing and I’m vowing the big renovation.  One of my organization tips found HERE are an awesome set of clear DVD cases that I use to hold my Spellbinders and rubber stamps – see picture above.  I’ve been doing the happy dance over these for years and just when things couldn’t get any better, I get to do a happy dance on top of that happy dance.  I went to order these cases from a regular vendor day before yesterday and decided I’d rather call the company to order them rather than use my credit card on line (I’m a stickler about encryption).  They are in a different time zone than me, so yesterday I missed them.  Drats!!  I got online and did a little bit of research – all that ever seems to come up is Amazon and I didn’t want that either.  Lo and behold up pops the name TapeOnline.  I’ve never heard of them but the price on these DVD’s is half of what they cost with the regular vendor and the shipping was 1\3 of the cost of what I had paid for previous orders.  And get this…I ordered them at 6:00pm last night and my mouth dropped open when the Fed ex man knocked on my door a bit ago.  They’re already here – less than 20 hours later.  Happy, happy dance, right?!!?!

The regular vendor I used before had never let me down so I certainly don’t want to bad mouth them, but I sure do want to good mouth TapeOnline.  I’ll be changing the link on my tutorial to point to them since I’ve ordered from them and received such good service.  Now excuse me while I happy dance my way back to the studio to put up my new DVD cases.  If you look at the organizational tip I did back in 2009 you’ll see I use these for cling stamps too – a word of advice – if you do that please put your stamps on a clear liner sheet so that the stamps don’t react with the acrylic.  Here are the links:  (These are sold as you see in the picture above (without an inner tray).  In the past I removed the tray and threw it away – now with this vendor I get a better price as they offer them without the inner tray!!

Tape Online               Super Jewel King Box Size One/Two Jewel Box

I have a new card for tomorrow so I’ll see you then!!

pinTHIS SHAREthis TWEETTHIS EMAILthis
  • Angie CrockettMarch 23, 2012 - 5:03 pm

    Thanks so much for the info, Becca!!!! This is fantastic news! DH will be thrilled to hear this as well! Blessings, AngieReplyCancel

  • Kelly LittleMarch 23, 2012 - 5:11 pm

    Becca,

    I am happy dancing with ya, girl!! :) I have been looking for something better than my CD cases for these, as they just don’t seem to be staying put, and I am getting bigger ones than I originally started out with the circles and ovals – thus needing bigger cases. I too am trying to re-organize my craft room and don’t want to show anyone until it is finished :)ReplyCancel

  • Sandy MMarch 23, 2012 - 5:12 pm

    Thanks for the link to the larger size DVD Jewel cases. I have used the square ones for a while to store dies and stamps but some of the larger dies won’t fit. The new size may fit some of the longer stamps sets too. I hate cutting them in half in order to get them to fit in the square box.ReplyCancel

  • Shelly SchmidtMarch 23, 2012 - 5:12 pm

    Thanks for this info- I need to do some organizing- and these will come in very handy- and I just ordered mine : )ReplyCancel

  • Edna BurgessMarch 23, 2012 - 5:19 pm

    That is exciting news, but I looked on line and there are so many choices. What are the numbers you used to order this item? Would like to know. Love the idea. Thanks for sharing and good luck with your room. Mine needs help also, but can’t do anything until I have a scrapbook done for graduation in June. EdnaReplyCancel

  • Chris R.March 23, 2012 - 5:19 pm

    Wow! This is great. Thanks so much for the link.
    What kind of clear liner sheets do you use?ReplyCancel

  • Lynda JoyMarch 23, 2012 - 5:20 pm

    Thanks, Becca. I’m definitely going to try these. Do they fit the larger dies?ReplyCancel

  • terriavidreaderMarch 23, 2012 - 5:25 pm

    What do you mean when you say use a clear liner sheet (?) and that they may react with the acrylic?ReplyCancel

  • Rita KernMarch 23, 2012 - 5:37 pm

    Also doing the happy dance with you! That is also one of my goals for this year.

    I did want to mention, I had seen a similar storage hint from a different blog that I wanted to mention how she stores her metal Nestabilities. She buys a large magnetic sheet and cuts to fit in these and it holds the Nestabilites really secure so no movement or tape needed.

    Yes, I wondered about the clear liner sheet also?

    Thanks for the tip!ReplyCancel

  • Dottie DavisMarch 23, 2012 - 5:39 pm

    I am so thrilled to open up your blog to find a good die and stamp storage solution. So thrilled that I just placed a nice sized order. Now to see it at my door will have me dancin’! How do you sore your inks and reinkers? I have one revolving clear plastic storage rack for stacks of ink pads, but it is not big enough for all of what I have. Another thing is all the wood mounted stamps that I just love that I need help finding a home for. Any suggestions?
    Thanks for sharing with us your new find!ReplyCancel

  • LisaGregoryMarch 23, 2012 - 5:46 pm

    Well add another to the happy dance list. Thank You so much for the awesome link!!! I just completed a big order as well!!ReplyCancel

  • FrancineMarch 23, 2012 - 5:46 pm

    At the price spellbinder sells their products we would expect that they package them in a containers that we could re-use.
    That will be more environmenttally responsible.This way each of us we wouldn’t have to look for an adequate container.
    Merci anyway Becca for the useful link.

    FrancineReplyCancel

  • Lynda MarquezMarch 23, 2012 - 5:51 pm

    Becca, I am doing the happy dance with you…thanks for letting us in on the scoop! I just ordered some too!ReplyCancel

  • Teresa GrayMarch 23, 2012 - 5:52 pm

    I found them a few months ago. I love the cases and love your idea with the spellbinders. I have mine on magnets but the box there in is so heavy now I was think I might need to change something. They are fast not less then 20 hours fast for me but still fast.ReplyCancel

  • chaunMarch 23, 2012 - 6:12 pm

    These look cool! Do the Spellbinders rectangles fit in these? I’d been using CD cases, but the elongated rectangles, or whatever they’re called, don’t fit in those CD cases. Thanks!
    Since then, I’ve just been leaving them in the clear plastic packaging they come in. Is there a problem with that?ReplyCancel

  • chaunMarch 23, 2012 - 6:14 pm

    I forgot to ask: Is that dark thing in the case, behind the Spellbinders a magnetic sheet?ReplyCancel

  • HettieMarch 23, 2012 - 6:21 pm

    Thank you! Thank you! Thank you!ReplyCancel

  • Pattie Jns.March 23, 2012 - 6:25 pm

    fantastic, !!!!!!I have been hoping for something like this. and the price is good too. One question what did you line them with. felt? or magnetic sheets?Thanks Becca, your supper. ……have a good.ReplyCancel

  • NancyMarch 23, 2012 - 6:39 pm

    What a great idea—have just ordered some cases
    when you refer to the liner, do you mean the plastic sheet the clear stamps come on
    thanks for the tipReplyCancel

  • Becky GreenMarch 23, 2012 - 6:42 pm

    VERY NICE Becca!!!!!!!!!!!!!!!!!!!! I know EXACTLY what you mean about getting things CHEAPER than expected!!!!!!!!! It makes me do the happy dance too! :) WHAT A FIND!!!!!!!!!! :) I AGREE with Francine, You’d THINK that Spellbinders would place their dies in a case we could use for storage with their prices!ReplyCancel

  • NancyJBMarch 23, 2012 - 7:01 pm

    I have been buying the cases from the vendor that you had told us about. I just happened to be looking at a Blog 2 evenings ago and saw TapeonLine talked about. I did not need any at this time but when I checked them out I was so excited to see the prices that I went ahead and ordered 20 more to have on hand. Guess that means I will have to fill them now :-) Mine are on the way and should be here soon. Thanks for sharing with everyone. In this economy we need to help wherever we can.ReplyCancel

  • NancyJBMarch 23, 2012 - 7:07 pm

    BTW, I have all my dies in the cases. I buy the magnetic sheets at Wal-Mart that come 2/pkg. in the children’s crafts section. They are just a little bit larger than the cases so I cut them down. They have sheets that peel off the back and adhesive that sticks just great. (Noticed there were some questions about that.)ReplyCancel

  • FernandaMarch 23, 2012 - 7:10 pm

    Thanks so much for sharing. I need to order these ASAP!!! ? For weeks I was wondering how to store my Spellbinders – now thanks to you (and the deal) I’m running to order these babies! I’m doing the happpy dance too.ReplyCancel

  • Charlene DahlbergMarch 23, 2012 - 7:11 pm

    Wow – this is just awesome – too late today to order but I sure will as soon as they open .Gee wonder if they are open on Saturday. Do you use a magnetic sheet to hold your nesties in place?and if so, can you recommend a vendor to purchase larger rolls than I can get at Michaels.I have a LOT of nesties to organize
    See what you have started?? they are going to be very, very busy. thanks so much BeccaReplyCancel

  • LizMarch 23, 2012 - 7:41 pm

    Interesting! Wish I had seen these long time ago. I use the Spellbinders books. Thank goodness Spellbinders is finally making the inserts again. Sadly though, some of my larger labels don’t fit in those slots. I finally went to ProBass and bought fishing lure books and inserts which was so much cheaper. After purchasing ten Spellbinders books and all the inserts, I’d had to find another method.ReplyCancel

  • Harriet ClarkMarch 23, 2012 - 7:53 pm

    Thank you so much, Becca! This company needs to give you some free goodies because I’ll bet lots of folks will be ordering these. I just did, and put “Becca Feeken of Amazing Paper Grace” where it asked for the name of the person who referred me. These will be so much better than the CD cases I’m currently using to store my dies. Those often break at the hinges, so most are held together with a rubber band. I use magnetic sheets, cut from much larger sheets (8″ x 15″) called “Magnetic Vent Covers” from my local Ace Hardware store. They come three big sheets per package, and they aren’t expensive. Can’t remember the exact price, but they work great! I use Scor-tape (Sookwang tape) to adhere the magnetic sheets to the CD case.
    Thanks so much for yet another wonderful “share!”ReplyCancel

  • Kay QuintonMarch 23, 2012 - 8:02 pm

    well I am a little thick so would you give me a better hint about the product, I went to the website but couldn’t figure out which one you ordered. How about a product number?ReplyCancel

  • Lindyloo, South Wales, UKMarch 23, 2012 - 8:09 pm

    Hi Becca,
    you’re right, it is so nice to write about something that is good and especially when it is not just good but cheaper; that is a definite plus! This is a lovely idea and if I could have found these in the UK before, I would probably have used this myself.
    I store all my dies on magnetic sheets in plastic cd pockets. These each have a card backing with labelled tabs and stand in an open card cd box. They are easy to find and easy to take in and out. All my edgeabilities and Grand dies are kept on A4 magnetic sheets in plastic protectors in suspension files in a filing cabinet, under my desk, next to where I sit. I also keep my inking craft sheets, tissue paper, pieces of felt, chipboard etc in the same way so that everything I want for my diecutting is always close at hand.
    Have a wonderful weekend Hugs LindaReplyCancel

  • TammieMarch 23, 2012 - 8:13 pm

    I just ordered 100! Hope you get a commission! Hugs, TammieReplyCancel

  • Debrah ScottMarch 23, 2012 - 9:20 pm

    Thank you, Becca. I’ve been considering these, and now I know where to buy them. What do you use for the clear liner sheet?ReplyCancel

  • Allison PhillipsMarch 23, 2012 - 9:48 pm

    Hi Becca,
    I just joined in – in the happy dance.
    Thanks for the tip. I just completed
    my order.
    Bye for nowReplyCancel

  • TerriMarch 23, 2012 - 9:55 pm

    Thank you Becca. I hope they can deliver this product to Canada. It mentions somethings can’t be shipped outside of US. As for the magnetic sheets, I buy mine from the $Rama and cut them down.

    Ter ;)ReplyCancel

  • LindaMarch 23, 2012 - 10:07 pm

    Thanks so much for the great tip, will be ordering soon. Two questions for you Becca or anyone:

    1. Where do you purchase the liner sheets, as I have thrown out the packaging when I put my clear stamps in CD boxes, and need to get them off the acrylic. I notice some have begun to “etch” into the plastic of the CD box?

    2. Are these DVD cases thick enough to hold cling mounted stamps, on both sides and still close?

    Thanks again!ReplyCancel

  • DebiMarch 23, 2012 - 10:13 pm

    What is and what type of ” clear liner sheet ” do you suggest for the cling mounted stamps on these cases?ReplyCancel

  • Stella DMarch 23, 2012 - 10:17 pm

    Hi Becca, Thank you so much for sharing this vendor with us. What do you use as the “clear liner sheet” and where do you get them, please? I have lots of “unmounted” stamps that did not come as sets therefore no clear liner sheets.
    Thank you!!!!!ReplyCancel

  • ashMarch 23, 2012 - 10:39 pm

    I get soooo jealous when I read about things like this. I’ve tried buying these in Toronto and they’re unavailable. My supplier has had her eye out for them since your last post, I believe it was in 2009 and still nothing. Guess I could always order from the States but by the time you consider the duty and will they all arrive in tack it really doesn’t seem worth the hassle. I’m a believer in Good things come to those who wait and I’m quite willing to wait. In the mean time I’ll continue to recycle my ugly plastic DVD cases. …..ashReplyCancel

  • Diana E. BishopMarch 23, 2012 - 11:11 pm

    Well I just ordered some also and I am sure they will be running out of these if this keeps up. Fantastic idea Becca and can’t thank you enough for it. I too, am trying to re-organize my shop and hopefully this will be a great help. With all the orders….YES, you should get a comission!
    Blessings !ReplyCancel

  • Joyce M. AndersonMarch 23, 2012 - 11:20 pm

    WOW—so glad to hear from you – -was very concerned so, I prayed
    for you.
    Thanks so much for the Info above…will send for some immediately.

    God blessReplyCancel

  • Ellen - CardMonkeyMarch 23, 2012 - 11:59 pm

    I too ordered and probably ordered too few (only 36) but I figured I’d give it a go, because it’s just not working for me to store my Spellbinders in their original packaging. One friend of mine bought a huge magnetic write-on wipe off board and she has all of her Spellbinders on there, on display for easy access. Another has all of hers in sheet protectors that have magnetic sheets in them, and that can be terribly expensive — and heavy! So I’ll give this a try. Always looking for neater ways to store the things I invest in so heavily!!

    Fondly Ellen CardMonkeyReplyCancel

  • Karol hallMarch 24, 2012 - 12:03 am

    Thank you Becca. I had ordered some from your last vender and quickly used them up. I am ordering more from this new vendor. Thank you so much for the tip.ReplyCancel

  • cynthia beynonMarch 24, 2012 - 12:54 am

    BECCA I WENT TO TAPE ONLINE BUT FOUND THEY WERE ONLY
    SOLD IN LOTS OF 200. DID I LOOK AT THE WRONG ITEM

    CYNTHIAReplyCancel

  • VickiMarch 24, 2012 - 2:42 am

    Thanks Becca. I have been looking for these without the insert. Was getting SU cases. They are nice buy pricey. I also buy my magnetic sheets at Lowes. Dryer vent covers and the are inexpensive. I will use for Clear stamps and Large Spellbinders as you have.ReplyCancel

  • GerryMarch 24, 2012 - 3:18 am

    I will certainly look into this vendor. Thanks. I have my Nestabilities in Scraprack 6 up and 4 up 12 x 12 pocket sheets and stored in a 12 x 12 scrapbook. I purchased magnetic sheets from widgetsupply.com which were cheaper than Michaels or JoAnns. I will check at my local Ace Hardware for the vent covers. Where do you get your magnetic sheets?ReplyCancel

  • Mary Ann TMarch 24, 2012 - 6:34 am

    It’s always amazing to me how things work. I’ve been looking for larger boxes for my clear stamps as one of my fave stamp companies has changed the sizing of their stamp sets. And here is exactly what I need. I clicked on your link and was able to order them at $0.88 a piece (for those of you having trouble, just click on Bekka’s link. Thanks so much for sharing.ReplyCancel

  • Kris TurnerMarch 24, 2012 - 6:48 am

    Thanks for the tip, Becca. I’ve placed my first order (they’ll probably in inundated!). It really helps to see how the items can be stored.ReplyCancel

  • Caryn S.March 24, 2012 - 7:08 am

    Becca I think God sent you as an answer to my worries! Seriously, last night I woke up in the middle of the night and could not go back to sleep because all I was thinking was what to do about my craft room (plus I am inheriting a HUGE amount of supplies from someone very generous and I don’t know where I am going to put them!). I’ve been trying to figure out what to do with the few SB dies I do own and lo and behold here is this post! So I placed my order today. I was concerned about what the shipping would be since they don’t tell you before hand but it was not bad. I also liked that you can order by the piece instead of in a lot like some places. I don’t need 100 of these at a time…YET!!ReplyCancel

  • KimkraftMarch 24, 2012 - 7:59 am

    These look fantastic! Thank you for the tip!

    For those not finding the actual product – click on the link Becca left below the second picture and paragraph. It’s the one on the right “Super Jewel King Box Size One/Two Jewel Box” That link will take you straight to the product instead of just the website.

    Becca – I too have my unmounted stamps in CD cases. Please expand upon the “clear liner sheet”. Most of mine were rubber samps on wood blocks that I “unmounted” to ease storage. I didn’t realize we shouldn’t put them directly onto the CD case.

    Thank you for your help! You are awesome!ReplyCancel

  • Marilyn NimmoMarch 24, 2012 - 8:47 am

    I love unexpected surprises like that. So glad you found them for a lower price and got great service to boot! Now, I need to get into my craft room and get it cleaned up…..ReplyCancel

  • StephMarch 24, 2012 - 8:50 am

    Thanks so much love them. I have one more question what do you store your even longer spellbinders in (meaning the borders that come in the accents or motif sets and the new insert set.ReplyCancel

  • LanaMarch 24, 2012 - 9:31 am

    Thanks so much Becca….just ordered 20!!!ReplyCancel

  • Lynn WildMarch 24, 2012 - 9:33 am

    I love a bargain – especially a crafty one! I’m pleased for you.

    I am very curious though, as I don’t recognise the die set on the left, although I have the others. Please can you put me out of my misery and tell us what they’re called?

    Reagrds, Lynn WildReplyCancel

  • GlendaPMarch 24, 2012 - 10:03 am

    I’ve also found that if I glue one of those magnetic business cards (that I receive in the mail) in the bottom of the box, the card is large enough to catch a part of each one of the dies. They work well.ReplyCancel

  • JeanneMarch 24, 2012 - 10:49 am

    Just ordered 29, but have abut 100 with the darn inserts that can’t be removed. Any suggestions?ReplyCancel

  • Brenda WolfingerMarch 24, 2012 - 11:38 am

    Thanks for the suggestion. I’m just starting to get into the embossing/spellbinder/diecut thing! A friend told me about cd/dvd cases. But then I have a couple of long dies and was wondering how I was going to store them. Thanks for all the links. I love all of your work. Also, where can you buy magnets sheets big enough to fit into the cases. I’ve just been using strips that you can get at Wal-Mart.ReplyCancel

  • DarCMarch 24, 2012 - 11:56 am

    I’m adding my thanks for the DVD case info. I have been storing my Quickutz/Lifestyle Crafts die cut alphas (even the Grands) in CD cases but these DVD cases will reduce the number I have to use for each set in the future. I’ll save a lot a shelf space. Yay!
    Hmm, maybe I didn’t order enough…?ReplyCancel

  • Linda wMarch 24, 2012 - 1:55 pm

    I have ordered my DVD cases from tapeonline as well. Excellent service and such a good price too. I definitely like that I don’t even have to remove the inside part of the case.

    gettin’ inky…ReplyCancel

  • dianeMarch 24, 2012 - 5:27 pm

    Thank You Becca , I am ordering alot of them, I might take the prize for messiest craft room LOL.
    DianeReplyCancel

  • CarolMarch 24, 2012 - 5:30 pm

    Thank, Becca, for the neat idea using the jewel case and the name of the vendor! Wonderful!!! CarolReplyCancel

  • VeldaMarch 24, 2012 - 6:14 pm

    To Brenda, re magetic stuff for cases. I buy magnetic heater duct covers and cut them to size. I can make a couple out of each for what I use now. Not sure how many you could get for these but it is a reasonable solution.ReplyCancel

  • Regina aka Mrs. HamMarch 24, 2012 - 6:53 pm

    Becca,
    Thank you so much for the link. I will be ordering from them ASAP.ReplyCancel

  • Patty GluckMarch 24, 2012 - 10:01 pm

    Becca
    What a great idea. I will have to order some for my spellbinders. What is the black in the case is it a magnetic sheet? Where do you find them? Thanks for your great idea. I also need to do some reorganizing!
    I just love all of your creations!
    PattyReplyCancel

  • Marcie SmithMarch 25, 2012 - 6:06 am

    I have adopted your method of storing Spellbinders in these cases and just can’t thank you enough for sharing this with us. I also use these cases for stamp sets and love them. Really saves room. I have to appologize thou, because I was doing alot of reorganization back in early December and needed to order more cases when I ran across this very company with these cases without the inserts. I thought I had mentioned it to you at that time because I was so excited on the price and how fast I got them. But I may have just had good intentions and just forgot due to the holidays and my major reorganization. I am glad that you found them anyway. I would also like to add that the most inexpensive magnetic material to line your cases with can be found at your local Home Depot or Lowes. They are magnetic vent covers by Frost King. They are 8″ X 15″ per sheet, and they come 3 to a pak for $4.47. Work great and very reasonable.
    MarcieReplyCancel

  • Barb P.March 25, 2012 - 10:34 am

    Thank you, thank you, Becca. I’ve been looking for something for my stamps – up here in my small Canadian town, it’s hard to find blank cds, and when I do, they are the thin kind with the insert. These will work so much better. Even with shipping to Canada, they will be worth it. Love all your creations – thanks for sharing them. Barb P.ReplyCancel

  • Barb WibelMarch 25, 2012 - 12:54 pm

    Becca, thank you for sharing!! I have been looking for DVD cases with removable liners. These are perfect for the larger Nesties and I’m sure I’ll find many other uses for them. I just ordered and will no doubt be ordering MANY more!ReplyCancel

  • Brenda WolfingerMarch 25, 2012 - 8:50 pm

    I finally took a look at these cases online and they are still not long enough to old Spellbinder Edgeabilities. They measure almost 21cm (8.25″) and the cases are only 19.9cm (7.75″) tall or am I measuring wrong. I’m looking for something to hold the longer dies. I have one of Tim Holtz’s dies and it measures 32.5cm or about 12.5″. If anyone has a solution as to how to store these longer dies let me know. Thanks.ReplyCancel

  • Linda BendorfMarch 26, 2012 - 12:04 am

    Hi Becca: I use a similar solution, but instead I use the jewel DVD cases that come in 5 colors. I get magnet tape from the local craft store and cut it to the length of the inside case and attach to one side of the case. I take the Spellbinder card that comes in the packaged dies and trim it to the length of the case and slip it in the clear front protective cover on the DVD so I have the picture, name, and label number for each die. I organize the number label dies in green cases, squares & rectagles dies in blue cases, tags & accents in red cases, cirles & ovals in purple cases, miscellanous shapes in orange cases so that they are easy to find. I then file them by color in a basket.ReplyCancel

  • Patti LongMarch 27, 2012 - 1:04 pm

    i have been looking for cases like the ones you use. I checked the site and so excited on the price . Now I will organize my spellbinders dies to I can see them.ReplyCancel

  • Gloria StengelMarch 27, 2012 - 10:09 pm

    Becca, where do you get your magnet sheets for inside the cases?ReplyCancel

  • J. JonesMarch 28, 2012 - 9:37 am

    Wow! I was floored by all the models of cases sold. Which model number are you using? Dying to see what kind of shelving you use for all the cases (I am rapidly outgrowing my shelf space.).ReplyCancel

  • BobbiMarch 29, 2012 - 7:30 pm

    Thanks so much for the tip. I ordered some to try, and they were perfect. Thanks again for sharing.ReplyCancel

  • DeniseMarch 30, 2012 - 7:05 pm

    I love this. Just ordered my own supply. I have used CD cases for my acrylic stamps and looked for the best idea for storing my spellbinders. Thanks so much for sharing.ReplyCancel

  • Nancy HandleyApril 3, 2012 - 6:16 pm

    Thank you so much for the info! I just placed my order for 20 and I’m itching to reorganize my clear stamps. Listed you as the referral – thanks again for sharing!ReplyCancel

  • JeanneApril 15, 2012 - 12:42 am

    Again, I need more info on the plastic sheet you said to use for the acrylic stampsReplyCancel

  • Cindy LouApril 18, 2012 - 10:26 pm

    Hey Becca! Thanks so much for the link, I have placed my order and am joining you in the Happy Dance! So glad to be able to get these without the extra inner tray that came with “the other vendor”, I tried so hard to figure out what I could do with that thing cause I hate to throw anything away lol. Now to await the arrival of my new cases for my cling stamps and my spellbinder dies :)ReplyCancel


Happy Monday sweet friends!  Cool things going on today!!  I have a new tutorial to share you with (by reader demand) and a bonus tip!!  First of all, let me just say that sometimes I’m on autopilot – on my last card I mentioned using a Martha Stewart punch and it was actually an EKSuccess Large Edger Punch.  I knew that and have no idea why I wrote it that way!!  I’ve gone back to my original post and edited in the correct information and I have it correctly here too!!  Thanks for tipping me off, you are the best readers evah!!  My card today uses the same technique of punching 360 degrees around to create a border frame, corners filled, with a consistent margin all around.  It’s a quick tutorial today, and I show you how to do this with any type of linear border punch!


Here’s the HD video:

SUPPLIES I USED
StampsOur Daily Bread Designs – Quote Collection Two
Paper:  
Die Cuts With A View, Coredinations, Neenah Classic Crest Cream 80 lb
Ink:
Memento Rich Cocoa
Accessories:
EK Success Modern Cube, Spellbinders™ Blossom Tags and AccentsSeam Binding, Corsage Pins, Recollections Pearls, Prima Flowers, Recollections Pearl
Additional Ideas:  Our Daily Bread Designs GallerySpellbinders Blog 

Hey, by the way, did you notice my new button?  It’s on the right side of my blog – all you have do is grab the html and throw it into your side bar.  I also figured out that I had a bad link on my contact page that was trying to send you to the FAQ (frequently asked questions) but was sending you to an old version.  I’ve corrected it.  I hope you’ll take a second to look – you may even find the answer to your question there!!  Thanks for stopping by today – I’ll see you soon!!

pinTHIS SHAREthis TWEETTHIS EMAILthis
  • Naomi A. of COMarch 19, 2012 - 6:33 pm

    Love this…the background paper expecially! Love those birds!ReplyCancel

  • Jerri KayMarch 19, 2012 - 6:38 pm

    This is so beautiful Becca.ReplyCancel

  • Debbie DunhamMarch 19, 2012 - 7:02 pm

    Absolutely gorgeous!ReplyCancel

  • Nan GMarch 19, 2012 - 7:03 pm

    So cool!! Love this technique, it makes for an unusual background! Thanks for the tutorial!ReplyCancel

  • FrancineMarch 19, 2012 - 7:15 pm

    So brilliant! Those tutorial are perfect.
    This card is beautiful i really like it.
    Merci pour tout.
    FrancineReplyCancel

  • Denise TrottierMarch 19, 2012 - 7:27 pm

    Dearest Becca,
    What would we do without you? You teach us so many useful and beautiful techniques and your work is simply exquisite…thank you for sharing with us and do keep on inspiring us…God Bless…hugs…
    Denise TrottierReplyCancel

  • Lori AMarch 19, 2012 - 7:33 pm

    Beautiful card Becca!!! Thank you for the very informative video – I will definitely give this technique a try :DReplyCancel

  • Mary HMarch 19, 2012 - 7:35 pm

    Thank you so very much for taking the time to develop these most informative tutorials. What you show is extremely clear & easy to follow; it was also great to have the specific sizes needed for the paper. I also appreciate that you ennunciate clearly and it’s easy to hear your voice. You don’t speak softly, but in a moderately maintained tone; the softness is a problem for someone who doesn’t hear well. Thanks again…and will be looking forward to seeing more when you have time. Blessings.ReplyCancel

  • Carol RMarch 19, 2012 - 7:44 pm

    Thank you for this tutorial! I have been trying to figure out how to do what you do but need to see it in action to follow through. Beautiful card shown today.ReplyCancel

  • Nadine IllingworthMarch 19, 2012 - 7:52 pm

    A very oriental feel which would go with a lot of stamps i have. Have now got how to do the frame so i will be trying this card. Hope it turns out as wonderful as your. !0 out of 10 . wonderful colour too.ReplyCancel

  • Linda TMarch 19, 2012 - 8:08 pm

    Thank you for the tuturial!!! It was so helpful
    God BlessReplyCancel

  • annMarch 19, 2012 - 8:27 pm

    that was amazing, thank you again for another great tutorial.
    Are you on etsy yet? How will we know where to look for the cards you have for sale?ReplyCancel

  • Jean HempelMarch 19, 2012 - 8:32 pm

    Love this card and the quote, one of my favorites, of course all of them are my favorites!! Love the Tutorial.. thank you so much.. You are just too sweet…
    Hugs, JeanReplyCancel

  • Caroline D.March 19, 2012 - 8:34 pm

    Beautiful card and the punch frame tips on the video was great! Thanks for sharing itReplyCancel

  • SorayaMarch 19, 2012 - 8:51 pm

    Your cards are so ex quite. Thank you for the marvelous tutorial, too.ReplyCancel

  • Marcie SmithMarch 19, 2012 - 9:20 pm

    Becca, thanks so much for the tutorial, and the info on your first card using this punch technique. I thought I was totally loosing it and spent some time searching for a Martha Stewart punch that didn’t exsit. I really liked the scrolled border best and thought it to be very feminine with Mother’s day right around the corner. Now I know where to look. Thank you, thank you, thank you.
    I also liked your info on making the larger cards. I prefer working with a larger base also. Seams easier to align medalions/bow/ and sentiment, and you don’t have to waste a 12 X 12 sheet of paper to accomplish it.
    I also wanted to say that I am seeing your Becca Bow Maker croping up all of the place and am so happy for you. I love mine and have been using it alot. Works fantastic if anyone out there is reading this and hasn’t picked one up yet. Oh, and your card is gorgeous today as always!!!!
    Hugs,
    MarcieReplyCancel

  • DawnllMarch 19, 2012 - 9:27 pm

    You always give such great directions- and always are an inspirationReplyCancel

  • Linda EMarch 19, 2012 - 9:37 pm

    Fabulous technique, Becca!ReplyCancel

  • Diana E.March 19, 2012 - 9:39 pm

    Oh how beautiful and Thank you for the tutorial. Now, if I can just do it.
    Where do all your fantastic ideas come from? Thank You, Thank You !ReplyCancel

  • VeredMarch 19, 2012 - 9:45 pm

    I love your videos, thank you so much for your great ideasReplyCancel

  • ClaudiaMarch 19, 2012 - 9:58 pm

    Becca: Love the border filled frame but am having trouble doint it with both of the 2 punches I have. I have the “abstract flower chain” & the “argyle large edger.” They leave open borders unlike yours that go all around. What am I doing wrong? You mention a “linear” punch & I’m thinking that perhaps neither of my punches fit that description. Help!!ReplyCancel

  • Lindyloo, South Wales, UKMarch 19, 2012 - 10:06 pm

    Hi Becca,
    Your card is beautiful and the border filled frame is a really nice change from Spellbinders all the time (I am a Spellbinder addict, just got to love those dies!). Thank you so much for the video tutorial, it really helped me get to grips with the concept, so much so I have already created my first border filled frames. My first attempt was using the Martha Stewart ‘Happy Birthday’ deep border punch. It looks beautiful and makes a lovely worded frame that is suitable for any age.
    Have a good week Linda xReplyCancel

  • RufusMarch 19, 2012 - 10:44 pm

    Thanks so much for the tutorial, Becca! Loved the card and wondered how you managed to get the beautiful backing. That particular punch is new to me and I like it! But I’ll def. be trying your tutorial with some of the punches that I’ve got!
    Thanks,
    R/ReplyCancel

  • RebekkaMarch 19, 2012 - 11:00 pm

    Your card is gorgeous Becca, love how you did this with the border punch. Great tutorial too. :)ReplyCancel

  • Susan ThomasMarch 19, 2012 - 11:24 pm

    Thank you so much, Becca! I love learning new techniques, and you are just the most creative person! Your cards are always beautiful.ReplyCancel

  • ChelseaMarch 20, 2012 - 12:13 am

    Amazing tutorial, Miss Amazing Becca. Thank you for showing us this little pearl. You are such a whiz with these punches! We spend a lot of money on those punches (even with our coupons!) and it is nice to have some things we can do with them other than the obvious. Many thanks to you!ReplyCancel

  • MaryannMarch 20, 2012 - 2:38 am

    Such an awesome tutorial here again Becca, it´s always so easy to follow and understand. And your card looks so gorgeous again here too. Sooo beautiful work hun, I really love it.
    Have a wonderful day and week ahead here now.ReplyCancel

  • GloriaMarch 20, 2012 - 2:56 am

    Becca, maybe you made the mistake on the name as the EK punches and the MS punches are made by the same company? There are so many beautiful ones, including the Spellbinder and now even some other companies are getting in on the Spellbinder wagon. Wish I could afford them all!ReplyCancel

  • BernieMarch 20, 2012 - 3:01 am

    Brilliant! Another spectacular card and tutorial too.
    Blessings BernieReplyCancel

  • Nancy SchultzMarch 20, 2012 - 3:40 am

    Beautiful card and thank you so much for the Becca Bit and Bonus! You are totally awesome Thank you Becca!ReplyCancel

  • Anne DaviesMarch 20, 2012 - 3:58 am

    Becca, what a gorgeous card, it has a Charles Rennie Mackintosh feel to it, absolutely love it. Thank you for posting the video, so useful. Welsh AnnieReplyCancel

  • Karen WallaceMarch 20, 2012 - 6:09 am

    Thank you so much for the explanations, I just tried the 5×7 vertical card and will get it loaded on my blog today. I love it!! Your card is fabulous!ReplyCancel

  • Becky GreenMarch 20, 2012 - 6:16 am

    LOOOOOOOOVE this Becca!!!!!!!!!!! THANK YOU for showing us! SOOOOOOOO SIMPLE when you show us!!!!!!!!!! I believe I’ll be playing today!!!!!!!!! :) AND Thank you for all the little “Becca Bits!” :) You make a person SMILE!!!!!!!!!!! :)ReplyCancel

  • Tina DeLong AKA GardenDivaMarch 20, 2012 - 6:25 am

    You are just soooo clever. I adore all of your cards and you really threw me for a loop with that 7″ tall card……………..now I know how you did it !

    It IS the paper size that matters most when doing those border punches around the page………I don’t have that particular punch but I may have to go and buy it as it does make such a lovely background.

    Thanks for sharing your amazing talent with all of us…..ReplyCancel

  • Francie (Montreal)March 20, 2012 - 6:28 am

    I am in awe. Your card is simply gorgeous, and just so “together”. Every element complements the total look. It’s lovely. Also, a gi-normous thank you or figuring out these clever punch manoeuvres and for kindly sharing them with us. Your generosity abounds and is appreciated.ReplyCancel

  • lois skiathitisMarch 20, 2012 - 6:30 am

    Beautiful card Becca. The punched panel gives the card an Asian flair to the card. Embellished beautifully. I love the designer paper it is so pretty. Great video showing us how and a wonderful tip as well. As always Becca, TFS!!!
    :-DReplyCancel

  • Becky GreenMarch 20, 2012 - 6:45 am

    HAD TO COME BACK!!!! Becca, have you seen the Stampin Up punch, Large Ribbon Border? They’re by EK Success too. That has the same little marks on the punch that you talk about. I tried what you said with this punch, although I think that punch in particular, won’t do what you said, only because it cuts off the design from the original piece of paper. BUT, can you think of ANY REASONS WHY this punch would have these SAME MARKINGS????? Just thought I’d throw this out to you, SINCE YOU ARE A PAPER CRAFTING GENIUS!!!!!!!!!!! :)ReplyCancel

  • JessicaMarch 20, 2012 - 7:19 am

    Spectacular card as always Becca! I love the background paper. Thanks for sharing the punch tutorial. I’m always looking for new things to try. Especially with my punches,
    Hugs, JessReplyCancel

  • Bonnie WeissMarch 20, 2012 - 7:21 am

    You never fail to amaze me Becca … both with your talents and your willingness to share your ideas. Another great video and beautiful card.ReplyCancel

  • conniecrafterMarch 20, 2012 - 7:58 am

    that punch is so cool, I haven’t seen that one, thanks for showing us how to do this with our own punches, Beautiful card!ReplyCancel

  • Ann robbinsMarch 20, 2012 - 8:04 am

    Becca,
    I just love your videos which helps dummies like me. Yours is my favorite blog of all time. Everyone of your creations just absolutely amaze me and Spellbinders are taking over my creating life. Thanks for all you do for us.
    MSTGANE
    AnnReplyCancel

  • Vicky SchmidtMarch 20, 2012 - 8:17 am

    Becca, Thank you ver much for your video. I usually avoid that kind of card.
    The card is beautiful. I definitely have to try that today.
    Love, VickyReplyCancel

  • Cheryl StaufferMarch 20, 2012 - 8:48 am

    Gorgeous and elegant card with the wonderful punched panel!! Thank you so much for sharing how you used the punch to create this terrific look and I will have to give it a try with some punches I own. I appreciate your video as it makes using the punch so clear and I love your tip for making the larger cards from a 8 1/2″ X 11″ piece of cardstock. I love the larger cards also and hate all the waste I get from using a 12″ X 12″ cardstock.ReplyCancel

  • beckyMarch 20, 2012 - 9:02 am

    Becca, you have created another beautiful card! You are so generous to share your creativity through video. Thank you so much, you have exceptional God given talents :-)ReplyCancel

  • Jean CMarch 20, 2012 - 10:57 am

    I love your card. The border punch makes a wonderful and unusual background for the round die cut. Thanks for sharing your creativity with us!ReplyCancel

  • patricia p.March 20, 2012 - 5:47 pm

    Becca
    You know I love your blog and look forward to it all the time and love love love you work. You are one of a kind.
    Now you know by now I love your Becca Bits and have really missed them. I was jumping for joy today when I saw a Becca Bit..Fantastic..really and it looks so easy…yeah I know..I’ll be struggling with it too. Thank you so much Becca for the Bit. I love them and I learn so much from them.
    Great job.
    patReplyCancel

  • Kelly LittleMarch 20, 2012 - 6:38 pm

    Another great tutorial, Becca. I was looking at the punches at Michaels tonight wondering which one to get and thinking of your past tutorial. I will have to print my coupon and go back this week, as I just couldn’t decide, and I had forgotten my coupon anyway LOL ;)ReplyCancel

  • TammieMarch 20, 2012 - 7:35 pm

    Becca,

    Will you be teaching classes on the Online Card Classes site? I’d be the first to sign up.

    TammieReplyCancel

  • LorettaMarch 20, 2012 - 8:21 pm

    Absolutely gorgeous. Thank you so very very much for the tutorials. I find them very informative and easy to follow. Look forward to viewing your blog and feel you’re oh so talented.ReplyCancel

  • eveleneMarch 21, 2012 - 3:14 am

    Thanks kindly for the nice tutorial. Another stunner. You always amaze me with how you can easily conjure up creative ideas such as this. You’re one of the few designers that always come up with something new and original.ReplyCancel

  • Judy AMarch 21, 2012 - 9:05 am

    Thank You for the wonderful tutorial!! You make it look so easy!!!
    Thanks for spending the time and your talent to enlighten us!
    I will have to “dust off” my border punches and start creating.
    I love to learn something new everyday. Thanks for making my day!!!!!
    Hope yours is wonderful. Thanks so much Becca!ReplyCancel

  • Karen WallaceMarch 21, 2012 - 9:49 am

    I used your video to make a vertical 5×7, it’s about the third one down on my blog and I sent them to your blog to watch the video. Thanks so much!!!
    ReplyCancel

  • NancyMarch 21, 2012 - 1:45 pm

    Hi Becca :) that’s a beautiful card and thanks so much for doing the video! I’ve just come upon your site and been through a lot of very gorgeous ‘stuff’ :) I think it will be a nice place visit with my teaReplyCancel

  • Patti WilleyMarch 21, 2012 - 6:18 pm

    Well how about that! What a fantastic idea to utilize linear punches! Your cards are such a beauty! Thank you for your beautiful tutorials Becca!ReplyCancel

  • EileenMarch 22, 2012 - 7:41 am

    Another beautiful card! I love what you have done with the border punch it all adds to the card, and the tutorial was so easy to follow because of your explicit instructions. Thank you Becca.
    LOL EileenReplyCancel

  • JuneMarch 22, 2012 - 9:05 pm

    Thanks for the tip on punching the cards. What do you use for envelopes? Where can you buy them?ReplyCancel

  • deborahMarch 23, 2012 - 12:19 pm

    Hi Becca great tutorial thank you. Ive missed you this week and hope all is well and that we will be seeing you soon. Have a blessed weekend.ReplyCancel

  • ChrisMarch 23, 2012 - 4:21 pm

    I have been trying to find the designer paper you used on the card displayed now with the border punch and spellbinder. It says it is coredinations but I have been to several websites and am unabke to find this. Could you point me in the right direction? I think the paper is beautiful!

    Thanks for your helpReplyCancel

  • EvelynMarch 24, 2012 - 7:22 am

    Thank you. I have new ways to use my punches nowReplyCancel

  • AdrenniaMarch 28, 2012 - 2:58 pm

    Simply beautiful. Thanks for sharing.ReplyCancel

  • Cindy CloseMarch 29, 2012 - 8:52 am

    Becca: where do you find the envelopes to fit your card sizes? Do you buy or make them?ReplyCancel

  • sheilaApril 7, 2012 - 10:13 am

    this is awsome you are an incredibly talented and blessed lady. I just love going over and over all you work it is so inspiring. Thanks for being a blessing and sharing your talents that God has blessed you with.ReplyCancel

  • Cheryl RotnemApril 7, 2012 - 12:40 pm

    Love it so much! A friend of mine made it in Make the Cut program for electronic cutters!!! Not exactly like yours but super cool anyway!
    TFS all your hard work for us!ReplyCancel

  • Pattie JnsApril 8, 2012 - 5:34 pm

    Becca, I really enjoy and learn so much from your tutorials. I am a visual learner. would you think about maybe doing these special tutorials like they do on splitcoaststampers, so you can print the instructions with your pictures. that way one can read and see each step. this would be so helpful, then each time one needs them they would have instructions to follow. Not having a computer in my work space, I am not able to work an continue to watch at the same time. Please consider this option for all us visual learners.
    thank you sooooo much. …. hugs and blessingsReplyCancel

I N F O