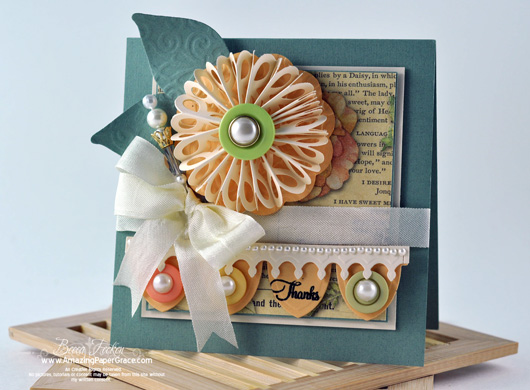
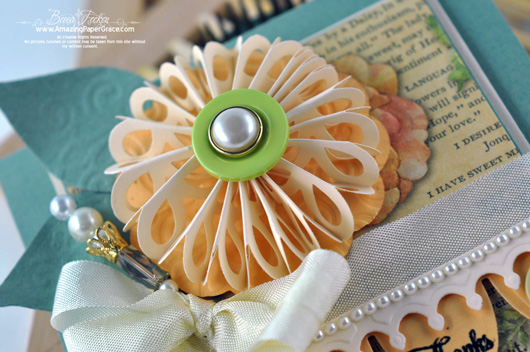
Top of the morning!  Yesterday quite a few of you asked me to develop a tutorial to show you how to do the white flower that was on my pocket card.  I was only too happy to oblige so I cooked up a new card with the same flower as a sample to use during the tutorial.  For the round base of the flower I used Spellbinders Big Scalloped Circles LG and attached Spellbinders Nested Leaves, both are embossed with Spellbinders Floral and Stone Impressabilities.   The flower itself is made with a border punch!!  Then along the bottom I used Spellbinders Banner Basics One and Spellbinders Banner Basic Three for a little bit of whimsy and to show my tiny sentiment.


The video to show you how I made it is here:

OMGoodness, YouTube was having a little tantrum today.  It kept kicking me out or was telling me my little 5 minute video would take 6 hours to upload.  It’s behaving itself now, I’ve been trying to get this up for hours but thankfully it’s finally up.  Enjoy.  I’ll see you soon!!  By the way, the name of the EK Success Border Punch is Chinese Knot Chain.

pinTHIS SHAREthis TWEETTHIS EMAILthis
  • JeanApril 28, 2011 - 8:05 am

    Becca ~ Thank you. Blessings.ReplyCancel

  • Brenda OsmanApril 28, 2011 - 8:08 am

    Lovely..as usual. Thank you for your devotion to this site. You make my day….EVERY day!ReplyCancel

  • lois skiathitisApril 28, 2011 - 8:37 am

    Beautiful card Becca, love the flower and to think that it was make with a piece of paper and a paper punch. Nice work. As always Becca, TFS!!! :-DReplyCancel

  • Lori mApril 28, 2011 - 9:47 am

    Beautiful and thank you for all the wonderful tutorials and videos you share.

    Blessings, Lori mReplyCancel

  • Susan NelApril 28, 2011 - 9:48 am

    woww gorgeous flowerReplyCancel

  • RebekkaApril 28, 2011 - 9:50 am

    This is so pretty Becca! Thank you :)ReplyCancel

  • Susan NelApril 28, 2011 - 9:50 am

    looks like 2 rows with the fiskar punch, if not i’m sure i can try that with my fiskars ,, you ‘re such an inspiration,,,ReplyCancel

  • Sheila - UKApril 28, 2011 - 9:58 am

    Many thanks Becca I’m so pleased you’ve done a tutorial on the ruffled flower as I think it’s just so beautiful.
    God bless.

    Love Sheila xxReplyCancel

  • Debby WaltersApril 28, 2011 - 10:02 am

    wohoooooooo,,,,, I am looking forward to this tutorial. Hope I have the punch….have a great day everyoneReplyCancel

  • LucindaApril 28, 2011 - 10:07 am

    thanks! Can’t wait to see the tutorial – what a beautiful cardReplyCancel

  • MarisaApril 28, 2011 - 10:11 am

    Fabulous flower. Will check back for the tutorial. Thanks for sharing all your talent with us :)ReplyCancel

  • Naomi A.April 28, 2011 - 10:14 am

    I love it Becca…so whimsical!ReplyCancel

  • Deebi27April 28, 2011 - 10:17 am

    You are as amazing as your blog title! I am thinking I was good to go until you said you used a punch! Can’t wait to see the new Becca’s Bits, it like all others will go into the email folder for referencing!! You are so generous with your tutorials…thank YOU!ReplyCancel

  • Lori EllApril 28, 2011 - 10:22 am

    That’s so pretty. Thanks for sharingReplyCancel

  • Melanie TaiApril 28, 2011 - 11:19 am

    What a beautiful card! Love it! Thanks for sharing and teaching us how to make the flower.ReplyCancel

  • Janet CastleApril 28, 2011 - 11:22 am

    Thanks you Becca for the tutorial…now to find that punch!!! LOL!
    LOVE IT!!!
    Jan CastleReplyCancel

  • Sallyann MettlerApril 28, 2011 - 11:24 am

    Hi Becca,
    I love the ruffled flower. On the first card you showed us with this flower it had pink backing petals that looked like you had stamped a design in white. Is that stamped or is that the paper? I would love to know how you did that also. Are the pink petals a die cut or a punch or what. Please share how you did the pink petals.
    Just love your work.
    Thanks so much for sharing your talent with all of us.
    SallyannReplyCancel

  • RubyApril 28, 2011 - 11:31 am

    Love this technique and your wonderful video. I wish I could see through your eyes as you always see a die-cut, punch and punch border in a new and wonderful way. Tks for sharing!ReplyCancel

  • Donna RApril 28, 2011 - 11:35 am

    Becca, thanks so much for the great tutorial video. I’m curious what kind of tool you are using to score? It obviously wasn’t the normal tool that comes with the Scor Pal. Thanks for sharing your creativity with us. I learn so much from you. Have a wonderful day.ReplyCancel

  • Denise~Paper PonderingsApril 28, 2011 - 11:42 am

    I love that punch! That is so awesome!ReplyCancel

  • ChinnuApril 28, 2011 - 11:43 am

    How lovely, Becca! Thanks for the tutorial. How DO you think of these things?ReplyCancel

  • SherylApril 28, 2011 - 11:49 am

    gorgeous card! I have made these with straight paper – never punches – I’ll look at my stash.. or I will just have to pick up that punch!!!ReplyCancel

  • Tami MApril 28, 2011 - 11:58 am

    Thank you for taking the time to do a tutorial, I was admiring your card and wondering how you made it! I’m so excited to give it a try and I already have that punch so I’m off and running! Thanks again!ReplyCancel

  • Becky GreenApril 28, 2011 - 12:05 pm

    WHAT A PRETTY LITTLE CARD Becca!!!! LOVE those deep colors!!!! AND Thanks for the Tutorial!!!! :) You’re THE BEST!!!!!!ReplyCancel

  • Francie (Montreal)April 28, 2011 - 12:08 pm

    You must be the fastest ‘scorer and accordion folder’ south of the 49th parallel. Kidding. Seriously though, I just love the card and the ruffled flower tutorial. It can be dressy or casual depending on what you attach in the middle. A very helpful flower to have in one’s repertoire. You somehow manage to keep coming up with new design elements that make your blog the coolest, freshest one around. Thank you again for all you do.ReplyCancel

  • BernieApril 28, 2011 - 12:13 pm

    Amazing! Who else but you would see the posssibility of a flower in that punch. Love the way your mind works and so thankful that you share your talent with us.
    Blessings BernieReplyCancel

  • Gloria WestermanApril 28, 2011 - 12:54 pm

    How pretty……I love this….will have to try it…thank for sharing this with us……have a wonderful day!!!!!:)ReplyCancel

  • Mary HarrisApril 28, 2011 - 1:05 pm

    Thank you Becca! That is lovely :)ReplyCancel

  • Mz CookieApril 28, 2011 - 1:44 pm

    this is soooooooo cute… now I have to go buy this punch…. I sure hope that EK Success is sending you some bonus’ for all the sales you send them….LOL. Thx for sharingReplyCancel

  • Martha StaalenburgApril 28, 2011 - 2:54 pm

    Becca your are an amazing, creative, and very giving woman. I look foward every day for your posts. THANK YOU SO MUCH FOR SHARING your creativeness with all of us.

    God Bless,

    Martha Staalenburg :DReplyCancel

  • Kaen WallaceApril 28, 2011 - 3:01 pm

    Fantastic video, thanks so much!!!ReplyCancel

  • DonnaApril 28, 2011 - 3:05 pm

    Becca, THANK YOU for all the tutorials and your willingness to make them for all of us!! You are one of the most gifted, talented people I know, and you make the MOST BEAUTIFUL things to inspire all of us! Again, THANK YOU!ReplyCancel

  • Angela (UK)April 28, 2011 - 3:22 pm

    Ooooohhhh ooooohhhhh ooooohhh Becca I just love watching your videos – thanks so much :)ReplyCancel

  • SallyApril 28, 2011 - 3:43 pm

    Hi Becca,
    that is the coolest flower and you are so kind to share your wonderful creative talents, thank you ever so muchReplyCancel

  • DollyApril 28, 2011 - 3:51 pm

    WOW, Great flower and you make it look so easy!!ReplyCancel

  • Chris R.April 28, 2011 - 4:30 pm

    You are a creative genius! Thanks so much for doing the tutorial.ReplyCancel

  • MichelleApril 28, 2011 - 5:19 pm

    You continually amaze me with your creative talents. This is beautiful!ReplyCancel

  • Nicole SApril 28, 2011 - 5:41 pm

    This is fabulous! You are so creative. Off to order a Chinese Knot Chain punch! LOLReplyCancel

  • Debbie PammentApril 28, 2011 - 5:41 pm

    Thanx sooo much for being sooo sharing with your tutorials – another FABULOUS one! Off to shop for this punch – LOL
    xXxReplyCancel

  • Mary RobersonApril 28, 2011 - 5:57 pm

    I find myself using Scotch Quick Dry Adhesive often because I like that it sets up quickly. I checked “you didn’t name mine” because with regular white glue there is the long drying (set up) time involved.ReplyCancel

  • Robin bApril 28, 2011 - 6:33 pm

    Another great tutorial. Thanks for sharing. Have a good evening. RobinReplyCancel

  • Dianne CApril 28, 2011 - 7:04 pm

    Thanks for the tutorial on your flower. Great idea. DianneReplyCancel

  • racheApril 28, 2011 - 7:29 pm

    That is so neat! And lovely.
    Thanks for taking the time to share.
    God bless!ReplyCancel

  • VivaceApril 28, 2011 - 8:21 pm

    Very, very pretty flower! Good job!ReplyCancel

  • Donna GApril 28, 2011 - 8:22 pm

    Dear Becca,
    Thanks so much for sharing this technique with us. This flower is sooo cute! How do you come up with these ideas?? You’re the best!
    Thanks again,
    Donna GReplyCancel

  • Mary H.April 28, 2011 - 8:44 pm

    Oh Becca, such a lovely flower & card. Thanks for the great tutorial. You continue to outdo yourself. I have that punch, and was able to get the Sizzix flowers & swirls embossing folder you showed so beautifully a few weeks ago. You are a wonderful enabler, and it is so generous of you to share your creativity & ideas & techniques with the rest of us. God BlessReplyCancel

  • Michel EApril 28, 2011 - 9:04 pm

    Lovely card.

    Please keep the people in Alabama in your prayers after the devastating tornado that went through here last night. I live about five miles away from where it started. God was looking out for me and my family yesterday.

    craftymom205 at yahoo dot comReplyCancel

  • Judy McMullenApril 28, 2011 - 9:16 pm

    Thanks for another great tutorial, Becca! Love that flower!!ReplyCancel

  • ChelseaApril 29, 2011 - 12:31 am

    Lovely! That is such a pretty lacy flower. Thank you so much for such an excellent tutorial for your great idea.ReplyCancel

  • pat pApril 29, 2011 - 1:42 am

    Becca what a pretty flower and it’s so airy too. A great demo and I’m going to do one now myself. Well I think I have to get the punch first. ha ha.
    But now I’m looking at my other punches to see if I can find another punch that I could try this with.

    Thanks Becca

    patReplyCancel

  • EvApril 29, 2011 - 3:25 am

    great tutorial
    love how it looks on your cardReplyCancel

  • Sylvia/LittleTreasuresApril 29, 2011 - 3:27 am

    Thanks Becca for sharing the wonderful tutorial. It’s like you make “Paper Magic” . The card and colors are so beautiful.ReplyCancel

  • Angelina WesselsApril 29, 2011 - 3:43 am

    Love your card and your tutorial! What a pretty and fun flower shape!ReplyCancel

  • RebeccaApril 29, 2011 - 5:38 am

    Gorgeous flower. Though technically it is pleated, not ruffled.ReplyCancel

  • Constance MOttApril 29, 2011 - 8:48 am

    What a great video. Thank you so much for sharing this technique. Can’t wait to try it. Your flower is so pretty..ReplyCancel

  • Jan JacquotApril 29, 2011 - 8:54 am

    You make that flower look way too easy on your tutorial. I think I’ll just admire yours, and leave it at that.ReplyCancel

  • Denise TrottierApril 29, 2011 - 9:44 am

    Thank you so much, Becca, for all the wonderful tutorials and videos that you are so willing to share with us…I get so many ideas when I see them and as always your work is so exquisite…blessings to you, hugs…
    Denise TrottierReplyCancel

  • ClaudiaApril 29, 2011 - 10:06 am

    o wow, those are some gorgeous papers, thank you so much
    for a chance to win, wishing you all the best,
    Cheers :) ClaudiaReplyCancel

  • Alta RunnerApril 29, 2011 - 2:00 pm

    This is a wow card if I have ever seen one. Thanks!ReplyCancel

  • Christine LucasApril 29, 2011 - 2:50 pm

    Thank you so much for your generous offer to win this yummy paper!ReplyCancel

  • Peggy MApril 30, 2011 - 12:08 am

    Becka I have followed your wonderful blog for about 3 years now, and admired your gifted talent. I just wanted to let you know I appreciate your gift and pray that you will continue to serve as an inspiration to us for many years to come. No matter where I see your work, I can always tell that THAT card was made by you. Your style is so much like my style…only you’re sooooo much better than I. Keep inspiring us!ReplyCancel

  • judyApril 30, 2011 - 5:15 am

    The beauti of getting up and looking to see what you have created it the greatest, i get’s my day started and makes me feel wonderful another beautiful card. Have a wonderful day.ReplyCancel

  • HeatherApril 30, 2011 - 6:58 am

    Thank you Becca – you never cease to amaze me with your talent – I love all your tutorials – I wish I had all of them on a CD!!
    God bless
    Hugs
    Heather
    xReplyCancel

  • AnnSApril 30, 2011 - 7:15 am

    Great tutorial. Your instructions are so easy to follow. The flower is beautiful.ReplyCancel

  • […] I meant. I picked out four different punches, punched one strip, gathered (just like I show in my Ruffled Flower Tutorial) and it makes a quick and cute flower. Plunk down a button or something on top and you have a quick […]ReplyCancel

  • MaureenApril 30, 2011 - 4:02 pm

    Thank you so much for your tutorials. I will have fun trying this flower.
    Bless you. Maureen in New ZealandReplyCancel

  • SusanApril 30, 2011 - 7:11 pm

    Simply beautiful. I can’t wait to try making one myself!ReplyCancel

  • bonnie weissApril 30, 2011 - 7:12 pm

    Another great idea and tutorial, Becca … with so many punches, the possibilities are endless. tfs.ReplyCancel

  • DeniceMay 1, 2011 - 3:42 am

    I so enjoy these instructional videos, I am a person who needs to see something done to understand it better. Thank you so much for taking your time to help so many people. God bless…deniceReplyCancel

  • Nancy TedeschiMay 1, 2011 - 5:38 pm

    Your flowers are beautiful…thanks for sharing them with all of us.
    God bless!ReplyCancel

  • Sue NMay 1, 2011 - 8:04 pm

    Your website is wonderful … you do amazing work and you are so generous to share your talent. Thank you so much … I will be checking back regularly.ReplyCancel

  • JanetMay 1, 2011 - 8:46 pm

    Just tried a ruffled flower…used a MS punch that is like a chain of flowers….it worked but I need to work on hooking the ends together….think if I get the next one to look better they will be on the Mother’s Day cards I am mailing out. I used regular scrapbook paper so will try one tomorrow with card stock.ReplyCancel

  • LisaMay 3, 2011 - 12:59 am

    Beautiful! What a gorgeous card.ReplyCancel

  • sandi ackermanMay 5, 2011 - 9:03 am

    The flower teaching was great. Does any border punch work? I will have to check it out.
    Thanks.ReplyCancel

  • TerryMay 7, 2011 - 3:14 pm

    Okay. Guess what punch I had just purchased…? Gee…what to make with it!!! Great tutorial! Beautiful card! THNX ;-)ReplyCancel

  • Mary FullerMay 13, 2011 - 11:55 pm

    Becca, I think you are one of the most talented card makers that I have ever seen. Thank you for your wonderful ideas!ReplyCancel

  • Beth PollockMay 15, 2011 - 3:30 pm

    Becca, thank you so much for all of your efforts! Absolutely beautiful work!
    Hugs,
    BethReplyCancel

  • Rush'd LadyMay 23, 2011 - 8:29 pm

    Lovely! However I’m afraid of it getting crushed in the mail. I found a medallion on You Tube that was hot glued to a one inch punched circle, so that’s what I did with my medallions and hot glued a button on top. Made it so much easier putting it together.ReplyCancel


Hi there sweet friends!! I had a ball yesterday with the pocket card and it literally opened the door for some other stamps I wanted to revisit because I originally thought them to be too large.  I love this format!!

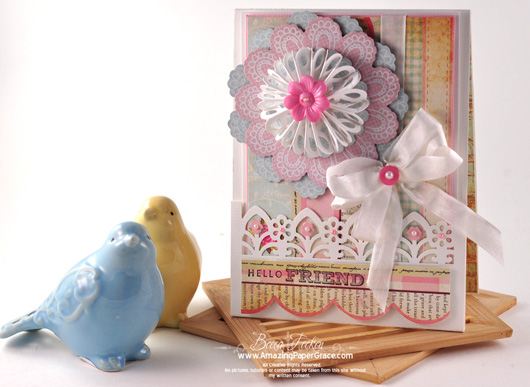
As I said yesterday, I can make use all the decorative elements on the card that I want and still use a huge stamp or huge sentiment.  The stamp I’m using today is one of my favorite girl friend stamps from Inky Antics.   I love to send this sentiment just to get a laugh and a “I know, right?!?” I made the same pocket card as yesterday but this one is 5 1/2″ x 7 1/4″.  I’ll be delivering this one, so no envelope needed but if it did I would simply protect the flower with the ring from an empty spool of ribbon and put it in a bubble wrap envelope or I would rework without the dimensional flower.  I’m rolling in cute today so I surrendered, okay?  Doesn’t that sentiment just crack you up?  I flipped the panel that belongs in the pocket and put this on the flip side.    I’ve had this stamp for a long time but it will never, never go out of style in my book :-)  Easy, easy, I tell ya!

You see it all together now.  On the right is the pocket part of the card, on the left is the flip side of the front panel and the inside has the same type of paper as is on the front panel.  It all makes me smile!  Hope you are having a fab day too!

SUPPLIES I USED
Stamps: Inky Antics (chocolate), Studio G (Hello Friend)
Paper: The Girls Paperie – Vintage Whimsy, Colorbok – Flea Market
Ink: Memento Tuxedo Black
Accessories:  Martha Stewart Border Punch – Garden Gate Trim, pearls, seam binding, EK Success Punch (Chinese Knot Chain), Blumenthal Flower Button, Copic Markers

Thanks for all your sweet, sweet comments – you all make it a pleasure to craft each day!  See you soon!!

pinTHIS SHAREthis TWEETTHIS EMAILthis
  • Naomi A. of ColoradoApril 27, 2011 - 10:42 am

    This is so darn cute….I am going to have to go out and get that MS border punch! Fabulous Becca!ReplyCancel

  • Brenda OsmanApril 27, 2011 - 10:49 am

    Oh My Goodness……………Love it, love it, love it!!!!! I even have that punch! I’ve said it before and I’ll say it again. You are such an inspiration. You are amazing. Such talent!!! Thank you from the bottom of my heart! You inspire me every day!!ReplyCancel

  • SallyApril 27, 2011 - 11:17 am

    HI Becca,
    that is totally AWESOME, the fact that I’m definitely a chocoholic probably adds to it too!! Love this style card.
    Thank you for your tutorial on it as well!
    As always your a wonderful inspiration to all of us!ReplyCancel

  • Beverly BohannonApril 27, 2011 - 11:18 am

    Gorgeous card!!! I must try this and I really “need” that punch!! It’s a new one to me. Love your inspiration and tutorials, Becca!ReplyCancel

  • Edna BurgessApril 27, 2011 - 11:20 am

    Love it and will be perfect for a friend of mine. She loves chocolate, forget men. EdnaReplyCancel

  • bonnie weissApril 27, 2011 - 11:20 am

    This is so whimsical for you Becca and I am loving seeing this side of you! The pocket card is such a fun style and with this stamp, it goes from fun to funny!ReplyCancel

  • KelleyApril 27, 2011 - 11:23 am

    I’m with you on this stamp, it will never go out of style! :) I’m intrigued with the border punch. I’m going to have to look for it. Thank you for another great card.ReplyCancel

  • MarisaApril 27, 2011 - 11:24 am

    Cute sentiment. I’m not a big chocolate fan (gasp!) but can appreciate those who are LOL! Great card and love the tip about using the ribbon spool around the flower for protection while mailing – brilliant!ReplyCancel

  • Mary H.April 27, 2011 - 11:38 am

    I’m really enjoying your pocket cards, and thanks for the video tutorial. It made it so much easier to understand what your verbal tutorial meant. You are simply amazing, that you can design & produce all these lovely creations, along with all the many ‘day-to-day’ chores you must have to do, just like the rest of us. Plus keep up a blog. How DO you do it????!!!! But I hope you can keep up with the cards, even if your other chores must fall to the wayside (LOL! Like mine do!) TFSReplyCancel

  • Nadine BaileyApril 27, 2011 - 11:39 am

    Oh what a wonderful girl friend stamp! I have got to find that one.. Thanks for making me smile real big with chocolate all over my face.ReplyCancel

  • MarianApril 27, 2011 - 11:47 am

    Oh MY!!! Now I need another border punch! What a beautiful card and I love the punch! *sigh*ReplyCancel

  • DonnaApril 27, 2011 - 11:48 am

    Sweet card!!! Love the colors and especially the flower!! Is there anyway you could e-mail me with directions for the flower and the white center? Would very much appreciate it!! Blessings ReplyCancel

  • MaryannApril 27, 2011 - 11:52 am

    Oh Becca this is sooo beautiful, and I agree with everybody else here, it sure put a sile on my face too, to read this sentiment here ha ha ha, and I agree, it´ll NEVER get out of fashion, as there´ll always be chocolate lovers around he he he. And your beautiful pocketcard is really awesome too, and thanks again for a brilliant tutorial. You really are such a wonderful inspiration to all of us every single day sweet friend. I just so love your work always, and always look forward to come and watch here every day, even I don´t always have time to comment, but I watch your site every day, that´s for sure.
    Thanks soo much just for being you hun. Have a wonderful day againhun and many more to come.ReplyCancel

  • RebekkaApril 27, 2011 - 12:02 pm

    What a fabulous girl friend card! I love this punch.ReplyCancel

  • Ellen BApril 27, 2011 - 12:02 pm

    Becca you inspire me to think outside the box! Your cards are beautiful and classic.ReplyCancel

  • ColleenB.April 27, 2011 - 12:11 pm

    WOW! That is Outstanding! Love that Chocolate stamp as well.
    ?
    For those of us who can’t watch the video on your pocket card, is there any chance you could provide the written instructions…please?
    Thank You.
    ColleenReplyCancel

  • Penny ReedApril 27, 2011 - 12:44 pm

    This is fabulous!!! I WANT that paper, and I love the punch. I may yet end up in the poorhouse! You are so gifted, Becca. TFS!ReplyCancel

  • Francie (Montreal)April 27, 2011 - 12:52 pm

    It cannot help but bring a big wide smile to your face when you look at this fun and fabulous card. Positively adorable and playful. Love it to bits. Almost as much as chocolate!ReplyCancel

  • Dena DeShirliaApril 27, 2011 - 12:57 pm

    How did you do the flower on the CHOCOLATE CARD. I love it and all you do.ReplyCancel

  • lois skiathitisApril 27, 2011 - 1:50 pm

    Becca, your card is so super cute. I love your recipe card all about chocolate it made me smile. as always Becca, TFS!!! :-DReplyCancel

  • auntie emApril 27, 2011 - 1:54 pm

    LOVE your cute pocket card! I’d stop eating chocolate but I’m no quitter!
    And did you know chocolate is a vegetable. Chocolate comes from chocolate beans and beans are vegetables,,,,therefor we should eat chocolate every day!
    Thanks for sharing!!! :)ReplyCancel

  • Marla H.April 27, 2011 - 2:30 pm

    Another amazing and beautiful card!!ReplyCancel

  • Rachel BrooksApril 27, 2011 - 3:23 pm

    Another winner! Love the stamp and a perfect setting for it! Thanks for sharing.ReplyCancel

  • PattyApril 27, 2011 - 4:13 pm

    I just love this card. I’ll have to get that border punch. I am such a punchaholic!! Would it be possible for you to tell us how to make the flower on the card. It is just beautiful!!
    PattyReplyCancel

  • Debby WaltersApril 27, 2011 - 4:17 pm

    Hah, I love this. Thank you for putting a sweet smile on my face today. I think I am going to try one of these cards right now. Thank you as always…hug, debReplyCancel

  • Laura/ sandytozApril 27, 2011 - 4:38 pm

    LOVE that stamp!!ReplyCancel

  • Lynne IngramApril 27, 2011 - 4:54 pm

    Becca how do you keep coming up with these wonderful things. That stamp gave me a much needed chuckle and now I am off to check out the Antics. Thanks for all your hard work and wonderful talent.ReplyCancel

  • val yobbieApril 27, 2011 - 5:25 pm

    I love your card..where do I get the chinese knott chain punch? Never On my list for ” Must have.” :o)ReplyCancel

  • VivaceApril 27, 2011 - 6:16 pm

    What a delightful card this is! I love the colors! I love the sentiment! Really nice. And I just had a piece of chocolate. Time to go finish up the other piece. Thanks Becca!ReplyCancel

  • JeanApril 27, 2011 - 6:24 pm

    Hi Becca ~ how do you do it!! Each card is as beautiful or more so than the last one!! Thank you so very much for sharing. Blessings!ReplyCancel

  • Becky GreenApril 27, 2011 - 6:29 pm

    TOO, TOO CUTE!!!!! I LIKE Inky Antics!!!! Have a few of their stamps myself! The colors you chose look like a candy shop!!!! :) This is a WONDERFUL card!!! :)ReplyCancel

  • JeanApril 27, 2011 - 6:41 pm

    Hi Becca ~ How do you do it! Each card is as beautiful or more so than the last one!! Thank you so very much for sharing. Blessings.ReplyCancel

  • Debbie BApril 27, 2011 - 6:44 pm

    You are never alone when you eat chocolate. Great card! Keep up the good work.ReplyCancel

  • Lisa SApril 27, 2011 - 6:49 pm

    I’m loving these pocket cards!! Your work is always “amazing”!ReplyCancel

  • SusanApril 27, 2011 - 8:06 pm

    Great sentiment and another beautiful card. Thanks Becca!ReplyCancel

  • Mary RobersonApril 27, 2011 - 8:13 pm

    I couldn’t agree more. In fact, isn’t chocolate one of the food groups?
    It sure makes every day a bit more enjoyable!ReplyCancel

  • RufusApril 27, 2011 - 9:11 pm

    Love the card, love the stamp even more!! Whoever it’s for is a lucky gal!
    R/ReplyCancel

  • ChelseaApril 28, 2011 - 12:05 am

    How fun! Overflowing with cute and clever artistry. Thank you once again for the inspiration!ReplyCancel

  • Theresa BonettiApril 28, 2011 - 12:22 am

    Each new creation seems to out do the last one. Simply beautiful. I understand how you made the white center part of the flower using the Chinese Knot Chain punch, but what are the scalloped blue/pink die cuts behind the white center? They add a nice touch.. It’s a joy to visit your blog daily – Thank-you for blessing us Becca.ReplyCancel

  • MarciaApril 28, 2011 - 12:26 am

    What a wonderfully beautiful card and funny at the same time. I love it and I love all your work, Becca. What an inspiration you are to many of us. Loads of hugs to you.ReplyCancel

  • Lorie B.April 28, 2011 - 12:42 am

    Great card!! That is so true about chocolate!! Now that is a great stamp!ReplyCancel

  • JeanApril 28, 2011 - 4:28 am

    Love this card. This is too cute!ReplyCancel

  • racheApril 28, 2011 - 5:28 am

    Love the card and love chocolate too!!
    Beautiful card.ReplyCancel

  • AnneApril 28, 2011 - 5:35 am

    Such a lovely card! Haven’t ever read that chocolate accolade before – so funny :o)
    Hugs
    Anne (UK) xReplyCancel

  • Angelina WesselsApril 29, 2011 - 3:41 am

    This is an adorable card! What a great chocolate saying. Perfect for your pocket card!ReplyCancel

  • June CosgroveApril 29, 2011 - 9:23 am

    Your flower of the Loom tutorial inspired me to make one. After making a few lopsided ribbon flowers, I added a cutout round of sponge inside the box and poked the nail through; from the bottom, to hold the center nail straight to insure the flower would be in round and balanced. Your design abilities are magical and your designs are breathtaking. I will look for the prima papers at Michael’s as they would be lovely behind a ribbon flower.ReplyCancel

  • Dorthy BarberApril 29, 2011 - 11:42 am

    Becca, I look at your site often and admire all the beautiful cards you show, I have even tried to duplicate a few. The paper looks great and would love to add it to my supplies.ReplyCancel

  • Rosie WestApril 29, 2011 - 7:26 pm

    You do the neatest projects. I just love them, and enjoy looking at them. I am a Chrisitan too….He is soooo good, gives us talents to work with and friends who share that love. Blessings, Rosie West, Sheridan, INReplyCancel

  • DeniceMay 1, 2011 - 3:49 am

    Yum…..chocolate…..I know someone who is alergic to chocolate and said that would be their last meal when they knew it was their last day on earth… don’t blame them. : ) God bless……deniceReplyCancel

Hi there blog friends! Several of you asked me to show how I put together the pocket card. It’s easy and doesn’t take much time so I thought I’d go ahead and make a Becca Bit out of it :-) I really like this format. It’s very easy and it makes a very sturdy card even if you have a wimpy weight of cardstock.  I see lots of possibilities for the cut out on the pocket with die cuts and border punches.  Since it’s fresh on my mind, you may see more this week.

Thanks so much for peeking in!!  See you tomorrow!!

pinTHIS SHAREthis TWEETTHIS EMAILthis
  • Pat SApril 26, 2011 - 8:02 pm

    Becca, I couldn’t get your video on the pocket card to work. Message is the video is not available.ReplyCancel

  • DebraKApril 26, 2011 - 8:28 pm

    very cool, thanks Becca…! Was the camera in fast motion when you were cranking the handle or were you going that fast? Impressive! I noticed you used an embossing tool to score–will have to try that one…I don’t like the tool that came with my MS Score pad.ReplyCancel

  • ColleenB.April 26, 2011 - 8:39 pm

    Wonderful tutorial.
    Thank U
    ColleenReplyCancel

  • Barbara JayApril 26, 2011 - 8:43 pm

    Thank you for the video !! I wondered how you did it . Love that card format . TFSReplyCancel

  • Jackie PApril 26, 2011 - 8:44 pm

    Thank you so much for making that!! I really expected it to be some long complicated process. Hmmm I need more nesties – oh here’s a perfect excuse to get more thanks.
    JackieReplyCancel

  • Jean McGeeApril 26, 2011 - 9:14 pm

    Thank you Becca for doing this.
    Jean McGeeReplyCancel

  • Deebi27April 26, 2011 - 9:22 pm

    THANK YOU, THANK YOU, THANK YOU…BECCA. I love this card! Since you make it look so simple it must be…ReplyCancel

  • MichelleApril 26, 2011 - 9:38 pm

    Thanks so much! Great video!ReplyCancel

  • RufusApril 26, 2011 - 9:40 pm

    Thanks for doing this Becca bit on how you put together your pocket card! Not as complicated as it looked!
    R/ReplyCancel

  • Chris R.April 26, 2011 - 9:49 pm

    This card is beautiful! I love it!! Thank you so much for making the video.ReplyCancel

  • RubyApril 26, 2011 - 9:52 pm

    Love the idea of a pocket card… I don’t have the Grand Calibur, but I figure I will ‘down-size’ the technique to an A2 card…wish me luck! Tks for sharing.ReplyCancel

  • AlisonApril 26, 2011 - 10:20 pm

    What a neat looking card I must experiment with the dies I have and see what happens Thank you for showing us how to do it.ReplyCancel

  • KelleyApril 26, 2011 - 10:44 pm

    Becca, thank you for the video. You made it look so simple, I can see many uses for this card.ReplyCancel

  • Norma JeanApril 26, 2011 - 11:05 pm

    Very cool Becca, Thanks for sharing your creativity with the rest of us!ReplyCancel

  • RebekkaApril 27, 2011 - 12:09 am

    Thank you Becca for this tutorial..ReplyCancel

  • DawnllApril 27, 2011 - 12:30 am

    Wonderful design and great tutorial- thanks for sharing sweetie
    blessings to you.ReplyCancel

  • ChelseaApril 27, 2011 - 12:49 am

    Thank you for the tutorial on your pocket card. You make it look very easy to do. I think I’ll have to give it a try :- )ReplyCancel

  • Lorie B.April 27, 2011 - 3:56 am

    Thank you, Becca for the tutorial. I am really looking forward to giving this a try. :o)ReplyCancel

  • TrishApril 27, 2011 - 4:28 am

    thank you Becca for your tutorial, you make it sound so easy.
    Hugs Trish.ReplyCancel

  • Olga JewellApril 27, 2011 - 4:41 am

    awesome TFS!ReplyCancel

  • lois skiathitisApril 27, 2011 - 4:48 am

    Great tutorial Becca. The end results are stunning. Thanks for another wonderful Becca Bit. As always Becca TFS!!! :-DReplyCancel

  • Rachel BrooksApril 27, 2011 - 5:28 am

    Thanks for the tutorial. That’s such a big help when my computer is upstairs and my work room is downstairs. I’ll have to give it a try.ReplyCancel

  • Dotty AApril 27, 2011 - 5:49 am

    Love this idea… will be trying this one for sure…
    Thanks for sharing!!ReplyCancel

  • Debbie BApril 27, 2011 - 6:05 am

    Thank you for the tutorial. Could you do this in a smaller format if you don’t have the Grand Caliber? I know it wouldn’t be as grand as yours but maybe a 4X4 card?ReplyCancel

  • bonnie weissApril 27, 2011 - 7:03 am

    You make every trip to my computer worthwhile, whenever you have posted something, Becca and this visit is no exception. This is definitely a ‘let’s give it a go’ card style and technique…thanks.ReplyCancel

  • JessicaApril 27, 2011 - 8:41 am

    Hey Becca, great way to switch it up! You are so very creative. Thanks for sharing that creativity with us.
    Hugs, JessicaReplyCancel

  • SheilaApril 27, 2011 - 9:34 am

    There was no video nor wording on how to make the card.ReplyCancel

  • KarenApril 27, 2011 - 9:35 am

    Great tutorial Becca! Thanks for showing such detail-you make it look so simple. I had my a-ha! moment when you did the second score line for the pocket so it would accomodate a bulkier insert. Thanks for sharing it with us.ReplyCancel

  • CharlotteApril 27, 2011 - 10:02 am

    Your pocket card is a great idea! Thank you so much for doing a video tutorial on how to make it (which us “visual” learners so appreciate). I don’t have a grand calibur so can’t make a card this size – but, I’m going to try making a smaller size card with one of the “regular” nestabilities die.ReplyCancel

  • Francie (Montreal)April 27, 2011 - 10:14 am

    Thank you, Becca. You’re explanations are so easy to follow, I believe a dull-normal like myself could do it. If you ever give up crafting (shudder), I could see you excel in a teaching roll, too.ReplyCancel

  • Monica BlackApril 27, 2011 - 10:36 am

    Beautiful card. Thanks for the tutorial. I use blue painters tape to hold my dies in place. No need to de-tack it.ReplyCancel

  • CandyApril 27, 2011 - 10:53 am

    Very very nice! What did you use to create gold wording ie. gold stamping on your card? Was this ink? or embossing powder? or other? Was the tag cut out of gold mirror paper or other? Thanks so much for your inspiration.ReplyCancel

  • CandyApril 27, 2011 - 10:55 am

    I found the answers. Thanks again for all your hard work!ReplyCancel

  • ColoradoApril 27, 2011 - 12:52 pm

    Great card idea! Any ideas for those of us who don’t want/have or can’t afford the Grand dies and Grand Caliber from Spellbinders??????ReplyCancel

  • Robin B.April 27, 2011 - 5:13 pm

    Thank you sooooooo much for the tutorial. It makes so much sense now after seeing the video. I really do appreciate your sharing this beautiful technique. Have a great evening. RobinReplyCancel

  • WandaApril 27, 2011 - 6:25 pm

    Thanks Becca,
    This will be my Mother’s Day Card. Yahoooooo…..ReplyCancel

  • FMApril 27, 2011 - 11:49 pm

    Great idea! Thanks, Becca.ReplyCancel

  • Pat HinesApril 28, 2011 - 8:48 am

    Great tutorial Becca, as always your directions make it very easy to follow along. Hope to try it soon.ReplyCancel

  • alexApril 28, 2011 - 4:55 pm

    Great tutorial Becca,Love it love it you just gave me an wonderful idea thanks!!ReplyCancel

  • Angelina WesselsApril 29, 2011 - 4:04 am

    Another fun card – your video tutorial was very helpful. Can’t wait to try this out! So pretty and fun!ReplyCancel

  • debraMay 2, 2011 - 9:38 am

    It’s a gorgeous card! So creative too! Thanks for the step-by-step video, I loved it — just the help I needed!ReplyCancel

I N F O