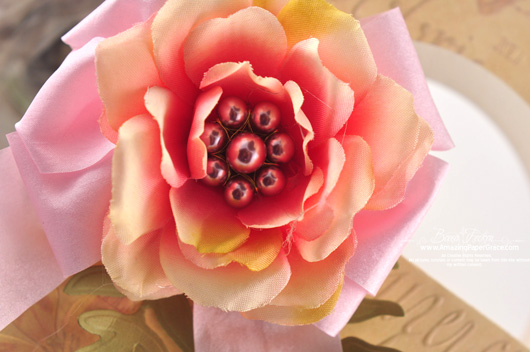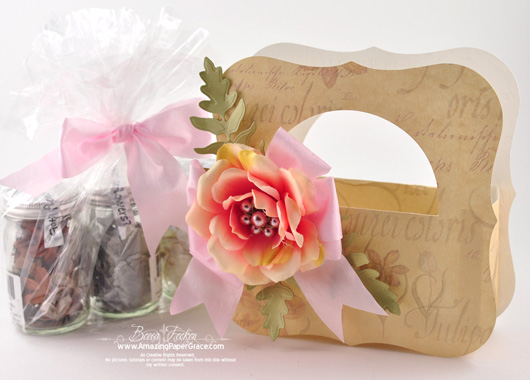
Hi there, while I’m making a little gift this morning I thought I would share this half cut technique (I also call it partial cutting) that many of you have asked how I accomplished. It’s easy and the bag can be made in less than an hour.  My bag is larger than 6″ but this is a scalable technique, so you can use it with both larger and smaller die templates.   Have a look at my video to see how!
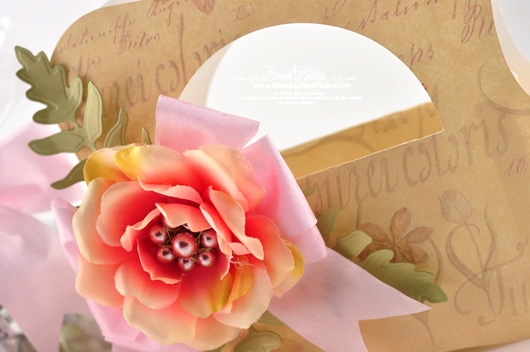

Add your favorite flower, learn how to make the matching center with the Becca Bit called Frugal Decorative Pearl Flower Center.


My flower measures roughly three inches in diameter so I needed to make a bigger bow to extend beyond the edges. I pulled out my trusty peg bow maker and made a triple layer 4″ peg bow. 

SUPPLIES I USED
Stamps: None
Paper: K & Company
Ink: None
Accessories: Spellbinders Grand Labels One, Spellbinders Grand Circles, Spellbinders Foliage

ETA:  The strip of paper that I use in the video is 3″ x 12″ but feel free to alter the depth depending on how big of an item you need your bag to accommodate!

Hope you are having a fabulous day!!!  Thanks for stopping by!!!

pinTHIS SHAREthis TWEETTHIS EMAILthis
  • SueMarch 13, 2011 - 11:03 am

    this is beautiful. I am looking for ideas for mothers day cards and thank goodness I found your site. You do awesome work. Its very kind of you to share your knowledge.ReplyCancel

  • BarbieMarch 13, 2011 - 11:09 am

    So beautiful it would be great for a gift card and a little chocolate!!! Thanks for sharing your lovely inspiration.ReplyCancel

  • Lori mMarch 13, 2011 - 11:42 am

    What a stunning gift idea for Mother’s Day or any occasion, thank you for sharing.

    Blessings, Lori mReplyCancel

  • Marge (mer)March 13, 2011 - 11:54 am

    You never cease to amaze us, Becca! Can’t wait to receive my Grands and try this out!!!ReplyCancel

  • Sheila - UKMarch 13, 2011 - 12:00 pm

    Thanks for a wonderful tutorial Becca…your gift bag is beautiful and it’s so clever the way you did a partial cut.

    Love Sheila xxReplyCancel

  • Maureen ChandlerMarch 13, 2011 - 12:00 pm

    Hi Becca, I love your website and all your videos! It is better than TV and I am always learning something new! Thanks for all you share!!! Hugs!ReplyCancel

  • ChinnuMarch 13, 2011 - 12:04 pm

    Another Becca Beauty! Thanks for sharing!ReplyCancel

  • SuziMarch 13, 2011 - 12:22 pm

    Love it! Makes perfect sense AFTER I see you do it! Thank you!ReplyCancel

  • Cindy ClickMarch 13, 2011 - 12:40 pm

    I love this bag. I’m always needing gifts for the women in our bible study and this is perfect. Thanks for sharing your God-given gift. CindyReplyCancel

  • Pat SMarch 13, 2011 - 12:45 pm

    Another wonderful and useful idea from our craft queen! Thanks, Becca. I really love your Becca Bits.ReplyCancel

  • Candy MillsMarch 13, 2011 - 12:54 pm

    Thanks for another great tutorial, Becca!
    That Grand Label is a wonderful size for your gift bag.
    Hugs, CandyReplyCancel

  • Ina I.March 13, 2011 - 12:59 pm

    Great tutorial!!!! And indeed very easy.
    Thanks a lot!ReplyCancel

  • CherylMarch 13, 2011 - 1:01 pm

    Beautiful Becca!! I see some Easter candy baskets coming!! I wondered how you did it!!! I love your ability to “think out of the box”!!! Hugs and thank you for the tutorial!ReplyCancel

  • FMMarch 13, 2011 - 1:06 pm

    Love this idea! What a beautiful birthday gift idea for my elderly aunt! I’m going to get busy now! Thanks for the tutorial!ReplyCancel

  • Carol VMarch 13, 2011 - 1:22 pm

    Great gift bag and thanks so much for the wonderful videoReplyCancel

  • lois skiathitisMarch 13, 2011 - 1:53 pm

    I love it when you do the Becca Bits Becca they are so much fun. Your project is gorgeous. That big flower and huge bow really stand out so nicely. As always Becca, TFS!!! :-DReplyCancel

  • Mary H.March 13, 2011 - 2:14 pm

    Wonderful video. Would never had made any sense to me until I saw your demonstration!!!Thanks for taking the time to show us how you made this beautiful gift bag.ReplyCancel

  • MaryannMarch 13, 2011 - 2:18 pm

    Thank you so much for thetutorial on this Becca. It´s such a great idea, and a awesome way to wrap a little gift for someone, who has everything. Thanks so much for always sharing your great ideas with all of us.
    Have a wonderful week ahead hun.ReplyCancel

  • Barbara WilsonMarch 13, 2011 - 2:18 pm

    Lovely bag. Will have to try this.ReplyCancel

  • Naomi ArmentaMarch 13, 2011 - 2:19 pm

    Becca, I will have to give this a try!ReplyCancel

  • Mrs. HamMarch 13, 2011 - 2:47 pm

    Your set is amazing. I have learned so much watching your “Becca Bits”. Thank you, and I look forward to the next tutorial.ReplyCancel

  • JalineMarch 13, 2011 - 2:53 pm

    Wonderful video, thank you so much.ReplyCancel

  • Olga JewellMarch 13, 2011 - 3:23 pm

    Gorgeous gift bag, thanks for the fantastic video!ReplyCancel

  • MickieMarch 13, 2011 - 3:24 pm

    Whoo Hoo, this was a much needed Becca Bit!! You are just too too good girlfriend!ReplyCancel

  • Barbara JayMarch 13, 2011 - 3:27 pm

    Thanks for another great Becca Bit. Everything looks so simple when you do it. :) I can fiddle for hours trying to find a way to accomplish an idea I have . TFSReplyCancel

  • Eulalia GambiniMarch 13, 2011 - 4:04 pm

    Thanks a lot for the formidable video! I follow you from Italy every day… thank you once again for your incessant inspiration!!
    xoxoxo EulaliaReplyCancel

  • Karen BMarch 13, 2011 - 4:30 pm

    I would never have thought to do this. What a great use of the dies. This opens up yet another way to use these dies. BTW, you have the most gorgeous hands and voice. I’m sure you’ve heard this before but it really is true. thanks for sharing.ReplyCancel

  • LynneMarch 13, 2011 - 4:59 pm

    Becca, you have truly been blessed with such artistry and creativity! Thank you for sharing so many inspiring projects with us. By the way, I agree wholeheartedly with Karen B, your voice is mellow and soothing, your words comprehensive and concise, and your hands are indeed beautiful.

    I keep meaning to ask you, where can I find the beautiful crystal or mirrored card stand that you use in photos of your cards? LynneReplyCancel

  • ChaunMarch 13, 2011 - 5:01 pm

    I love this idea!
    Thanks for sharing more of your fabulous ideas!ReplyCancel

  • Tina Van EickMarch 13, 2011 - 5:22 pm

    Becca, Love the gift bag…another great idea!!! Gotta run and grab my Grand Calibur!!!

    God Bless You, TinaReplyCancel

  • ChelseaMarch 13, 2011 - 5:27 pm

    Wonderful tutorial on a lovely gift bag! Thank you so much for sharing your techniques.ReplyCancel

  • caroline hillMarch 13, 2011 - 6:36 pm

    You live up to your blogs name.Thanks I was wondering how you
    did that. Can not wait to try. From CarolynReplyCancel

  • Cindy haffnerMarch 13, 2011 - 7:16 pm

    FABULOUS Becca!!ReplyCancel

  • ShirleyMarch 13, 2011 - 7:18 pm

    I happened upon your website not long ago and can’t get enough of it. I’ve never seen such beautiful cards. I’m new to card making but after seeing your creations I have to rethink if I have the talent to do this. I love that you share your talents thru your tutorials, they are very helpful to us beginners, thanks.ReplyCancel

  • DelamaMarch 13, 2011 - 7:59 pm

    I really like it. And I’m glad that you did a video on it. Thank you for sharing.
    Have a great day :)
    DelamaReplyCancel

  • CharleneMarch 14, 2011 - 12:53 am

    Oh Becca – you are so very talented and creative. Thank you for sharing this video and tutorial on how to make the bag. I love it that we can use what we already have and don’t have to “purchase” a special template or die to create the idea. Blessings…..ReplyCancel

  • JoannMarch 14, 2011 - 2:44 am

    This is absolutely beautiful!!! I love it! Thank you for sharing this.ReplyCancel

  • Elfrieda EverettMarch 14, 2011 - 6:52 am

    Becca, thank you for the spellbinder cut out; I will try it. Good tutorial.ReplyCancel

  • KathyMarch 14, 2011 - 2:06 pm

    I LOVE this project!!!ReplyCancel

  • WillowMarch 14, 2011 - 2:21 pm

    Thanks Becca, that was great!!!ReplyCancel

  • RoulaMarch 14, 2011 - 11:26 pm

    Hi Becca.
    Your work is amazing.
    Love Roula…ReplyCancel

  • pegMarch 17, 2011 - 11:08 am

    What a great idea and another great use for those super-ginormous dies by Spellbinder!ReplyCancel


Hi there blog friends!!!  After I got finished with my card today I realized that when looking at the the sentiment, I may have created a little oxymoron, ha…ha.  What started out to be Just a Little Note turned into a blinged up note.  I’m shaking my head – I just didn’t think about this when I was in the throes of the pearls.  Kind of like simple elegance, right!?!  I mean is there really an simple elegance?  I know, the places our minds go!  At any rate the cutout heart is from a new set of Charm Dies that were custom made by JustRite.  Oh the possibilities!!  I can forsee making a little locket for a scrapbook page, for a card or to give a little girl with this die template.  This is the first time I’ve used it, but I know it will become a staple in my “toolbox”.  It’s just the right size – big enough for a locket or gift tag, but small enough that I could center it on Spellbinders Lattice Pendant for that trendy doily look.   Of course Spellbinders Parisian Accents seem to peek out from underneath a lot of things I make – lots of mileage with that set too.

I don’t know if you noticed, but the pattern on that Charm is perfect.  That’s because I used the matching stamp set that’s drawn to the perfect scale to go with the charm.  Since there are four different charms in the die set there’s a JustRite matching stamp set from the Cling Collection to go along with it – so pop on over to the JustRite site and have a look at the Charmed stamp set.

How obvious is it that I got carried away with the pearls, lol!!  I just love them, can’t you tell?  I tied a Peg Bow and embellished it with a homemade jewel pick and finshed off with a swirl of pearls.

SUPPLIES I USED
Stamps: JustRite Stampers – Charmed Cling Set
Paper: K and Company, The Paper Company
Ink: Colorbox Chalk Ink – PInk Pastel, Ancient Page – Azalea
Accessories: JustRite, Custom Dies – Charms, Spellbinders Lattice Pendant, Spellbinders Parisian Accents

Not quite finished with my next tutorial, but I may have it this afternoon or tomorrow.  Thinking about going to have coffee with the girls and then back for final touches.  I hope you’re doing something spectacular today!!

pinTHIS SHAREthis TWEETTHIS EMAILthis
  • lois skiathitisMarch 12, 2011 - 10:08 am

    Very pretty in pink Becca, I love how you have accessorized the card Becca. As always Becca, TFS!!! :-DReplyCancel

  • KarenTMarch 12, 2011 - 10:08 am

    This card is absolutely stunning!!! I really, really, love it!!! Thanks so much for sharing your talent!!!ReplyCancel

  • Naomi ArmentaMarch 12, 2011 - 10:30 am

    Beautiful as always!ReplyCancel

  • LenoriaMarch 12, 2011 - 10:51 am

    I love your card!! All the pearls and swirls are absolutely gorgeous.ReplyCancel

  • Mary H.March 12, 2011 - 10:53 am

    All the elements fit together perfectly to make this lovely creation. How in the world do you ever manage to always get it ‘just right’ so that it is a thing of beauty????Thanks for sharing.ReplyCancel

  • FernandaMarch 12, 2011 - 10:56 am

    Nothing you do is “just a little” everything is of :GRAND CALIBUR” !
    Just love all the exquisite details on this creation! Thanks for sharing!ReplyCancel

  • Sheila - UKMarch 12, 2011 - 10:59 am

    Oh another stunning card Becca….your colour choice and accessories are always so perfect too.

    Love Sheila xxReplyCancel

  • Chrissy SMarch 12, 2011 - 10:59 am

    Hi Becca I just love this card, if i received a card like this, i would cherish
    it forever. thank you for sharing your talents.
    hugs Chrissy xReplyCancel

  • ColoradoMarch 12, 2011 - 11:01 am

    Lovely card, Becca. I love all the pearls, but I guess I’m just too frugal to put that many on one card. I think my husband would think I was crazy if I did! LOL!!ReplyCancel

  • pamela watsonMarch 12, 2011 - 11:04 am

    Love the little note and pink is my favorite colorReplyCancel

  • Jeanielou KaufmanMarch 12, 2011 - 11:06 am

    I am doing something spectacular as you requested in your hopes. I am enjoying another great creation. It is so lovely with the pink hues. I often have wondered if you string all your pearl embellishments. Maybe you will answer that some day for us curious kittens… :-D…you know, “curiosity killed the cat”.
    Have a blessed day in Our LORD.
    Hugs, Jeanielou fr/PAReplyCancel

  • ChaunMarch 12, 2011 - 11:12 am

    I love the pearls too. Where do you get them? I can’t tell if the ones that are in a swirl, toward the right, are on a piece of acetate, or if they are on the cardstock. They are lovely, and I’d like to try this myself. Any tips to pearl application, or what brand pearls work best? I assume they are sticky-back pearls? Thanks!ReplyCancel

  • ROSE C.March 12, 2011 - 11:14 am

    I think its beautiful.ReplyCancel

  • chrisMarch 12, 2011 - 11:16 am

    Such a sweet card :)ReplyCancel

  • SusiMarch 12, 2011 - 11:23 am

    A lovely card, really liking the softness of the DP you chose for the background!ReplyCancel

  • Rebecca ShreveMarch 12, 2011 - 11:29 am

    Becca, this is so gorgeous!!
    When you showed the close up of the heart……….well, wouldn’t that be fun to do a heart card by placing the die near the fold! You could have a card on top of the card for a little secret message. What do you think?

    Thank you for sharing. God certainly has blessed us by blessing you.
    I love fall out!!

    BeckyReplyCancel

  • Shelly SchmidtMarch 12, 2011 - 11:47 am

    Another beautiful card! Love it- I am such a pink lover!ReplyCancel

  • MaryLouMarch 12, 2011 - 11:52 am

    Hi,

    You use those fabulous pearls in a lot of your cards.
    What are they called, and where do you get them?
    Inquiring minds want to know!

    Thanks,

    MarylouReplyCancel

  • lacyquilterMarch 12, 2011 - 12:02 pm

    Pretty.ReplyCancel

  • Francie (Montreal)March 12, 2011 - 12:04 pm

    Oooooh! This card is a real pearl! Lovely, delicate and pretty in pink.ReplyCancel

  • ChinnuMarch 12, 2011 - 12:07 pm

    So soft and delicate, Becca – very pretty!ReplyCancel

  • Tami BMarch 12, 2011 - 12:31 pm

    This is beautiful. I keep checking my local craft store for the Parisian Accents. I wish they would hurry up & get them in! And you know what else I wish? I wish I owned stock in the pearl embellishments industry, just because of you. Thanks for another absolutely gorgeous creation.ReplyCancel

  • Darlene GabrielMarch 12, 2011 - 12:40 pm

    Gorgeous card Becca (but then aren’t all your creations elegant and gorgeous?). I love the way you use pearls on your cards all the time. Love the pinks of this card and the new dies you’ve used. Thanks for being so willing to share your creations with us.ReplyCancel

  • LouiseMarch 12, 2011 - 12:41 pm

    Love your card, especially the bling!!!ReplyCancel

  • ChelseaMarch 12, 2011 - 1:20 pm

    OH! What a pretty card!! So feminine, and I love seeing the long horizontal shape of the card, rather than the standard rectangle. (Sorry that doesn’t make sense, but I don’t know the official description of that long type of card.) Anyway, thank you for sharing such beautiful work!ReplyCancel

  • Candy MillsMarch 12, 2011 - 1:23 pm

    Anyone would LOVE to receive this ‘little note’.
    My it is so beautiful.
    Love the paper and all of your dies as usual.
    Your bow. stick pin, and all those amazing pearls are so wonderful!
    Enjoy your time out with your friends :o)
    Hugs, CandyReplyCancel

  • MickieMarch 12, 2011 - 1:29 pm

    Been off line for several days due to circumstances and had to get on here ASAP to get a Becca FIX. LOL Paged through and you have done some more amazing work my dear. Can’t wait to get lined out to get back to crafting my cards, you have such wonderful ideas and I just love this flower. Gotta do that one!!ReplyCancel

  • EileenMarch 12, 2011 - 1:52 pm

    Beautiful card, beautiful bling!

    LOL EileenReplyCancel

  • Gloria WestermanMarch 12, 2011 - 3:04 pm

    So pretty and elegant…..just beautiful….ReplyCancel

  • DelamaMarch 12, 2011 - 3:05 pm

    I love the card. I like the back paper with the butterfly and flower and the heart templet you use and how you use the pearl on the card. Thank you for sharing.
    Have a great day :)
    DelamaReplyCancel

  • DawnMarch 12, 2011 - 3:34 pm

    So pretty!!!!
    Thank you for sharing the beauty!
    Hugs, Dawn
    ReplyCancel

  • Mary HarrisMarch 12, 2011 - 4:14 pm

    I love it!! I love the pearls and that stick pin… gorgeous!! That heart is just so sweet!ReplyCancel

  • Lori EllMarch 12, 2011 - 5:06 pm

    beautiful as usualReplyCancel

  • JeanMarch 12, 2011 - 7:25 pm

    Becca, This is so beautiful. I love the heart. This is a sweet card. Thank you for sharing your talent and your creative mind!ReplyCancel

  • Martha-Bristol,CTMarch 12, 2011 - 7:28 pm

    Beautiful!!ReplyCancel

  • Mary RobersonMarch 12, 2011 - 8:43 pm

    This card totally rocks! Love everything about it:)ReplyCancel

  • CindyMarch 12, 2011 - 9:18 pm

    Wow – that is some “little” note. I love it. All blingy and pink with pearls (two of my favorites!) Beautiful, Becca!ReplyCancel

  • MichelleMarch 13, 2011 - 12:33 am

    I love this card, it is the pink that grabs me, but I do have to admit before I read your blog post and I saw the sentiment I had to laugh. Nothing “little” about this design! Gorgeous.ReplyCancel

  • Pam HMarch 13, 2011 - 12:55 am

    Love those pinks!ReplyCancel

  • PatMarch 13, 2011 - 4:09 am

    As always your work has inspired me to do more different things with my craft work. Bless you . Pat xxReplyCancel

  • Dusty GallowayMarch 13, 2011 - 5:17 am

    This card is adorable! I have a question: What type of adhesive do you use for the pearls you use on so many of your cards…I seem to have trouble getting mine to stay on my cards!~ReplyCancel

  • patounineMarch 13, 2011 - 5:56 am

    superbe comme d’habitudeReplyCancel

  • MichelleMarch 13, 2011 - 9:20 am

    Beautiful! I love all of the pears and that new die cut from Just Right is perfectReplyCancel

  • AnneMarch 13, 2011 - 1:16 pm

    I think it’s just the right size :o)

    Very pretty!

    Hugs
    Anne (UK) xReplyCancel

  • Anne ( Midlands UK)March 13, 2011 - 1:45 pm

    Beautiful Becca. AnneReplyCancel

  • jennifer flettMarch 14, 2011 - 3:59 am

    that is lovely could do the smaller size
    for wedding favours
    jen (UK) xxReplyCancel

  • jennifer flettMarch 14, 2011 - 4:09 am

    Beautiful!
    another inspiring work of art
    jen (UK) xxReplyCancel

  • LisetteMarch 14, 2011 - 9:21 am

    Hi Becca!! Your cards are so inspirational for me. I have a question with the spellbinder dies, since you use them so much. When you cut out a label or anything that has very thin swirls, how to you get the cutouts out of the dies without bending them for making holes in them by trying to poke them out? Thanks for any tips!! God Bless. LisetteReplyCancel

  • Sue (suen)March 14, 2011 - 11:26 am

    What a delicate, lovely card, Becca! The heart charm is just wonderful, nestled on the parisian accents! The pearl flourish and DP choice are absolutely perfect!ReplyCancel

  • Jackie FieldsMarch 15, 2011 - 4:40 pm

    How long have you been making the cards? It sounds like you have everything possible to work with. I so envy your talent and would love to be able to duplicate your cards.
    Thanks again for sharing your talents.
    JackieReplyCancel

  • paulaMarch 15, 2011 - 4:46 pm

    simply stunning… far too nice for a note…

    Paula, Derbyshire, UK. x x xReplyCancel

  • Karen LinarezMarch 16, 2011 - 10:21 pm

    I love this card! Again, you shown your extraordinary creativity with your use of the spellbinders layers and the way you stacked them and laced the ribbon through. And, of course those bows of yours are scrumptious. I am trying to accomplish such fluffy bows, but I guess I need better ribbon to work with. When I get one that looks like a “Becca” bow, I’ll post it on my new blog for you to see!ReplyCancel

  • ConniecrafterMarch 18, 2011 - 3:29 pm

    So Beautiful, love the paper, great pearl accenting and great detail on your pin too!ReplyCancel

Hi there blog friends, I mentioned I would be back today with this tutorial – I simply ran out of steam last night and became engrossed in the news of the earthquake.  So this is a quick and simple tutorial – honestly if you blink you will miss it, lol!    I received a lot of emails asking me to go in greater detail on how I made these Lacey Flowers on the card I have in the following post:  https://www.amazingpapergrace.com/if-we-knew/ It’s so, so easy . . . no learning curve, I promise!  So sit back and enjoy!  I hope you try this for yourself!

I know that someone will ask me about the tool that I used in the video.  It has a slit in the tip that makes it easy to curl papers – it is a quilling tool and can be purchased at Hobby Lobby (less than $5.00) or any hobby place that carries quilling supplies :-)

pinTHIS SHAREthis TWEETTHIS EMAILthis
  • Lori mMarch 11, 2011 - 1:43 pm

    Becca,

    I follow your blog daily and don’t always have the few minutes needed to comment on how incredible your work is. Many thanks for all you do to help keep my brain inspired.

    Blessings, Lori mReplyCancel

  • Elaine AllenMarch 11, 2011 - 1:43 pm

    Becca –

    Thank you for another womderful tutorial video. What a beautiful flower this makes.

    Elaine AllenReplyCancel

  • Marge (mer)March 11, 2011 - 2:19 pm

    This is just such a “WOW” flower — I totally need to make some of these!!! Thank you sooo much for sharing your incredible talent again, Becca!!!ReplyCancel

  • CookieMarch 11, 2011 - 2:21 pm

    And you will too, I don’t think there is anything that you can’t do when it comes to paper…. this is gorgeous… and I’m gonna save it…. thanx for sharing your creativityReplyCancel

  • Valerie MartinMarch 11, 2011 - 2:21 pm

    Oh Becca!!! You are such a SWEETIE!!! I just adore you and ALL of your creations…I think this is one of my FAVS!!! Have a GREAT weekend!!!
    10,000 Blessings,
    Valerie MartinReplyCancel

  • Kathy HMarch 11, 2011 - 2:24 pm

    Becca,

    Thank you for this great tutorial! The flower is beautiful and I’m anxious to make one of my own.

    Kathy H.ReplyCancel

  • GaleMarch 11, 2011 - 2:41 pm

    Becca,
    Thank you so much for this flower – Becca Bit. It does look very easy and so beautiful and different.
    thanks.
    GaleReplyCancel

  • RebekkaMarch 11, 2011 - 2:47 pm

    Thank you Becca! These sure are adorable!
    Have a great weekend.ReplyCancel

  • JalineMarch 11, 2011 - 2:55 pm

    Wonderful and easy, I believe you now, lol. Thank you so much for taking the time to make the video.ReplyCancel

  • ConniecrafterMarch 11, 2011 - 2:55 pm

    I just got my order of the lacey circles yesterday, thanks for sharing! Beautiful card!!ReplyCancel

  • Kathy PMarch 11, 2011 - 2:56 pm

    I love this flower and as you say, so simple ….. once you know what to do! lol Thanks for sharing with us. I love the videos as I learn with my eyes. Can’t wait to try this out but this weekend I am trying to tidy up my craft room so I can get productive next week. lolReplyCancel

  • Mrs. HamMarch 11, 2011 - 3:05 pm

    Wow, That does look easy. Thanks for another tutorial. I have learned so much watching your “Becca Bits”. Keep them coming.ReplyCancel

  • lois skiathitisMarch 11, 2011 - 3:19 pm

    I must say that was quick and easy even I could make some of those pretty flowers. LOL!!! I love it when you do the Becca Bits. As always Becca, TFS!!! :-DReplyCancel

  • Pat SMarch 11, 2011 - 4:14 pm

    Thank you, Becca. I will definitely try this! These are so cute!ReplyCancel

  • DawnllMarch 11, 2011 - 4:21 pm

    just love these, thanks for sharing sweetieReplyCancel

  • Olga JewellMarch 11, 2011 - 4:27 pm

    These are fantastic!. Thanks for telling us how, now off to try!ReplyCancel

  • MaryannMarch 11, 2011 - 4:35 pm

    WAUW thank you so much for sharing this Becca, these flowers are sooo beautiful and looks so easy to make, that everyone should be able to make them. You´re always sooo smart. TFS that dear friend and have a wonderful week-end.ReplyCancel

  • Judy I, St. Louis MOMarch 11, 2011 - 4:39 pm

    Wow! that looks so easy I think even I could do it. Thanks for the great tutorial. I may even have the tool from back in the last century when I was doing quilling.ReplyCancel

  • Linda LMarch 11, 2011 - 4:49 pm

    Becca they are adorable and so are you for sharing them with us. Thank you….I will try it with my Lacey Circles.ReplyCancel

  • DelamaMarch 11, 2011 - 5:12 pm

    I love watching your video and I learn alot from them. Thank you for take the time to doing them. And I hope everything is going ok at your house.
    Have a great weekend :)
    DelamaReplyCancel

  • Rachel BrooksMarch 11, 2011 - 5:14 pm

    Thank you for the tutorial. Now I’ll have to add to the Spellbinder’s collection! You are costing me SERIOUS money!! :)ReplyCancel

  • LynneMarch 11, 2011 - 5:26 pm

    Thanks for the great tutorial Becca. Just lovely and am treating myself soon to a set of scallop dies for my layering but more for the flowers!! Bless you for taking the time to share.

    xReplyCancel

  • Candy MillsMarch 11, 2011 - 5:38 pm

    Thank you!!!!!
    I adored the flowers on your card – but really didn’t know how you made them :o)
    Love, CandyReplyCancel

  • MargeMarch 11, 2011 - 5:53 pm

    Love your flowers and Cards Fabulous as always I look at your page each day Wonderful Inspiration. MargeReplyCancel

  • Deebi27March 11, 2011 - 6:22 pm

    Becca, I just saw the assembly of these flowers in the last week on another blog, but your take on the darling flowers are a BIG kick up several notches…thanks SO very much! Can’t wait to try these out! Your creativity is an amazing, thanks for letting me and sooo many others tag along :o)!!!ReplyCancel

  • Rhonda ZMarch 11, 2011 - 6:27 pm

    Great tutorial. I can’t wait to make these.ReplyCancel

  • Shelly SchmidtMarch 11, 2011 - 6:44 pm

    Wow- I love this! This is such a pretty flower- thanks for sharing the tutorial. The card is just gorgeous!ReplyCancel

  • caroline hillMarch 11, 2011 - 6:46 pm

    Thank you so much for sharing your Becca bits.
    You make papercrafting more interesting.ReplyCancel

  • MichelleMarch 11, 2011 - 7:05 pm

    Genius! I love these! I love making paper flowers.ReplyCancel

  • TrishaMarch 11, 2011 - 7:19 pm

    Thank you for doing this. We were just downgraded from a tsunami warning to an advisory and hubby just had surgery yesterday afternoon, so it was a double blessing to have your wonderful tutorial to distract me from my worries. (Where’s all that faith when you really need it?) Three minutes of forgetting. Thank you for that!ReplyCancel

  • Nancy BMarch 11, 2011 - 7:36 pm

    I am amazed at ways you come up with to use Spellbinder dies. How in the world does that work? Do you get them and challenge yourself to think of different ways to use them. I’d love to see you address this issue with a future post.ReplyCancel

  • Beth B.March 11, 2011 - 7:42 pm

    How adorable are these flowers?!!!!! Thanks so much for the tutorial!ReplyCancel

  • nancy wolffMarch 11, 2011 - 8:12 pm

    Thanks, just love the look and really appreciate you taking the time to show us how it’s done. Thank you.ReplyCancel

  • Jeanne SzaboMarch 11, 2011 - 9:08 pm

    Wonderful!!! I can not WAIT to show my card club this technique! I love your Becca Bits, cards, creativity and blessings you share with us. Thank you!ReplyCancel

  • ClaudiaMarch 11, 2011 - 9:58 pm

    Becca: You are unbelievably talented. I am going to go for the flowers but I know they may not be as beautiful as ours. Thank you for the wonderful tutorial. You’re the best!ReplyCancel

  • Kelly SasMarch 11, 2011 - 10:08 pm

    Thanks Becca so much for sharing this technique! I LOVE it and can’t wait to give it a try!!!!ReplyCancel

  • michelle frasherMarch 11, 2011 - 10:52 pm

    this technique is so simple yet looks wonderfully complicated. thanx for all your great tutorials. you inspire so many people with your art.ReplyCancel

  • Neesey GebalskiMarch 11, 2011 - 11:30 pm

    These flowers are so cute. TFSReplyCancel

  • AmandaMarch 12, 2011 - 2:46 am

    Hi Becca. You are just the ‘cleverest’ lady I have ever come accross in blogland!! I just love your blog and visit it whenever a new post is published, but don’t always have the time to leave a comment. Your creations are absolutely gorgeous/fabulous/grand … not really enough words to describe them :-)
    Thanks for sharing your knowledge with us.
    God bless!ReplyCancel

  • Corine van der ZeeMarch 12, 2011 - 4:12 am

    Thank you so much for sharing!

    Hugs CorineReplyCancel

  • HeatherMarch 12, 2011 - 5:25 am

    Brilliant Becca – a nice alternative to all the rest doing the rounds. tfs
    Hugs
    HW(UK)
    xReplyCancel

  • Sheila - UKMarch 12, 2011 - 5:36 am

    Oh I loved these flowers when you did them on your card so thank you very much for the tutorial can’t wait to give then a go…so pretty and unusual. You’re a star Becca.

    Love Sheila xxReplyCancel

  • MaryMarch 12, 2011 - 5:50 am

    Wow they are gorgeous Becca thanks for sharing :)ReplyCancel

  • josie walrathMarch 12, 2011 - 6:28 am

    thank you so much Becca what a pretty flower.ReplyCancel

  • AnneMarch 12, 2011 - 7:04 am

    Thanks so much for the tutorial, Becca! You make it look so easy :o)

    Hugs
    Anne (UK) xReplyCancel

  • LeanneMarch 12, 2011 - 7:46 am

    Thanks for this amazing tutorial. Before I viewed it it never seemed like it was a new twist to quilled roses. Beautiful!ReplyCancel

  • HeatherMarch 12, 2011 - 8:55 am

    Thank you for the tutorial … it’s a tremendous help to “see” what you did instead of just read it.ReplyCancel

  • RitaMarch 12, 2011 - 9:40 am

    Hi Becca – love how you think ‘outside the square’ with things we use in traditional ways – thank you – love the result of the lacy flowersReplyCancel

  • cynthiaMarch 12, 2011 - 9:58 am

    Becca, I really enjoyed the “Becca Bit” concerning flowers. I can’t wait to try it, in a few minutes! Be blessed and stay in the crook of His arm. CynthiaReplyCancel

  • DawnMarch 12, 2011 - 10:14 am

    Lovely flowers and your video such a help in
    understanding how to make them!
    Thank you again for sharing your amazing talent!
    Hugs, Dawn
    ReplyCancel

  • Jeanielou KaufmanMarch 12, 2011 - 11:13 am

    I loved all your videos on the ‘bits of great info’. I even lost sleep as I stayed late on this puter last evening. It was all wonderful info to let us be better crafters. Thanks for all the time you gave to do the videos. Every hint is a very precious gift to us. I hope we all run with them and share all your talent and wisdom with others. That is why we are here…to pass our love to others. We were created for God’s pleasure.
    Thanks for you being such a blessing to us.
    Hugs, JeanielouReplyCancel

  • Darlene GabrielMarch 12, 2011 - 12:42 pm

    These flowers are just too adorable – thank you for the tutorial.ReplyCancel

  • LizetteMarch 13, 2011 - 7:59 am

    Stunning and easy! Best combination! LOVE IT!ReplyCancel

  • Mary AllenMarch 13, 2011 - 5:18 pm

    You have the greatest ideas and you make it look so easy Becca. Thank you for sharing your amazing talent. Hugs, MaryReplyCancel

  • RosieMarch 13, 2011 - 10:24 pm

    Becca: I tried making a flower and used (not real heavycardstock). Are you using paper or cardstock? My little green flower didn’t want to relax after I used a *dot* and wondered if that was why. Could you email me to let me know? My holes in the scallops aren’t as large of a cut out either, wondered if that would have anything to do with it. Thank you in advance for your reply.ReplyCancel

  • MonicaMarch 14, 2011 - 5:08 pm

    WOW! WOW! WOW! You make everything look so easy, so of course I HAVE to try this! Thank you so much for sharing everything with us!ReplyCancel

  • Karen LinarezMarch 16, 2011 - 10:30 pm

    Thank you for that tutorial! I would have been one of those people to ask about the tool, that’s exactly what I was thinking when I saw it in the video. You are so stinkin creative! lolReplyCancel

  • […] has created a wonderful Felted Rolled Roses video tutorial.  You can also view Becca Feeken’s Video on Rolled Lacey Roses.  I used a similar technique using Glimmer Mist, Chalkboard Mist and Glimmer Glam to add a layer […]ReplyCancel

  • […] card and must admit that making the flowers was fun. I saw this Spellbinders flower tutorial  at Becca Feeken’s blog. Instead of using the lacey circles I used the standard circles small. Mine is not nearly as […]ReplyCancel

I N F O