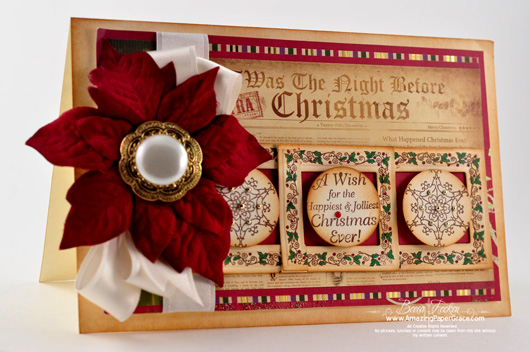
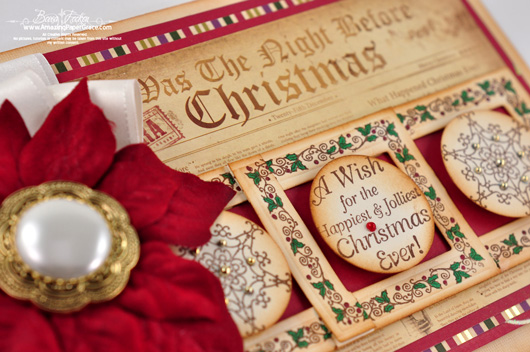
Hiya!!  Happy Friday.  So ya know what today is?  That’s right – Sketch Challenge Friday over at the JustRite Inspiration Blog.  My card today follows the sketch – it’s oh so classic – I hope you’ll play along too!  A couple of details first – I  I used Christmas Nested Frames and Whimsical Christmas.  I cut three frames and snipped them so that they would make three squares.  The frames (made with Spellbinders Classic Long Rectangles LG) are stamped with Memento Rich Cocoa and colored with Copics – G16 and R59.  I stamped the flakes and sentiment from Whimsical Christmas and cut them out with a 1 1/2" EKSuccess Punch.
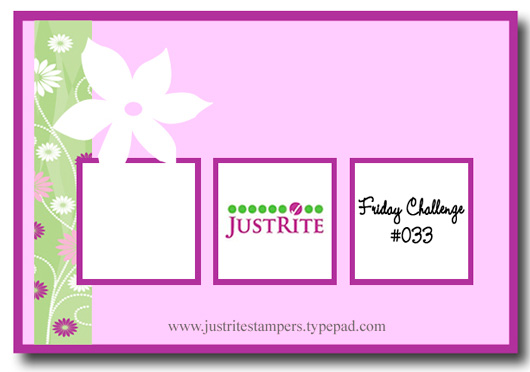
So here’s the JustRite sketch if you’d like to give it a go.  All the details are right here on the JustRite Inspiration Blog.
Card Recipe:
Stamps:  JustRite Stampers – Whimsical Christmas, Nested Christmas Frames
Paper:  Kaisercraft – Dear Santa Collection, The Paper Company
Ink:  Memento – Rich Cocoa
Accessories:  Spellbinders Long Classic Rectangles LG #2 and #4, 1 1/2" EK Success Punch, May Arts Satin Ribbon, Poinsettia


P.S.  Only a couple more days left to get your free catalog.  You can still receive a FREE 2010 JustRite Catalog & Idea Book simply by using this coupon code:  IDEAS811 in the box marked promotional code at checkout.  Offer is good until August 31st.
 

pinTHIS SHAREthis TWEETTHIS EMAILthis
  • ColleenB.August 27, 2010 - 1:13 pm

    Oh, another Beautiful card.
    The poinsettia looks so real.
    ColleenB.ReplyCancel

  • Melissa B MitchellAugust 27, 2010 - 1:14 pm

    This is so beautiful. I love the antique look and colors.ReplyCancel

  • janeyAugust 27, 2010 - 1:19 pm

    This is stunning, Becca!ReplyCancel

  • BarbaraAugust 27, 2010 - 1:26 pm

    Very lovely l!! I have not gotten into the Christmas mood yet. Maybe if I see enough Christmas cards it will push me. :)
    The stores are filled with Christmas decorations and I am still buying summer clothes.ReplyCancel

  • ColoradoAugust 27, 2010 - 1:40 pm

    Just tried to check out with the free Just Rite catalog and it didn’t work. Don’t know why I should have to put in a credit card for something that is free.

    Added by Becca >>>>> Hi Colorado – I just tried it and when I put in the code in zeros out shipping and then checks off a button that says no payment is required. Perhaps you have something else in your cart or the code may have been entered incorrectly. Could you give it another try – everything went through fine for me.ReplyCancel

  • LynnAugust 27, 2010 - 1:45 pm

    Oh, Becca your cards are always so awesome – I just love this christmas one – thanks for sharing your talent with us all.ReplyCancel

  • Valerie MatinAugust 27, 2010 - 1:46 pm

    OHHH it is BEAUTIFUL!!! It literally took my breath away!
    ValerieReplyCancel

  • ElaineAugust 27, 2010 - 1:50 pm

    This is gorgeous!ReplyCancel

  • LennyAugust 27, 2010 - 1:59 pm

    Your card is so beautiful it makes a wonderful gift by itself. In fact, IF I could make such lovely cards I’m afraid I’d keep them for myself! ;)ReplyCancel

  • JessicaAugust 27, 2010 - 2:35 pm

    Wow what a beautiful card Becca! You always create so many beautuful things!!! hanks for sharing your talentReplyCancel

  • JoAnn BurnhamAugust 27, 2010 - 2:59 pm

    Wow, your card is gorgeous. TFSReplyCancel

  • Linda C.August 27, 2010 - 3:06 pm

    Picture PERFECT! Thanks for the inspiration!ReplyCancel

  • SuziAugust 27, 2010 - 3:15 pm

    The sketch alone looks like Classic Becca. You turned it into a thing of beauty. Love the “headline” paper. TFS!ReplyCancel

  • DebraKAugust 27, 2010 - 3:24 pm

    oh my, this is just stunning! Looking at your projects is like being in an art gallery… I am mesmerized!ReplyCancel

  • GaleAugust 27, 2010 - 3:49 pm

    Beautiful just beautiful.
    GaleReplyCancel

  • NY DebbieAugust 27, 2010 - 4:59 pm

    gorgeous!!!!ReplyCancel

  • mary puskarAugust 27, 2010 - 5:34 pm

    Knockout card Becca! I just have to write and tell you that I used your system for organizing my ribbon and I am in love with it. And boy is it space saving! It’s unbelieveable. I put the pics on my blog.

    Mary
    ReplyCancel

  • sheilaAugust 27, 2010 - 7:03 pm

    Oh My Gosh!!!!!! This is the most beautiful Christmas Card I have seen yet.ReplyCancel

  • Deb VandersteegAugust 27, 2010 - 9:22 pm

    Wow,This is a beautiful card Becca.ReplyCancel

  • SusanAugust 27, 2010 - 10:03 pm

    Becca, I just love everything about this card …super duper,

    I must have that christmas set after seeing your beautiful creation, thanks for sharing.ReplyCancel

  • Gloria HaneyAugust 27, 2010 - 10:11 pm

    Beautiful card, Becca — stop by my blog, I’ve left an award for you there.ReplyCancel

  • FabellaAugust 28, 2010 - 5:53 am

    Hello Becca. I’m surfing cross your blog an hour or perhaps a little bit longer. I’m absolutly faszinated about what I can see here. You’re such a big talent, never saw things like this before. Great!! And thanks tons to you to show us, how we can do thinks like you do! Fabulous! I’m sure, I’ll come back again and again and again :)ReplyCancel

  • EileenAugust 28, 2010 - 7:23 am

    Hi Becca…..another Masterpiece…..absolutely stunning!!!
    Thank you for sharingit with us.

    LOL EileenReplyCancel

  • lengowAugust 28, 2010 - 11:00 am

    Beautiful card, very beautiful ,
    Salute !ReplyCancel

  • BernieAugust 28, 2010 - 4:24 pm

    This is stunning, Becca! Love everything about it especially the colors!
    Blessings BernieReplyCancel

  • ConniecrafterAugust 28, 2010 - 5:18 pm

    Awesome vintage card, love all the gem accenting, neat framing and beautiful flower!ReplyCancel

  • lois skiathitisAugust 29, 2010 - 5:08 am

    What a beautiful vintage holiday card you have created. The poinsettia looks so real. Beautiful colors chosen and I can see the little pearls that you used. Beautiful work. As always Becca, TFS!!! :-DReplyCancel

  • Traci S.August 29, 2010 - 9:00 am

    Wow, Becca, this is an incredibly beautiful card. It makes me wonder how much time you spent on it. There are so many tiny beautiful details in this. And, I really like the layout. I can’t tell if they are actually cut windows–that are lined…or drawn that way. I really like this card!

    Thank you so much for taking the time to show it!

    He IS Able,
    Traci S.ReplyCancel

  • Traci S.August 29, 2010 - 9:01 am

    Oh, I am so sorry, Becca~

    I forgot to mention that AMAZING HUGE poinsettia and bow! THAT is gorgeous. Just open my mouth, and keep it hanging…GORGEOUS!

    You keep on surprising me!

    He IS Able,
    Traci S.ReplyCancel

Hello there!  Thanks so much about the kind remarks you left about my planner.  Yes I’ll be making a tutorial for it, but first I need to make sure the materials are readily available so that I can head off questions before the emails start coming in, lol.  Stay tuned for that okay?  In the meantime I have card to share using the August Release for Our Daily Bread Designs.  My sentiment and sunflower is stamped from the Happy Fall set and the sunflower is die cut from one of ODBD’s new dies.  For this sunflower I stamped three times with white embossing powder and colored the sunflower with chalks.  I cut each one out and trimmed for three different layers. 

For this card I picked gingham as my background and smudged with a little bit of green dye based ink.  I used a Cuttlebug background – this one is exclusive to OhMyCrafts and if you ask me it begs for pearls in each of the little diamonds – okay – twist. my. arm.  How heavenly is that ribbon?  Yep, that’s a Walmart purchase (I am not kidding).  I added another piece of grosgrain for a real bow with two leaf pins (from Joann’s) then popped everything up on Spellbinders Labels Fourteen.  To finish I popped my layered, chalked sunflower on the bottom edge of my Spellbinders panel.  I know it’s hard to believe but I really tilted that panel :-)  You can’t fault a girl for wanting have fun, right?!!

Card Recipe:
Stamps:  Our Daily Bread Designs – Happy Fall
Paper:  The Paper Company, Dena’s Closet – Colorbok
Ink:  Green Dye Based Ink
Accessories:  Our Daily Bread Designs – Sunflower Die Cut, Cuttlebug – OhMyCrafts Exclusive, Spellbinders Labels 14, Embroidered Ribbon, Leaf Pins, Pearls, Chalk


Thanks for stopping by!!


pinTHIS SHAREthis TWEETTHIS EMAILthis
  • Elaine AllenAugust 27, 2010 - 9:12 am

    Gorgeous, Gorgeous card Becca! I love how you have an eye for putting things together. This is just so fresh and clean looking. Beautiful work.

    Elaine AllenReplyCancel

  • MickieAugust 27, 2010 - 9:38 am

    Another pretty one Becca. I love the sunflower, oh well, I just love all of it!ReplyCancel

  • ColleenB.August 27, 2010 - 9:46 am

    Stunning! Absolutely Stunning.
    Love that ribbon.
    ColleenB.ReplyCancel

  • Debbie OlsonAugust 27, 2010 - 9:50 am

    Beautiful, Becca! That’s my fave of the new Spellbinders dies, I think, and that embossed shape behind is a lovely addition as well!ReplyCancel

  • Michel EAugust 27, 2010 - 9:50 am

    Gorgeous as usual.ReplyCancel

  • MargieAugust 27, 2010 - 10:09 am

    Becca, such a sweet card; I really luv everything about it. The lace–whata find. Another lovely day and loverly card. Thx –
    B-BlessedReplyCancel

  • MarcieAugust 27, 2010 - 10:12 am

    Becca,
    I really liked the embossing folder you used. Pearls were definitely a great addition !!!
    MarcieReplyCancel

  • RebekkaAugust 27, 2010 - 10:22 am

    BeautifulReplyCancel

  • CheriAugust 27, 2010 - 10:45 am

    Yikes, beautiful! Can you share where you got those leaf pins, I love pins and can’t find any!!!!!!!!!!!!!
    TFSReplyCancel

  • EzminaAugust 27, 2010 - 10:55 am

    A absolutely wonderful card!! Love the ribbon!ReplyCancel

  • JeanAugust 27, 2010 - 11:08 am

    Great card! Love the ribbon! Love the cuttlebug background! So cute!ReplyCancel

  • JessicaAugust 27, 2010 - 11:29 am

    Walmart…. really…. I’ve never seen anything as lovely as this in my wally world. They are even discontinuing their fabric/sewing section. They only have a small one that has no fabric, and little bits of yarn, and notions like 3 or 4 shades of thread, one package of needles, a sewing basket or two. You get my drift. If I need fabric, I’ll have to go to a fabric shop. I don’t know if there are any!
    Thanks for sharing your lovely card with us.ReplyCancel

  • Regina NAugust 27, 2010 - 12:15 pm

    What a nice card. Fresh and pretty.ReplyCancel

  • ChinnuAugust 27, 2010 - 12:17 pm

    Lovely card, Becca! The ribbon is so pretty (how do you always have such amazing finds?) – and I love the pearls in the embossed diamonds.ReplyCancel

  • GaleAugust 27, 2010 - 12:21 pm

    Becca,
    Your cards are always just so beautiful. Thank you so much for sharing them. Keep up the great work.
    GaleReplyCancel

  • janeyAugust 27, 2010 - 12:30 pm

    Not everything needs to be ‘centered’ or straight on grain (as it should be for most things in sewing) – so I love the tilted panel. I also love that CB panel….gotta’ check that one out! This card is just so pretty.

    Thanks for sharing, Becca.ReplyCancel

  • Bev J.August 27, 2010 - 12:35 pm

    Love your card and that pretty ribbon. Like Jessica, our Wal-Mart just remodeled and got rid of most of the ‘stuff’ in fabrics. Bummer!ReplyCancel

  • MichelleAugust 27, 2010 - 5:34 pm

    So pretty! I love the CB background, and the added little pearls… stunning!ReplyCancel

  • DebbieAugust 27, 2010 - 7:09 pm

    Beautiful card as always. You are so talented and amazing.ReplyCancel

  • DiannaAugust 28, 2010 - 12:09 pm

    I absolutely love the card. I went to OhMyCrafts and looked for the Cuttlebug background with the diamonds and I can’t find it anywhere! What is the name of it?

    Thank you!ReplyCancel

  • ConniecrafterAugust 28, 2010 - 5:16 pm

    very pretty, I think the background needs pearls too, such pretty ribbon!ReplyCancel

  • lois skiathitisAugust 29, 2010 - 5:16 am

    This is so beautiful and the embossed ribbon is to die for. I love the gingham BG paper it’s a nice backdrop for the mail focal point and the embellishments are right on IMHO. I’m so excited that you are going to do the tutorial for us Becca, thank you so much for that. The planner is such a neat idea and will help me to stay more organized. As always Becca, TFS!!! :-DReplyCancel

Hello there, something other than a card today.  I had big fun with this project and with some tweaks I think I can make a few for different occasions.  JustRite Stampers is releasing a new font today called Myriad Pro (in upper case and lower case) and did it ever come in handy for this project.  Since I didn’t have stamps with these words, I could make my own and make them quickly!  This is by far my favorite JustRite Stampers font!!  It is very balanced and since it doesn’t have serifs the spacing of the letters is perfect.

This is a view from the side – the planner simply folds and is tied with ribbon.  I originally tried magnets but learned that they need to be very strong to hold everything together, mine were on the weak side.  I’ll be on the look out for the stronger ones..

This is a view with the planner opened up.  On the left is a Junior Legal pad cut in half then trimmed to 5 3/8".  In the center and on the right are two small notebooks that I made by cutting paper, cutting the binding holes with a binding punch then threading the coil.  The covers and backs are pieces of design paper backed by a more sturdy cardstock.

Laying down :-)  For each notepad I made I cut a Spellbinders Lacey Square and Labels Fifteen to make a label for the contents.  On the front of the planner I used Labels Four.

Lastly, this is the flip side!  I used fabric tape on all the joints after I learned that paper was not well suited to the stress of the bending.  The fabric tape I used is actually silk medical tape.  We have tons of it laying around the house and nothing is safe from my crafting scavenger hunts, lol!!

Project Recipe:
Stamps:  JustRite Stampers – Myriad Pro – 50 pt Upper Case and Lower Case
Paper:  My Minds Eye
Ink:  Ancient Page – Bordeaux
Accessories:  Spellbinders™ Lacey Squares, Spellbinders™ Labels Fifteen, Spellbinders™ Labels Four, Ribbon, Pearls, Binding Machine, coils, typewriter weight paper, heavy cardstock, fabric tape

In case you didn’t stop to see me yesterday I just want to repeat some things that are going on with JustRite Stampers.  It’s been a big month for JustRite Stampers – remember you have until August 31st to order your free catalog and the bonus is that the shipping on the catalog is free too.  Check for the details HERE.   Also, JustRite has announced that they will now be selling Copic Markers.  You can see the entire JustRite selection of Copic Markers HERE and if you’re not quite sure which ones to buy – there’s a JustRite chart with blending sets appropriate to the artwork on JustRite stamps – you can download it HERE.

Thanks for stopping by!!

pinTHIS SHAREthis TWEETTHIS EMAILthis
  • ShawnaAugust 25, 2010 - 9:12 am

    OMGOSH! This is gorgeous Becca!! I hope you plan on doing a tutorial on this? Pretty please!!!!!ReplyCancel

  • Susan GAugust 25, 2010 - 9:18 am

    Fabulous project! What a terrific gift that would make.ReplyCancel

  • sallieAugust 25, 2010 - 9:24 am

    I love this, My best friend is planning her daughter’s wedding and I think I will make one as a Wedding planner. I love your ideas they are always so fresh and fantastic!ReplyCancel

  • Heather xAugust 25, 2010 - 9:29 am

    Oh yes please a tutorial! I really need one of these Becca, so beautiful and lush :)
    *hugs* Heather xReplyCancel

  • TrinaAugust 25, 2010 - 9:29 am

    GORGEOUS GORGEOUS!!! I HOPE YOU MIGHT OFFER THE RECIPE FOR THIS ONE. LOVE YOUR BLOG AND ALL THAT YOU SHARE!
    HAVE A GREAT DAY!ReplyCancel

  • JessicaAugust 25, 2010 - 9:35 am

    Hey Becca. I love this Holiday list. I can create my own size to make one. But I’m thinking I’d like to have at least a measurement to have a starting point. Will you be adding the measurements to it anywhere? Thanks for all your love creations. I am always amazed at how lovely they are. TFSReplyCancel

  • paulaAugust 25, 2010 - 9:45 am

    wow what a fab project… the colour schemes and styles of these are endless and is making my brain whizz into action!!

    thanks for sharing such a fabulous project – as usual.

    Paula x x xReplyCancel

  • EarlineAugust 25, 2010 - 9:49 am

    What a wonderful project you made. What a great ideal love it.ReplyCancel

  • EliAugust 25, 2010 - 9:54 am

    Make me one…lol. This is so awesome. I may just have to make one. Do you mind? I LOVE the new font…you’re right, it is perfect.ReplyCancel

  • janeyAugust 25, 2010 - 9:58 am

    This is very useful idea! Thanks!ReplyCancel

  • Kelly MassmanAugust 25, 2010 - 10:14 am

    So pretty! The comment above is pretty fun–make me one!! That would be an AWESOME giveaway–one of something you made… :-)ReplyCancel

  • SuziAugust 25, 2010 - 11:06 am

    I hadn’t thought of cloth as the cover material. Duh! What a great idea! Gotta start watching for some nice remnants! Thanks for sharing the wonderful project.ReplyCancel

  • Debmom4caAugust 25, 2010 - 11:12 am

    Very cool project. Thank you for the catalogue reminder I do want one.ReplyCancel

  • lengowAugust 25, 2010 - 11:23 am

    Wow, Super extra idea,
    Regards,
    AgaReplyCancel

  • GailAugust 25, 2010 - 11:55 am

    Beautiful..i also would love to be able to make one for myself and a couple for gifts..hope you share your awesome creation..loves yaReplyCancel

  • NY DebbieAugust 25, 2010 - 12:05 pm

    What a great idea..and beautifully done as wellReplyCancel

  • Jenny LavenderAugust 25, 2010 - 12:17 pm

    GORGEOUS, as usual!! A tutorial would be awesome!! Thanks for sharing!

    Jenny L.ReplyCancel

  • TeelaAugust 25, 2010 - 1:07 pm

    This is beautiful. In fact, who wouldn’t LOVE to receive this! You are so gifted!ReplyCancel

  • Miss GAugust 25, 2010 - 1:25 pm

    If we stopped by yesterday??? Are you kidding

    BeautifulReplyCancel

  • […] Becca's Holiday Planner Add new comment […]ReplyCancel

  • Candy MillsAugust 25, 2010 - 2:24 pm

    OHHH Becca,
    Your planner is beautiful! What a fantastic idea and I can also see it being used for other reasons.
    Your papers are so pretty. Beautiful font used :o)ReplyCancel

  • StefanieAugust 25, 2010 - 3:04 pm

    Gorgeous! You are one talented Lady. Thanks for sharing all you do.ReplyCancel

  • Clare CurcioAugust 25, 2010 - 3:25 pm

    This is wonderful! I’m starting to feel the “mood” of Christmas trickling in! It’s time to start thinking about it anyway! I love thinking of Christmas all year long.ReplyCancel

  • Bev J.August 25, 2010 - 3:29 pm

    What a beautiful and practical planner-your work is awesome. tfsReplyCancel

  • Michelle ~ daydreams505August 25, 2010 - 3:40 pm

    This is just beautiful. :)ReplyCancel

  • alexAugust 25, 2010 - 3:45 pm

    This is just wonderfull and beautiful.. also very usefull, I need one!!! what a great idea.ReplyCancel

  • Terri SAugust 25, 2010 - 4:11 pm

    Gorgeous! I echo the request for a tutorial! What cutting equipment did you use on the jr. legal pad? Your work is always stunning.ReplyCancel

  • Linda CuellarAugust 25, 2010 - 4:29 pm

    Beautiful planner. Keeping my fingers cross that you do a tutorial on this. Would make a wonderful gift. TFSReplyCancel

  • Rosie WaldtAugust 25, 2010 - 5:17 pm

    Love you planner and hopefully you will do a tutorial. Christmas is just around the corner and we will be needing to thing of gifts.ReplyCancel

  • RhondaAugust 25, 2010 - 5:51 pm

    Is there a tutorial in the making…I hope sooo LOVE IT!ReplyCancel

  • Chris R. from IowaAugust 25, 2010 - 8:59 pm

    Wonderful project. A tutorial would be fantastic! Is there a reason for the spiral bound on the two or did I miss something here? How was the pad cut – from a store or some great tool you have? We need help on this. Simply gorgeous!!!!ReplyCancel

  • CindyAugust 25, 2010 - 10:14 pm

    What a great idea, great gift. I hope to see a tutorial as well.ReplyCancel

  • lois skiathitisAugust 26, 2010 - 10:48 am

    This is really a clever idea Becca, I love the finished project. It keeps you organized and is something pretty to look at. Maybe you could do a “Becca Bit” for us, if time permits of course. I would love to learn to make a planner like this. Beautiful work Becca. As always Becca, TFS!!! :-DReplyCancel

  • AnneAugust 26, 2010 - 11:08 am

    Ooooh – what rich colours! I love this project Becca. Beautiful.

    Hugs
    Anne (UK)ReplyCancel

  • SuAnneAugust 26, 2010 - 12:32 pm

    I’m joining in with everyone else – this is simply beautiful. And PLEASE PLEASE could you do a tutorial on the inside elements (like how and what did you use to cut through all those layers of paper?) as well as the making of the outer planner shell itself. We would all be so very grateful.

    Thank you so much for sharing your creativity and your ingenuity.ReplyCancel

  • Clare CurcioAugust 26, 2010 - 4:12 pm

    I’d love to see a tutorial on this! I would also like to see a tutorial on your Spellbinders Snowflake die 3-D snowflakes. Awesome, Becca!ReplyCancel

  • Gwen MangelsonAugust 26, 2010 - 4:31 pm

    I would be happy to PAY for a tutorial for this project!!ReplyCancel

  • KarrAugust 26, 2010 - 4:59 pm

    Absolutely BEAUTIFUL! I have been quietly following your blog for sometime and I love all of your work! Simply Inspiring :-)

    Would it be possible to get the measurements for this project? Would love to make one for my mom.ReplyCancel

  • Barb S. (FL)August 27, 2010 - 7:23 am

    WOW, WOW & WOW!!!!! That’s about all I can say.
    This is a fantastic project & I also hope you’ll be sharing a tutorial soon. These would be great for a craft show or as a gift.
    TFS,
    Barb S (FL)ReplyCancel

  • Debbie OlsonAugust 27, 2010 - 9:51 am

    What a WOW-ser, Becca–love it!ReplyCancel

  • VickieAugust 27, 2010 - 9:58 am

    Simply adorable I just never know what I might fine when I open your page and it is always always something amazing and beautiful. What an inspiration you are to so many people. would love instructions. I’m not as creative as you…..ReplyCancel

  • NancyAugust 27, 2010 - 11:50 am

    Fabulous planner-I love everything about it!!! I want to make some of these for gifts.ReplyCancel

  • MichelleAugust 27, 2010 - 5:36 pm

    What a great idea!ReplyCancel

  • KathiAugust 28, 2010 - 6:49 am

    Beautiful. I need one. You must do a Becca Bit on this. We all want to see how you did this. Please!!!
    Thank youReplyCancel

  • CarolR-HappyExpressionsSeptember 2, 2010 - 11:00 pm

    beautiful! I would love to see a tutorial on this also. Fabulous! TFS!ReplyCancel

  • Debbie BOctober 13, 2010 - 10:04 pm

    This planner is georgeous!! Will you be having a tutorial on this? I would love to make a few of these and give as gifts.

    ThanksReplyCancel

  • Kian GrayDecember 1, 2010 - 11:59 am

    you can get some free catalogs over the internet easily if you just search on google -“ReplyCancel

I N F O