Remember, I have blog candy running through Wednesday, August 11th, you can see the post HERE.

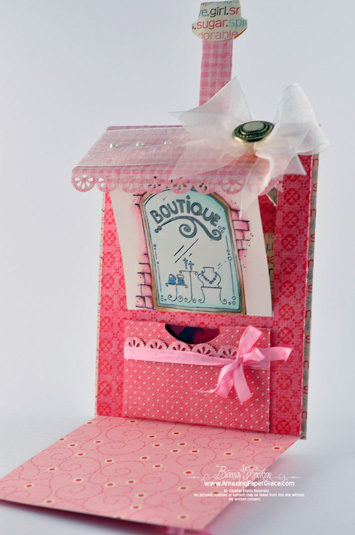
Hi there!! I’m almost embarrassed to tell you how long I spent on this card!! I made it because it was issued as a challenge. Little did I know how engrossed I would get in the inner workings and mechanics of the T-Slider card, but it had me engaged for a little bit. Have you made one yet? The tutorial for it is HERE on Splitcoaststampers. I did a test card so that I could figure out how every thing flipped and turned and then I decided to modify the pattern to suit the stamps I wanted to show. The challenge is a monthly Magnolia-licious challenge, and if you’d like to play the details are over on the Magnolia-licious Highlites Blog.
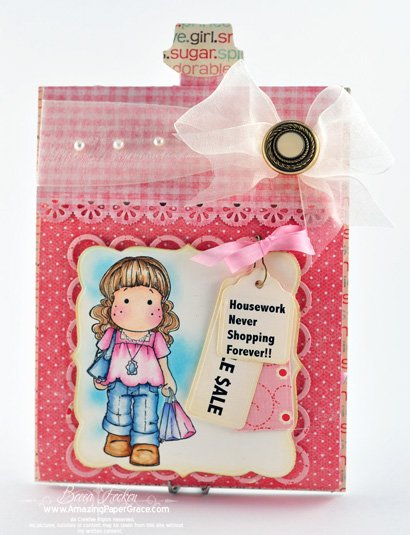
My card opens vertically, it has the T-Slide mechanism inside, but instead I wanted it to pop up the window for the boutique :-). This is such an adorable set of stamps. It is from the new Bon Voyage Collection at Magnolia-licious and on this card I used both #291 Tilda Goes Shopping and #535 Boutique. Once the vertical stick is pulled the awning goes up, the card falls open and the boutique window raises up. I thought all that action was a perfect opportunity to make this a gift card holder for one of my shop-a-holic friends.

For the front side of the card I used new Spellbinders Lacey Squares and Labels Fifteen – they go together perfectly!! Then I hung a cluster of tags using Tags Five. Tilda and the Boutique window are colored with Copic Markers. A change of pace for me – those stamps are so cute, no?
Card Recipe:
Stamps: Magnolia-licious – #291 Tilda Goes Shopping and #535 Boutique
Paper: Dreamy Two – My Minds Eye, Expedx Brilliant Cover 130lbs
Ink: Memento Tuxedo Black, Computer Generated Sentiment
Accessories: Spellbinders@trade; Lacey Squares, Spellbinders™ Labels Fifteen, Spellbinders™ Tags Five, Ribbon, Button, Pearls |
 
Thanks for stopping by!! Hope you are having a fab day!!

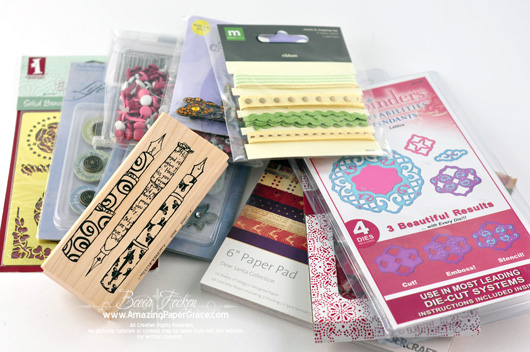
Hi there, it’s been a while since my last blog candy and I wanted to do a Double Play with all my "double purchases". So you are probably asking what is a double purchase?? A double purchase is something you like so much that you immediately forget that you’ve already purchased it and that it lives safely at home then you purchase it again, lol!!. I guess I’m not ashamed to tell you that I do this quite often. Sometimes I’m successful at taking things back but one of the craft stores in my area is abusive when you come to return their products. Oh the stories I could tell!! Yes, these are all double purchases except the Spellbinders was purchased locally just for this blog candy :-)
For your comment I hope you’ll share with me an idiom that made you go "hunh?" the first time you heard it, or one you use all the time. I’ll start !! From hanging around my grandma who lived on a farm in North Carolina – when things were gonna be tough because of a choice I made she say "You’ve sure got a tough row to hoe". When I used this on one of my then teenagers they acted like I was talking Greek!! Then again, I can’t tell you now often I’ve heard a saying that I sure didn’t get . . . one of my friends exclaimed "We’re cooking with gas on the front burner" and I have to admit I couldn’t figure out what she was talking about.
So if this is your first time playing double play, here’s how it works. The above blog candy is up for grabs. You can leave a comment on my blog, on this post, once a day until the end of the candy on Wednesday night at 11:00pm (CST), August 11th. Once the candy ends, I’ll have random.org pick a number that I’ll match to a comment number and that’s the winner. (By the way, please don’t put a web address in the text of your comment, not even the spelled out ones – it gets dumped into the spam bin and I get so many that I rarely pick through them.) The winner has 48 hours to reach out to me through my contact page which can be accessed on the top menu portion of my blog. All I need is for the winner to tell me they want the prize and give me a mailing address to send it to.
  This is the double play bonus- more double purchases!! Yes, can you believe it…I just got in on a good sale with Carpe Diem and purchased copics I already have…grrrr!! So the winner will get two new Copic Markers and a new punch. This is the double play bonus- more double purchases!! Yes, can you believe it…I just got in on a good sale with Carpe Diem and purchased copics I already have…grrrr!! So the winner will get two new Copic Markers and a new punch.
Here’s where the "double" part comes in. I’ll have a "Word of the Day" that will be posted in the box below two times per day for the duration of the blog candy. The morning word will go up right after 12 o’clock midnight (CST), then it will be erased and a new word put in its place right after 12 o’clock noon (CST). Pop in quick to visit this main blog candy post and write the word down. (Don’t put the words in your comment!!) Collect the words until August 11th, there will be a total of 10 words and if your name is picked for the blog candy and you can give me the 10 words when you claim your candy – you get the punch and copics too. If the blog candy winner doesn’t have all the words to win the bonus punch, the next name I draw will have a chance. I’ll keep drawing until we have a winner. Better grab the words and keep them to yourself just in case!! In the past I’ve had to pull a couple of names so I’ll keep my fingers crossed for you!!
| WORD OF THE DAY |
| watchful |
Last word!!
|
 
Hi there. If you visited yesterday, I mentioned that I was showing two parts of an ensemble that I created using Nested Hearts. This is the second part, so after this I’ll let up a bit. If you want to see the first part, you can see it HERE.  
It’s a trinket box. The walls of the box follow the contour of the heart template and the actual die templates are on the top and bottom. The sides of the box are about 3.5" tall – it would be large enough to accommodate a small gift, ring, bracelet or even stash your rainy day money. I smudged everything with Antique Linen and Vintage Photo Distress Ink and stenciled with Colorbox Rouge chalk ink. I used a variety of embellishments including lace, pearls and a tassel. The smaller roses on top were snipped from a piece of ribbon and the larger roses were made by me. The left one is simply two layers of ribbon gathered and cinched in the center. The right one is silk ribbon twirled into a rose shape. The luscious green leaf was a piece of crinkled fabric that I found at the fabric store. It honestly reminded me of Shibori silk – wish it were – but it’s a great fake um..er..faux :-) Here’s a closer look.
 

This is a view with the box open. I put two pieces of ribbon in between the real top and inside top. The ribbon keeps the top attached and the inside top makes the top seat correctly. To finish it off I ran velvet ribbon along the inside top to hide some of the mechanics.
 Here are both of the pieces of the ensemble together using Spellbinders Nested Hearts and Fancy Tags. Here are both of the pieces of the ensemble together using Spellbinders Nested Hearts and Fancy Tags.
Project Recipe:
Stamps: None
Paper: Xpedx Cream Cardstock, The Paper Company – Blonde Columns, Foam core
Ink: Colorbox Chalk Ink – Rouge, Antique Linen Distress Ink, Vintage Photo Distress Ink
Accessories: Spellbinders™ Nested Hearts, Spellbinders™ Fancy Tags, pearls, May Arts Silk Ribbon, Tassel, lace, eyelet |
Thanks for popping back in to see part two. I’ve learned of the loss of a friend who passed while I was away and it’s kept me out of the craft room for the past couple of days. Hopefully tomorrow’s the day. In the interim, I’m working on my next blog candy – it has been a couple of weeks!
 
|


That little girl is so cute! Love the colors on this card!
Really cute card. Thanks for sharing.
Oh my gosh! This is so amazing! Whatever time you spent it was totally worth it! So cool!
I have never made one ….would like to….but I don’t have anything that I think could work…..
I love yours……tfs
This is just so adorable. You just amaze me with the things you come up with!!! YOu should do a tutorial on this!!!
this is way too cute. i think that sentiment is my life story. :)
I have never made a T-slide card, but this is adorable! I just may have to try it out. Thanks for the link to the tutorial.
I love that sentiment on the front!!! It fits me perfectly! LOL!! I have to look into how to make a T-Slide card. Thanks for sharing!!
The card is so cute. I love the little Magnolia. I haven’t been brave enough to try the slide card yet. Looks complicated to me. But look like you’ve mastered it. Guess I’ll stick to the easier ones. Edna
Whoever is getting this is a VERY lucky gal! This is adorable! Love the way you changed the slider to go with your images.
R/
I can’t even imagine how long it took you to figure out and finish this card. It is absolutely AMAZING! My mind is still spinning just thinking about it. You go girl! God bless.
That is a VERY clever design!
This card is so cute! I can only imagine the time and love you put into it. It shows!
How cute is that!?! Clever, Clever, Clever, Becca!!!
So clever and CUTE! I just finished reading my son a bedtime story that happens to be a pop-up book. They are my FAVORITE! anything interactive seems to grab my attention.
Love it!
Thank you for sharing
Wow! What an adorable card! Everything about it is cute. I haven’t tried a T-slide card yet, but I’m feeling a bit inspired. Thanks for sharing!
That card IS incredible! I love it! Thanks for sharing!
Cute, cute, cute! Wowie!
Huggies ~
Sharron?
Becca – this is absolutely precious!!! The colors, the image, the slide. I love everything about it!
What a lovely card. Love the pinks. I will have to give the T-slider card a try. Thanks for the link to the tutorial.
How adorable is that!! Love it!
You are soooooo creative!!! Just love how you worked Shopping Tilda and the Boutique stamp into your slide card!!! FANTASTIC!!!!
Lots of work and you deserve all the wonderful comments including MINE! This is just wonderfully adorable!
I can understand how long this might have taken to create – it has a LOT of action in it and is absolutely wonderful. TFS
WAY TOOO CUTE! Graet job Becca, thank you so much for sharing.
Pam
OMGosh Becca,
I love, love, love this card.
The colors are ..oh so pretty.
I must look into making a T card.
TFS
This card is adorable. I have never tried a T-Slide card but now I have to try making one.
Thank goodness occasionally it takes “even you” a bit of time to construct a card!!. LOL It takes me all evening just to make a simple one . I change my mind so many times that my finished card doesn’t even resemble my original idea :)
Oh my goodness we can we have a Becca Bits video of this one? !! I can’t figure out how you go the awning to rise . Thanks !!
Becca, that is absolutely beautiful!! What a lucky friend you have who’s going to receive this!! :-)
This is another WOW moment..This is gorgeous and love how you did this.
Oh Becca!
I should have known you would come up with a completely different take on the “T slide” card. Just awesome!! I see you have the new stamps already. This Tilda is one of my favourites and I am looking forward to receiving her.
Wonderful card :o)
Hugs~
Oh my, that is too cute. It looks really difficult though. You did a marvelous job Becca.
Wow this is absolutely amazing, I love everything about it – it looks like it took you ages!! The colours are so pretty and I love the colouring on your Tilda….stunning project x
Wow stunning card.
Oh my Goodness, what an adorable card, would love a step by step tutorial of how you modified your card, this is just to freaking adorable. Love the paper and the colors you used. Great job!!!
This is absolutely wonderful Becca and so worth the time tou spent on it . Well done.
Love Sheila xx
You are amazing! Beautiful card, and the mechanics, awesome!
Becca, this is a real STUNNING card!!! I love it!!!!!!
hugs, Elly
I’ve never made a T-slider card before. Your card is beautiful and of course Tilda is always just so cute. I like the sentiment too. The opening almost looks like a canopy. Cleverly done Becca. As always Becca, TFS!!! :-D
OMYGosh Becca, that is absolutely Adorable.
Love the way the awning comes out.
U R Amazing; always coming up with something new (something I haven’t seen before) and what a great inspiration U R.
Do we get a ‘Becca bit’ on this?
ColleenB.
That is sooo adorable! It takes a real paper artisan to sit and figure out how to make something work and then re-design it to make it work again! You are awesome!!!
Thanks for sharing! :o)
WOW! is all I can say….! That is very tricky how you change the workings of your card… I have made a few but NOTHING like yours….. Again, Just Beautiful!
I wish I could borrow your brain for a short while. It would have been hard for me to put the original together. Let’s not even talk about altering it. I love your use of color. You do such a great job of shading and highlighting.
This is just the cutest idea I have ever seen…Hope you don’t mind if I borrow the idea as my best cardmaking friend has a birthday coming soon and this would be just great for her giftcard.
Becca, I’m speechless. You are seriously good, my friend!
Oh my! How ingenious Becca, such an amazing effect :0)
*hugs* Heather x
Okay miss Beccs, now you’re just showing off. Hehe! This is so great, I love it. You are so tricksy. Wonderful idea. You are such an inspiration and I learn so much form you. Thanks for sharing your talent. Blessings and have a great day.
Love the card.
Oooh my goodness, this is gorgeous, and I just love the way, you made this pop out of there. You´re just amazing hun, I just don´t know, how you seem to be able to just stump the ideas up from the ground? LOL, But I just love your work and this is just stunning, bith the wntire card and the coloring of Tilda, who´s looking more gorgeous than ever here too. So beautiful, I so love it..
Big hugs Maryann
ABSOLUTELY ADORABLE!!!!!! AND the sentiment is TRUE!!!! :)
You have really outdone yourself on this one! The design is absolutely amazing, choice of stamps is wonderful. You are truly an artist and a paper engineer! Thanks for the inspiration. =)
THAT is adorable. It took awhile to understand – pull tab, card falls open and awning goes up……I finally got it – WONDERFUL job. I truly appreciate the time you put into this one. A couple of weeks ago my daughter and I “worked” out/on a waterfall card………..we got it YES!!!! Thanks again for sharing your talent/gift with us.
Jean McGee
How fantastic, your creativity just amazes me, too cute!
Amazing as usual!! Love it!! Is this a new Tilda?
Thanks for the link to the tutorial. Teresa
There you go. . .being extra clever again! Love it! TFS!
I LOVE IT!!! I had to drag my Husband out of his “office” and make him see it!!! Even HE appreciated that it was TIME Consuming…It is INCREDIBLE!!! Thanks for sharing!
Valerie Martin
Wow I don’t know why I am still amazed by your cards but I am every single time. You always take everything to the next level with such brilliant results. Love it!
Hugs & Blessings Bernie
Oh my goodness! That is truly a work of art! You are so clever!
Wow this is a very beautifull card and is so completely different take on the T Slide card. I wondering how you have made this
Thanks for sharing. All your work is beautifull
gr. Jannita
WOWSA – I think I might have to try this. Cool technique and I love your card!
Amazingly ADORABLE—UNBELIEVEABLE–and BEAUTIFUL!!!
Love It!!!!!!
Becca,
This card is so cute. I love the Boutique window and the awning effect. I have to admit, I am not a big fan of magnolicious. I know I know everyone is probably thinking I am absolutely crazy, but I just am not a fan. But that aside, I always love how you use these stamps and of course your creativity just blows me away. Did you inherit your creativity? Cause you know – the apple doesn’t fall far from the tree. I know this is the wrong section of the blog for this, but I just had to throw it in!?!?
Marcie
Becca– I love the way you changed the slider! I love the awning and how you re-worked the design. It’s fabulous and as ingenious as you are. I love to see a tutorial on your re-design. Thank you so much for sharing. You truly do have a gift.
That is super cute Becca!! Way to go re-engineering that slider card :) I was wondering if that scallop border along the awning piece was made using a punch? I think I might need it ;)