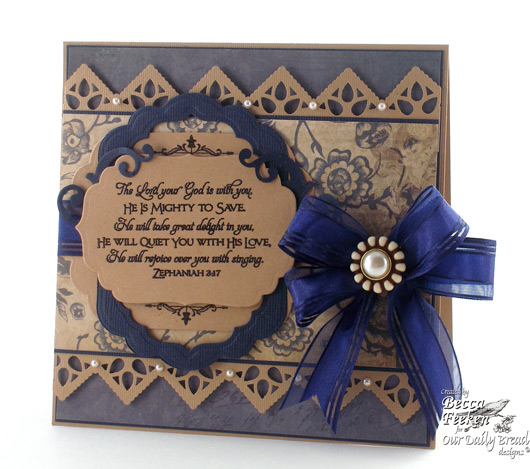
Good Sunday morning!  I have a quick card to share that I made using this month’s release from Our Daily Bread Designs – I’m using two sets – Scripture Series 1 and Fleur de Lis Borders.  I love them together – the flourishes just add so much elegance to any project.  Of course I have a tiny bit of a right angle border and of course I had to pull in some Spellbinders.  I’m using Labels Four stacked on top of a frame made with Labels Eleven and have embellished it with curly cues from Doodle Parts.
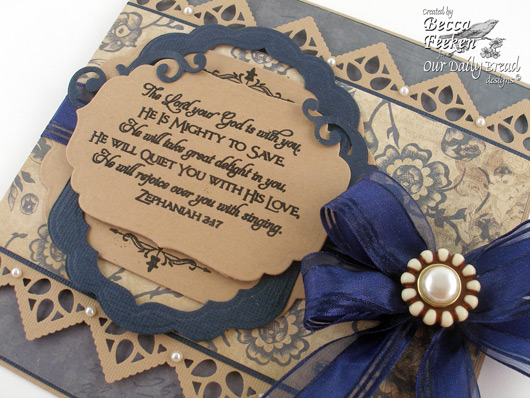

This one went together sweet and easy.

Card Recipe:
Our Daily Bread Designs:  Scripture Series 1, Flourished Frames
Paper: Bazzill, 7 Gypsies – Savannah
Ink:  Versafine Black Onyx and clear Embossing Powder
Accessories:  Spellbinders™ Labels Four, Spellbinders™ Labels Eleven, Spellbinders™ Doodle Parts, Martha Stewart Rain Drop Corner Punch, Pearls, Button, Ribbon


Have a sweet day friends.

pinTHIS SHAREthis TWEETTHIS EMAILthis
  • Karen WJune 20, 2010 - 5:14 am

    As always Becca just stunning. I love the masculine feel to this as well as feminine. Your tutorials were amazing and I hope to get time to try them also.ReplyCancel

  • bonnie weissJune 20, 2010 - 7:22 am

    Beautiful card and beautiful message, Becca.ReplyCancel

  • Magi DuncanJune 20, 2010 - 7:26 am

    Beautiful card, Becca! Don’t know if you read all your comments, but I have a question? What Spellbinder would you say you use the most? I just recently received a Cuttlebug as a gift and would like to purchase just one to start! Thanks! Hugs, MagiReplyCancel

  • Cindy haffnerJune 20, 2010 - 7:32 am

    BEAUTIFUL Becca!!ReplyCancel

  • emilyJune 20, 2010 - 7:36 am

    Becca, I just had to share your tutorials with the ladies on the scrapbooking forum I am on and everyone was soo impressed. I can hardly wait until I can get back down to my little room and try it out…
    Thank you so much for sharing!!!! :o)ReplyCancel

  • Fonda TottenJune 20, 2010 - 8:08 am

    Simply gorgeous!!ReplyCancel

  • Michel EJune 20, 2010 - 8:52 am

    Lovely card.ReplyCancel

  • RebekkaJune 20, 2010 - 8:52 am

    This is gorgeous..love the design of this card and great dpReplyCancel

  • MargJune 20, 2010 - 10:10 am

    I love the colours. Beautiful card.ReplyCancel

  • EarlineJune 20, 2010 - 10:38 am

    Amazing cardReplyCancel

  • LuAnn in AZJune 20, 2010 - 11:02 am

    Another “Becca beauty”! Thanks for sharing and another thanks for all the right angle tutorials. You’re still fabulous!!!ReplyCancel

  • Deebi27June 20, 2010 - 1:20 pm

    Elegant!ReplyCancel

  • CindyJune 20, 2010 - 1:53 pm

    Very elegant card, Becca!ReplyCancel

  • CathyJune 20, 2010 - 2:19 pm

    Love this card. You are amazing! I am so excited to try the right angle punching and making borders with the corner punches. It will open up a whole new world. On hold here right now. I babysit for my youngest grandson whose parents work shifts that require one working 10 days straight. That is the bad news but the good news is that they are off 10 days straight too. His other grandmother has him every Tuesday if they are working and dad usually has a day or two out of the 10 he is off. Consequently I don’t have him 10 days straight but it seems like it sometimes. We are on the 6th day straight and I have him yet tomorrow and Wednesday. Look out Thursday. I am going to play with your ideas all day. Thanks for your inspiration!ReplyCancel

  • ConniecrafterJune 20, 2010 - 2:53 pm

    very elegant, lovely border!ReplyCancel

  • MickieJune 20, 2010 - 4:25 pm

    Becca, that is so lovely and I love the way you manage to “put” things all together. Girlfriend, you are causing me to spend so much money! LOL! (As if I needed encouragement.) I am so stuck on the ODBD stamps and spellbinders that I need to buy stock. Keep ’em coming Becca, I truly admire your work.ReplyCancel

  • MarcieJune 20, 2010 - 5:59 pm

    Have been playing with right angles. Very interesting to say the least.
    Thanks for sharing. Love this card. For someone who says she doesn’t do masculine, you sure out did yourself this time. ODBD stamp is wonderful. Hope hubby is having a great fathers day!!!!
    MarcieReplyCancel

  • Billie AJune 20, 2010 - 6:41 pm

    Becca, beautiful card like all the detail and how it can be for either male or female very beautiful as always.
    Hope your dear hubby is back to great with his eyes and all looking bright and beautiful.
    thanks for the inspiration.ReplyCancel

  • NancyJune 20, 2010 - 7:13 pm

    This card is gorgeous-Love the colors and the right angle borders!ReplyCancel

  • marianne adamJune 20, 2010 - 7:22 pm

    Love the color combo! Simply stunning!ReplyCancel

  • CherieJune 20, 2010 - 8:28 pm

    Stunning!ReplyCancel

  • janeyJune 20, 2010 - 9:18 pm

    I am not a ‘blue’ person, but I absolutely love the blue in this card – it’s so striking!ReplyCancel

  • Leslie MillerJune 21, 2010 - 2:45 am

    Such beauty and perfection in the design! Love every bit of it, Becca!ReplyCancel

  • lois skiathitisJune 21, 2010 - 4:40 am

    Beautiful card Becca. Lovely shade of blue. I love the addition of the pearl button on the beautiful ribbon. It’s amazing how everything is just framed so nicely. I’ve been practicing on the right angle punching with no good results, but practice makes perfect. As always Becca, TFS!!! :-DReplyCancel

  • Joan FrickerJune 21, 2010 - 5:26 am

    Great card Becca, I love all those little details you do. I loved your punch Right Angle Punch videos too. I can’t wait to try your technique.ReplyCancel

  • Gloria WestermanJune 21, 2010 - 8:37 am

    Just Beautiful…….ReplyCancel

  • Deb RobinsonJune 21, 2010 - 8:49 am

    Becca:

    Love the colors you chose for the card. Very Elegant! Once again you gave us the Wow factor. I remember some time ago someone mentioned you using bows a lot, then you did one in paper! I love the elegance the bows give to your cards. Keep using them and keep inspiring us with your gift.ReplyCancel

  • JudyJune 21, 2010 - 1:08 pm

    Becca, your cards and projects are such wonderful works of art…
    I Must thank you for always being such an inspisration!
    It’s always fun to look forward to your next amazing creation using the nestbilities and martha punches..
    you open up a world of uses for these fun tools we have to play with.
    Hugs
    JudyReplyCancel

  • Lisa D. Atha (inspired by purple)June 21, 2010 - 8:03 pm

    This is so beautiful and elegant Becca. I love everything about it, especially the colors that you used.

    Hugs,

    Lisa AthaReplyCancel

  • Mary R.June 26, 2010 - 6:21 pm

    Becca, this has to be one of my favorite cards that you have made. I just love everything about it.ReplyCancel

  • Tina KingJuly 5, 2010 - 10:07 am

    Becca, I absolutely love your work. It’s amazing! I aspire to be like you. :) I have a simple question. What is the best paper adhesive to use? The liquids seem to make my paper get wavy. I am currently using the roll on adhesive and it tends to “let go” in areas and especially on envelopes the I make for mailing. Any suggestions you have would be greatly appreciated! Thanks and God bless.ReplyCancel


Hi Stampers:

Recently I shared a palette I made using Distress Inks.  I was tickled with my solution because I can keep the palette within an arms reach and frequently reach for it to paint images up.  In fact, in my work area I like having my most used items within arms reach because I’ve found that anything outside of that radius doesn’t get used frequently.  Then again, everything can’t be within that radius.  Since I use the blenders frequently and I picked up all 36 Distress Inks, I was in a bit of a dilemma because all 36 take more room that I had available sitting on my table.  So I came up with an easy solution – I found a way to put them all together in a way they could hang from the pegboard within an arms reach!

Remember, you can click any picture to make it larger.

Distress Ink Blender Storage - www.amazingpapergrace.com Here is my ring of distress ink blenders.  I consulted the list of inks from the Ranger website because they put them in color group order.  So each blender was put in the same order and it coincidentally match the order of my palette.
The ring is made up of little plastic bags that you get in the jewelry department of a craft store.  I wrote the names on (you can type labels if you’re a neatnik) and I made sure the names all ran the same way.  Keeping the opening at the bottom I applied a plastic hang tag.
Here are the supplies I used.  They can all be found at Michaels and many in other craft stores.

Thankfully these are up and off of my desk but hanging close by where I know I will use them!!

Thanks for stopping by, back soon with something crafty!

pinTHIS SHAREthis TWEETTHIS EMAILthis
  • Beth GrecoJune 19, 2010 - 7:40 am

    That is simply brilliant. What a great idea. I’ve a got a peg board right beside where I work and this makes such good sense. I’m on it. TFSReplyCancel

  • ColleenB.June 19, 2010 - 7:44 am

    What a Clever idea.
    Thank U 4 sharing.
    ColleenB.ReplyCancel

  • MargJune 19, 2010 - 7:49 am

    What a great idea. I am totally with you – if you don’t see it, it doesn’t get used.ReplyCancel

  • Carlos HaunJune 19, 2010 - 7:57 am

    Where did you get the plastic hang tags? I’ve never seen them for sale anywhere. Thanks! You are just so dang clever and organized.ReplyCancel

  • Alyssa BJune 19, 2010 - 8:00 am
  • EarlineJune 19, 2010 - 8:09 am

    Thanks for the infro. this will be helpful to a lot of people.ReplyCancel

  • Judie RymanJune 19, 2010 - 8:24 am

    You little fount of information!! Useful info, of course!! As I read this, I realized I can do this with OTHER items…..awesome! Thanks.ReplyCancel

  • Becky GreenJune 19, 2010 - 8:35 am

    WOW!!! SUPER idea!!! I think I’ll follow your lead and do the same!!! You could even do the same thing with sponge daubers!!!! THANK YOU!!! :)ReplyCancel

  • BarbaraJune 19, 2010 - 9:11 am

    Great idea but I just read somewhere and even more space saving idea. put a piece of velcro under the stampad case itself and attach your blender pad under there. There is just enough room!ReplyCancel

    • Becca FeekenJune 19, 2010 - 11:18 am

      Barbara, I tried to do the velcro and the blender underneath and it wouldn’t work for me :( The blender was so thick that the inkpads would not sit level when they were stacked. Maybe I went about it the wrong way?ReplyCancel

  • Pam (aka/YorkieMom)June 19, 2010 - 9:44 am

    Becca, this is a marvelous idea…….thanks so much for sharing!!!

    PamReplyCancel

  • Anne DoddJune 19, 2010 - 11:14 am

    Becca, I have already used a couple of your organizing tips and here is another brilliant one! Not only are you incredibly talented, but obviously very busy thinking up creative ideas for organization! Thanks so much for sharing with us!ReplyCancel

  • MarcieJune 19, 2010 - 11:29 am

    I love your creativity and organization Becca. I’m a neat freak, but crafting kinda goes against the grain there. You always have great ideas for keeping your toys neat yet convenient and best of all well cataloged. My kind of gal. Although it does take time to do all of these things. It is worth it in the long run.
    MarcieReplyCancel

  • Joanne LoweJune 19, 2010 - 11:42 am

    LOVE this idea, your brain is just wired to be so organized. Hoping I might even “catch” it someday! :) It’s so helpful to learn from your tutorials (PLEASE keep those coming–I can very rarely get out to classes because of being disabled in a car accident, so these online tutorials are my classes), and I love your artistry in your cards. You always think of a new way to use materials, especially paper punches.

    Blessings to you, and thanks again for this latest gem of an idea!

    JoanneReplyCancel

  • janeyJune 19, 2010 - 11:58 am

    I think your attention to detail (making sure all the names were in the same direction; having the opening of the bag at the bottom) transfers easily to your designing of cards – the beauty of a card is often in your details.

    Thank you, Becca!ReplyCancel

  • Susan GJune 19, 2010 - 12:50 pm

    Terrific storage idea. I’ve never heard of Hang Ups. I’ll have to look for them.ReplyCancel

  • MaryannJune 19, 2010 - 1:23 pm

    What a great idea Becca, and thanks sooo much for sharing it too. I think, that´s the problem, we all face every single day, how to store everything and still keep it inside reach. This is really an aexelent idea and can definately be trnsferred to many other things as well, so I hope, you don´t mind me “borrowing” the idea for some things here, cause I can see amny new possibilities in this system.
    Thank you sooo much for your always soo terrific ideas hun, and hav a wonderful week-end with your family.
    Biiiig hugs MaryannReplyCancel

  • HighDesertGalJune 19, 2010 - 1:43 pm

    I really enjoy your “Becca Bits” I have learned so much. Thank you for taking the time to put them together. Oh, your cards are amazing!ReplyCancel

  • ireneJune 19, 2010 - 2:05 pm

    O.K. so are you saying that you inked your pad, then enclosed it in a bag, attached it to the hanging ring? Does this stay moist enough to use? I too never get to things out of reach.ReplyCancel

  • Billie AJune 19, 2010 - 2:46 pm

    Great idea for the stamp blender pads, I like that idea. I have the ring stand that holds the tools but the pads hummm need to do this and I can just attach it somehow to the standing ring. Thanks for sharing.ReplyCancel

  • DebbieJune 19, 2010 - 3:09 pm

    Becca, I love all your storage and organizing ideas. These are great too. I just sorted all my inks and reills also. You have inspired me to get my studio in shape. I now have all the reinkers with the inkpads.

    I also just did my ribbons the way you did. I do have a question though – what did you do with the wider ribbons. You use the wider ribbons frequently in you cards so I am curious as to how you store them. I have all the others in the drawers. Also, how about ones that you have more than 4 yards or so.

    Thank you for all your card and storage ideas.ReplyCancel

  • Mimi2six4June 19, 2010 - 3:46 pm

    Great idea, you are so talented. I would love to have your creativity and talent for just one day. Thanks for sharing your ideas they are brilliant!ReplyCancel

  • PollyJune 19, 2010 - 3:52 pm

    Becca you are just too organized for me…could you come and do my room? LOL…ReplyCancel

  • Nancy WJune 19, 2010 - 3:57 pm

    I love all your punchouts with the MS corner punches. Have you been using them with different circle sizes as well? I’ve tried the ladybug punch along the outside edge of a circle and it is so cute and hilarious.ReplyCancel

  • Rhonda ZamoraJune 19, 2010 - 4:02 pm

    You have got the BEST organizing tips! Thank you for sharing.ReplyCancel

  • Maxine NaumannJune 19, 2010 - 5:49 pm

    I too like distress ink pads but have not found a supplier for the reinkers. Got any ideas to share.ReplyCancel

  • Valerie MatinJune 19, 2010 - 8:27 pm

    Oh Becca!!!
    I LOVE this idea!!! I too did not like the Velcro on the bottom…my stacks were all wobbly with the foam on the bottoms. Now this…I see it working out.
    So glad that you honey is doing good!!!
    Blessings,
    ValerieReplyCancel

  • Regina NJune 19, 2010 - 11:30 pm

    I love this idea. but I love all your ideas so whats new.ReplyCancel

  • lois skiathitisJune 20, 2010 - 4:23 am

    What a clever idea Becca. I store all of mine in a plastic bag and I’m always digging in there if you know what I mean. I’m laughing at your word [neatnik], it just tickled me. I have organized chaos. As always Becca, TFS!!!
    :-DReplyCancel

  • Michel EJune 20, 2010 - 8:53 am

    Great idea thanks.ReplyCancel

  • RebekkaJune 20, 2010 - 8:55 am

    What a great idea, thanks.ReplyCancel

  • Linda EJune 20, 2010 - 12:41 pm

    Can’t wait to incorporate this into my craft storageReplyCancel

  • ConniecrafterJune 20, 2010 - 2:32 pm

    great idea, I only have a small amount of them right now, but will be investing in moreReplyCancel

  • Mary LouJune 23, 2010 - 5:42 pm

    Thanks for the superb tip Becca!!
    HugsReplyCancel

  • Krafty DivaJune 25, 2010 - 3:21 pm

    Becca,

    What a WONDERFUL idea!

    Can you tell us which section of the Michaels store you found the Hang Ups. I’ve checked several stores and without looking all of the sales associates have told me that they don’t have them.

    ThanksReplyCancel

  • HelenJuly 25, 2010 - 5:20 pm

    Becca,

    You are brilliant! Thanks for sharing this great idea. You are always such an inspiration.ReplyCancel


Hi there.  I’m back with Part 3 which is the final part on Right Angle Punching.  I also wanted to show the trial borders I made up to help me see what the punch outs would look like.  I created a card that uses the technique to create a medallion. It’s similar to the cards I’ve made for the past couple of days but this shape is a little bit more complex.  How sweet is that Tilda, I just love her hair!!  This is from the newest collection over at Magnolia-licious called the Fairytale Collection and this one is #231 Spellcaster Tilda.


For the medallion I used Martha Stewart Layered Arches Corner Punch.  On top of that I layered
Spellbinders Labels Labels Twelve and Petite Ovals Small with a little curly cue at the top – that’s Flourish Accents.

Card Recipe:
Stamps:  Magnolia-licious – #231 Spellcaster Tilda
Paper:  The Paper Company, Paper Studio Pearl, K&Co. Madeline
Ink:  Memento – Tuxedo Black
Accessories:  Spellbinders™ Labels Twelve, Spellbinders™ Petite Ovals Small, Spellbinder™ Flourish Accents, MS Layered Arches Corner Punch, EK Success Corner Rounder, May Arts Satin Stitched Ribbon, Pearls, Copics

Here are examples of the borders I punched out with the Corner Punches.  I decided to do this so because the combination of the two make the right angles for the medallion and this helps me really see :-)  I know it boggles the mind – what I didn’t show are the actual border punches too.

There are more below – yes, I practiced!!

Lastly, here is third video on Right Angle Punching!


Thanks for stopping by!

pinTHIS SHAREthis TWEETTHIS EMAILthis
  • TeresaJune 17, 2010 - 9:48 pm

    Thanks so much for the tutorials on right angle punching. This was so cool and lots of fun. We know we can count on you to keep us brain-storming with our punches and spellbinders. Always fabulous and beautiful projects. I know you kept the last video quiet so it would go faster,but I kinda missed hearing you talk. Thanks again and have a great night.ReplyCancel

  • Darlene JJune 17, 2010 - 10:05 pm

    Becca,
    Now I have to go back and watch it again, so beautiful. I know I will watch these three tutorials several more times. I may be wasting alot of paper soon. Thanks for all the inspiration.ReplyCancel

  • RobinJune 17, 2010 - 10:14 pm

    Hi Becca,

    How do you do it? Your ideas and cards are so beautiful. I look forward to your emails more than anybody else’s!

    Does Martha Stewart know your address? She should so that the company can send you money! I’m sure their sales of punches have started to go through the roof because of your lovely cards and demos!

    Thank you for your daily inspiration.ReplyCancel

  • ColoradoJune 17, 2010 - 10:30 pm

    Wow! Martha’s company must send you you all the new punches as they come out… it appears you have them all! I can’t wait to try the right angle technique!! It’s very cool!ReplyCancel

  • Gloria WestermanJune 17, 2010 - 10:49 pm

    Totally awesome….this is so pretty and elegant…..but my question is where do you get your punchs at…..who sells all of those punch?????????thank you so much for this…..truly inspirational…..ReplyCancel

  • JeannieJune 17, 2010 - 10:50 pm

    Great tutorial series becca! Thanks for sharing!ReplyCancel

  • Patty W.June 17, 2010 - 11:04 pm

    Yep! I was right, you are the master of papercrafts! Thank you for sharing! I learn so much from you. Such an inspiration you are. The tutorials are awesome! Blessings! PattyReplyCancel

  • Candy MillsJune 17, 2010 - 11:50 pm

    Hi Becca,
    What ever would we do without you and your marvelous ideas??
    Do you have all the MS Punches and all of the Spellbinders? Sure looks like it. I hope to find at least one or two of these the next time I can get to a Michaels store.
    Many thanks for all you do for us.
    Hugs, CandyReplyCancel

  • Deebi27June 18, 2010 - 12:17 am

    What a triple play, you always make everything appear so easy, I didn’t get the bow tying, even though I repeated the video over and over. (It will be revisited again). This goody seems even more possible. but I find not any corner stamp will work. I will find a cool MS punch tomorrow and work my magic…thanks to you! Great tutorials…you ARE a master as what you do!ReplyCancel

  • MaryannJune 18, 2010 - 12:23 am

    WAUW I have seen all the bits now about this technique, and Im sooo amazes about the beautiful look on them. Thanks sooo much for sharing all these things and for making these videotutorials. I´m a person, who learns best by seing it done, so I´m just thrilled by these, and I´m definately going to try this soon too. I just LOVE it. Just soooo hard to get MS punchers here and sooo expensive to have them sent all over here from the US, but I would really love to have all her lace border- and corner punchers. I would just go awohl then he he he he. Thanks sooo much for a wondderful site.
    By the way, I also just loved the gorgeous card, you made with this too.
    Big hugs MaryannReplyCancel

  • RebekkaJune 18, 2010 - 12:32 am

    Girl this is awesome. Yes MS needs to be paying you :)ReplyCancel

  • KaylaJune 18, 2010 - 1:58 am

    Becca, i’m speachless. You have just convinced me to buy a bunch of punches :DReplyCancel

  • minervaJune 18, 2010 - 2:34 am

    Becca, what a great technique, i feel a spending spree coming on…ReplyCancel

  • minervaJune 18, 2010 - 2:40 am

    PS how did you punch the squared off border strip on the left hand side of you demo pictures…i can’t seem to figure out how to position my punch to get such a regular border…thanksReplyCancel

  • CherylJune 18, 2010 - 4:33 am

    Beautiful card Becca! Thanks again for showing us this technique. Could you show us how to make the beautiful bow on your card? I know there are other bow tutorials but this one is a little different. I still haven’t gotten one bow to look as nice as yours. Thanks.
    Hugs CherylReplyCancel

  • lois skiathitisJune 18, 2010 - 4:48 am

    Thanks for the Becca Bits mini series. I love your card today Becca, Tilda is just so sweet and I like her hair too. The bow is tied so nicely today. As always Becca, TFS!!! :-DReplyCancel

  • Pat H.June 18, 2010 - 4:59 am

    Hmmm..yet another reason to purchase a MS punch!! Thank you again for being so generous with your ideas.ReplyCancel

  • Beth GrecoJune 18, 2010 - 5:19 am

    Hah… That is awesome. I got to giggling though as it felt like one of those old silent movies. What beautiful work you do. I can’t imagine how you come up with these ideas. Between the punchies and the nesties, you’ve been very creative!!! Thanks for sharing all your ideas with us!!ReplyCancel

  • christine BrownlowJune 18, 2010 - 6:20 am

    Hi Becca,
    Thank you for your fantastic tutorials, I don’t know how you keep coming up with such beautiful ideas. You are so inspiring. I promised myself I wasn’t buying any more craft things. But I have just had to order this punch that you have used its so beautiful.
    I only have one MS punch will this techneque work with any other punches?
    Thank you again for sharing all your ideas with us. Take care Hugsx ChrisReplyCancel

  • CandiJune 18, 2010 - 6:29 am

    Becca! Thanks so much for sharing the wonderful tutorials ! I am now finally able to watch them (High speed yeah!) and I am always amazed at the wonderful works you do. God has gifted you and you share it How great is that!ReplyCancel

  • Pam SpradlinJune 18, 2010 - 7:12 am

    Great tutorial…seeing what you do makes it easier to copy how your cards turn out. Your talent is absolutely wonderful.ReplyCancel

  • Mary R.June 18, 2010 - 7:38 am

    Okay, Becca, I understand the trimming off process now. I cannot believe how creative and talented you are. I really do appreciate your Becca Bits and videos. Being a visual person, the video is truly appreciated. Just love your blog. Thanks for all you do and share.ReplyCancel

  • Cindy H.June 18, 2010 - 8:04 am

    Wow, your right angle punching is amazing but since I don’t own one corner punch, I think I need to get shopping so I can try your wonderful technique out :) Thanks so much for sharing another super video tutorial, too. Love the sweet Tilda card!!ReplyCancel

  • Fonda TottenJune 18, 2010 - 8:14 am

    Becca ~ Your tutorials are amazingly simple. I like that I can pause the video so I can punch along! Thanks so much for sharing your creativity. I’ve got so many more uses for my corner punches now. Have a blessed day!ReplyCancel

  • RubyJune 18, 2010 - 8:44 am

    Great video, you do great work. I just have to remember to turn the corner I’m afraid that I will continue going ’round’ the corner haha! Well practice makes perfect. I love your blog, you keep us challenged. Tks again for sharing!ReplyCancel

  • Cathy GreenJune 18, 2010 - 8:45 am

    Thanks so much for sharing how to do this! I think I know where my next 40% Michael’s coupons are going!ReplyCancel

  • JanneJune 18, 2010 - 8:45 am

    Thanks Becca!! This is such great information.ReplyCancel

  • janeyJune 18, 2010 - 9:06 am

    Becca, Thanks for your tutorials on how to use our punches in another way. I think all the samples you showed help us visualize all the possibilities. I want to use the postage size techqniue and am grateful that I was able to watch the Part 1 Becca Bit again. I also think it’s important that you stress that you practiced a lot to get to this level of success.

    Thanks!ReplyCancel

  • Kelly SasJune 18, 2010 - 9:13 am

    Becca you are my idol, my Rock Star!!! I think if I ever got to meet you I would faint. The way your mind works is pure genius! God certainly has blessed you with creative talent. May God continue to bless you with Amazing Paper Grace!ReplyCancel

  • MargJune 18, 2010 - 9:17 am

    Wonderful. Thank you. I have some time to play this weekend and guess what I will be doing.ReplyCancel

  • MelanieJune 18, 2010 - 9:24 am

    I just want to say thank you for sharing your knowledge of doing this. I’m going to be trying it out this weekend for sure!ReplyCancel

  • Carol WJune 18, 2010 - 9:41 am

    What a wonderful “grand finale” to this series of videos! Like others have commented, I have already added to my collection of MS corner punches just so I can do this!
    Thank you for stepping this out into 3 parts so we could get the hang of it and not feel overwhelmed. You’re absolutely right that once you get the first step, the second will come more easily, and so on. You are a wonderful instructor!ReplyCancel

  • Chris R.June 18, 2010 - 9:49 am

    Your creativity boggles my mind! Once again you have amazed me! Thank you for taking the time to make the videos for us.ReplyCancel

  • Wendy MooreJune 18, 2010 - 10:06 am

    The final act – curtains closed. Applause, applause. Thanks so much for these tutorials. I tried both 1 & 2 and used all the MS punches I own. They all turned out perfect. Can’t wait to work on the 3 rd tutorial. You’re the best!ReplyCancel

  • Martha NicholsonJune 18, 2010 - 10:15 am

    That has to bee the fastest Becca bit I ever watched. So for I have made it through step 2. I hope I can get this down pat. Thanks for showing all the different punches. I wish you had listed the names of each punch beside them. But I’ll find them somehow. Thanks for your wisdom.ReplyCancel

  • Marge R.June 18, 2010 - 10:45 am

    One word says it all: A-M-A-Z-I-N-G!!!ReplyCancel

  • LisaJune 18, 2010 - 10:58 am

    You are a fantastic reference…ReplyCancel

  • EarlineJune 18, 2010 - 12:35 pm

    Cute, cards you have made Becca way to goReplyCancel

  • Debbie GJune 18, 2010 - 12:41 pm

    Oh my word! It’s getting expensive to read your blog!!! I don’t have any MS punches, and I don’t think this technique will work with the corner punches I have… so as soon as I finish buying the spellbinders dies (which I started because of you), then I will start buying MS punches!!!! Hmmm, as everyone else says I hope these companies are reimbursing you! :)ReplyCancel

  • Terri MJune 18, 2010 - 1:05 pm

    I am always amazed at how you are able to look at a punch or a Spellbinder and see beyond the original design it was created for. I want to also thank you for sharing your creativity so that we can attempt to copy from the master of the punch!ReplyCancel

  • Kay MJune 18, 2010 - 1:55 pm

    Thanks so much, Becca, for a wonderful tutorial on right angle punching. This is another great way to use all our corner stamps. Your cards always give me such inspiration. They are always beautiful and your are so kind to share your knowledge and creativity with us! Bless you!ReplyCancel

  • JanJune 18, 2010 - 2:16 pm

    I have watched all three of these videos and all I can say is WOW! Becca, you are a genius! I am sure that you have singlehandedly brought about a jump in sales of MS corner punches and I think Martha should hire you or at least give you a cut. Thanks for sharing your genius with us and may God bless you and yours.ReplyCancel

  • alcoholinkyJune 18, 2010 - 2:31 pm

    brilliant. I’ve really enjoyed following your tuts and I’ve definitely learnt something. I don’t know how you mange to visualise these shapes. very clever!ReplyCancel

  • Cindy LouJune 18, 2010 - 4:29 pm

    Becca, You rock! I know I repeat myself, but this technique is so much fun and so very addictive. I sat in my craft room for 3 hours last night doing different punching/variations of your technique. Thanks for being so willing to share. Blessings ;)ReplyCancel

  • Nancy WJune 18, 2010 - 4:58 pm

    I am in awe of your creativity with those punches and the nestabilities. I love using punches and nestabilities in combination with Glitter Ritz microfine glitter and Sookwang/aka ScorTape.

    On the other hand, browsing your website is hard on my pocketbook as I can’t resist those punches when I see the possibilities.ReplyCancel

  • SherylHJune 18, 2010 - 6:14 pm

    Thanks for the great tutorials — just happened to purchase the Modern Garland corner punch at Michaels today and I actually made the small medallion on the first try! (well once I figured out that the paper doesn’t need to be seated within the wings of the punch) Now off to try the other two techniques. Thanks also for posting pictures of the other various corner punches as well — great to see more ideas. I will have to dig through my neglected punches and see what other corner ones I can find.ReplyCancel

  • JeanneJune 18, 2010 - 6:44 pm

    Becca, Becca, Becca,

    This is truly amazing! Every message says the same thing, we all want to buy these punches! I can’t wait to try this technique. The video’s are amazing! I am glad someone mentioned that we can pause the video, that will be so helpful. Thank you for keeping us glued to your website!ReplyCancel

  • sallieJune 18, 2010 - 7:53 pm

    WOW you make it look so easy. I am going to have to watch you do that a few more times before I try it. Love what you do!ReplyCancel

  • pat pJune 18, 2010 - 10:25 pm

    Dear Becca
    Wow look at all those practice sessions…and then you come and share this all with us..I’m so grateful. I will have to watch these video’s many times to sink it into my head..

    This is really a classic Becca design. You do such beautiful work with these creations of yours.. Your truly an artist and always searching for more creative ways of doing things. You create some of the most classic and elegant designs I’ve ever seen. Looking at your work makes me want to do better and be like you. Creative and so very original. You set the bar for beautiful creative work.
    Thank you from my heart Becca.
    PS I hope your husband is doing well. He is a very lucky man to have you as a mate.

    patReplyCancel

  • Lynne PhelpsJune 18, 2010 - 10:37 pm

    Thank you for coming up with a way to teach this technique without frying our brains! I love it that you are so analytical and look at the tools capabilities without being confined by their intended purpose. Bravo Becca, bravo!!!ReplyCancel

  • MarcieJune 19, 2010 - 12:18 am

    Becca

    Love this new technique of yours. Definitely have to try it out. It is superb!!! But we have become accustom to nothing less from you.

    MS does have a few more corner punches then those that you displayed. Out of curiousity, did you try them and just didn’t like their effect or are they actually some that you don’t have?

    Thanks so much for the three tutorials. It really does help to see you doing it.
    MarcieReplyCancel

  • DebiJune 19, 2010 - 2:49 am

    OMG, you rock! Truly amazing and inspiring and can’t thank you enough for the videos!!!!!ReplyCancel

  • BillieJune 19, 2010 - 7:28 am

    Becca, your work is FABULOUS…….I wish I had your talent. I do have the MS Punches and can’t wait to try them out. The problem I had was my sound, I couldn’t make out what you were the type ribbon you were using on the Bow Collar…..if you would please get me know, I would appreciate it and again, thanks for your information. Keep up the good work.ReplyCancel

  • RosettaJune 20, 2010 - 4:09 am

    You’ ve got me addicted to this punch. TKS!!!ReplyCancel

  • ConniecrafterJune 20, 2010 - 1:21 pm

    You are just so creative, this is so sweet!ReplyCancel

  • annJune 20, 2010 - 2:24 pm

    Just when I thought you couldn’t top yourself!! You are the best! thank you for all the beautiful inspiration you give us.ReplyCancel

  • ColoradoJune 21, 2010 - 10:51 am

    Whew! That was fast! Watched it straight through, but now have to go back and pause it and try to read the print I couldn’t see while it was running. Don’t know if you have any other visually impaired readers, but I’m sure, like me, they would have loved to have had the audio description of what you were doing.ReplyCancel

  • claudiaJune 21, 2010 - 9:52 pm

    Unbelievable. I see why you’re the expert. I can only hope I will be able to do these projects.ReplyCancel

  • AlexandraJune 22, 2010 - 5:02 pm

    Wow Becca, I love what you did with these punches. I don’t have any MS punches yet, I thought they were a bit pricey here in the UK, so I couldn’t justify the cost as I have a few corner and edge punches and dies. However you’ve convinced me a punch is not always just a punch, when you can do so much with these.
    Thanks for the tutorials, I’ll be back to watch them again once I’ve saved up my pennies to buy a couple of these to start me off.
    btw, the cards you’ve created using this technique are gorgeous.ReplyCancel

  • Nancy SJune 23, 2010 - 12:02 pm

    Absolutely fabulous, can’t wait to try it!ReplyCancel

  • Linda CoughlinJune 27, 2010 - 7:45 pm

    Wow, wow, wow, you are positively a genius. I bought a MS corner punch today with my 40% off coupon at Michael’s and went all the way through step 3. Everything came out PERFECT! Thank you so much for so generously sharing your creative talents with us. I will be using this technique and giving you credit with a link on my blog! Thank you again.ReplyCancel

  • Magda VinasJuly 19, 2010 - 3:53 pm

    Dear Beca,
    I’m amazed at the beatiful things you do, not wonder that your site is called Amazing Grace!
    I have been practicing the righ angle 3 but get loss at the second row in the corner; I will keep trying until I master it.
    Thanks for the wonderful things you do for us and the bits!
    God bless you!
    MagdaReplyCancel

  • JoAnn H.August 6, 2010 - 8:22 pm

    I am totally amazed at how you came up with that. I will be buying another MS corner punch. I love this idea. Thank You so much for sharing!!!ReplyCancel

  • karineAugust 14, 2010 - 3:07 pm

    thanks for this video tutorial its very amazing
    I made it very easily

    thanks

    KarineReplyCancel

  • lucylogicSeptember 6, 2010 - 4:18 pm

    Wow!!! Came across your demo whilst surfing the net and have sat here entranced by the versatility of these punches and your talent for getting more out of them. Have saved your site to my Favorites so that I can review the tutorial and follow your example with my own MS Punches. Many, many thanks for sharing this technique.

    LucylogicReplyCancel

  • JudiOctober 23, 2010 - 9:11 pm

    Wow, thanks so much! I loved that tutorial on the corner punches and I even have that one and a few others. Now I will go play! Thanks for sharing your talents!
    Judi
    SSW DTReplyCancel

I N F O