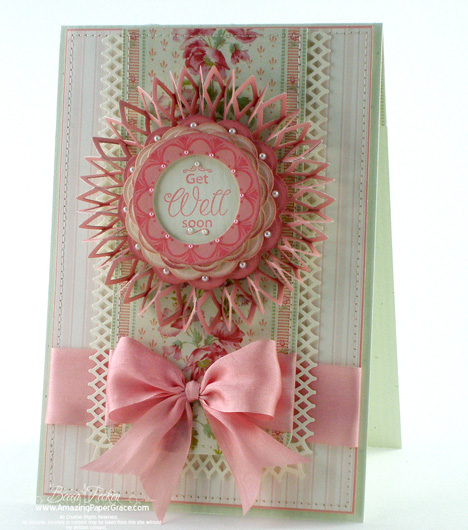
Hello there!  Thanks so much for your wonderful comments on my latest Becca Bit.  I know I’m not able to tackle every single email but when you all ask questions it sure gives me material to cover :-)  So I’m back with a card, and this one I’ve had floating around in my head and now finally to paper.  When I was thinking of what to do with the Spellbinders Lotus Pendant, I knew it would have a round center and I knew that JustRite had something to fit the bill!!  By the way, talking about fitting the bill – JustRite Stampers is having a smashing sale in May on many of your favorite sets – if you’ll just take a peek HERE – you’ll see which sets they have on special and several would be fab for the center of this flower . . . hint, hint ;-).  So first let me tell you the stamps I used.  I simply love the Decorative 2" Round Wide Borders (on sale right now) – they go with almost any sentiment that JustRite offers.  I paired it up with the Custom Design Cardmaking Kit – a set that takes you through almost any occasion.

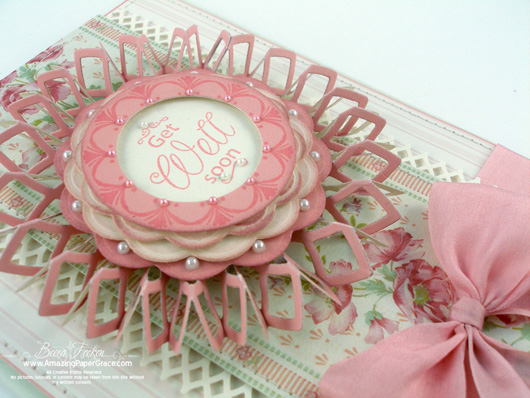
Okay, so now I’ll tell you how this medallion stacks up.  The base of the flower is made with Spellbinders Lotus Pendant – I used three of them and frilled them (my word for folding back and forth) and glued them together.  If you haven’t seen me do this before, check out this tutorial I did on a ruffled flower HERE.  Then I stacked (beginning at the bottom) the following Spellbinders sets,  Big Scalloped Circles SM #5,  Big Scalloped Circles LG #4, Big Scalloped Circles SM #4, Standard Circles SM #4 and Standard Circles LG #2.  Of course you can stack with the sets that you have in your stash, but people always ask exactly what I used and it keeps them from having to reinvent the stack.

I separated each layer with foam tape and it fits nicely in the center of the flower which I also had to build up with foam tape.  This is the type of card I would mail off in a bubble wrap envelope but I would take something like an large empty ribbon spool and seat it over the head of the flower to protect it from getting smooshed.  If a ribbon spool is not handy then I’ll take and empty container like perhaps one that held margarine and cut it to a low profile and seat it over the flower head.  More likely however, this would be the kind of card I’d hand deliver to a friend in the hospital where it could sit out to be enjoyed.  This is a question you ask often, I hope my explanation helps!

Card Recipe:
Stamps: 
JustRite Decorative 2" Round Wide BordersJustRite Custom Design Cardmaking Kit
Paper:  The Paper Company, Anna Griffin
Ink:  Colorbox Chalk Ink – Rose Coral, Tim Holtz Distress Ink – Victorian Velvet
Accessories:  Spellbinders™ Big Scalloped Circles LG, Spellbinders™ Big Scalloped Circles SM, Spellbinders™ Standard Circles LG, Spellbinders™ Standard Circles SMSpellbinders™ Lotus Pendant, Pearls, Ribbon, Martha Stewart Border and Corner Punch – Gothic Arches

I have the best readers!!  Thanks for being so darn sweet!!

pinTHIS SHAREthis TWEETTHIS EMAILthis
  • Kelly MassmanMay 12, 2010 - 7:31 am

    This is just gorgeous!!!ReplyCancel

  • SherryMay 12, 2010 - 7:50 am

    As always, you never disappoint….this card is breathtaking. If I got sick could you send me one? LOL Someday, I’d love to see all of your ribbons and how you store them. You must have the most amazinf ribbons in the world.ReplyCancel

  • Gloria WestermanMay 12, 2010 - 7:53 am

    Absolutely gorgeous….. I will have to go and check out spellbinders again…..your creativity is unbelievable…..thank Becca for always sharing your creation and on how to make them…..ReplyCancel

  • MelanieMay 12, 2010 - 7:53 am

    Becca, your cards are just simply works of art!ReplyCancel

  • janeyMay 12, 2010 - 7:55 am

    Stunning – and, as usual, very clear explanations. Thank you, Becca!ReplyCancel

  • ShawnaMay 12, 2010 - 8:08 am

    Gorgeous Becca. Your stuff is always gorgeous! One of these days I am hoping you will share with us how you mail your lovely creations without crushing your designs. Hugs to you!ReplyCancel

  • Sabrina aka okimom2girlzMay 12, 2010 - 8:15 am

    OMGosh, Becca, this is so beautiful!!! You are the Queen of awesome…the way you have done the Lotus pendant in combination with the flowers…..so stunning! Another beauty ready for a frame! Hugs and blessings, SabrinaReplyCancel

  • RosieMay 12, 2010 - 8:19 am

    Becca, this is one SHOWSTOPPER of a card. This will certainly cheer (and cure) the recipient! I too, was wondering how to mail these cards and now I know. Good advice all around. Please keep the inspiration coming!ReplyCancel

  • kraftychicMay 12, 2010 - 8:21 am

    Becca, Your card is just so very stunning! Thanks for sharing your wonderful creativity with us!ReplyCancel

  • ChinnuMay 12, 2010 - 8:24 am

    Oh, Becca! What a card. I hope the recipients of your cards TRULY appreciate all the work that goes into your cards. I wish I could peek into your mind to see how the “wheels” turn! Your talent and creativity is amazing.ReplyCancel

  • Karen WMay 12, 2010 - 8:35 am

    Just beautiful and I love how many different ways you use the spellbinders, loved the video on making them a tiny bit larger also. Thanks so much for the time it takes to help the rest of us.ReplyCancel

  • Amy HadleyMay 12, 2010 - 9:46 am

    breathtaking! Lovely layering and that floral print is gorgeous. Superb!ReplyCancel

  • Valerie MatinMay 12, 2010 - 9:53 am

    OH…MY…WORD!!! This is BEAUTIFUL!!! I CAN’T WAIT for a video on this one (HINT, HINT)
    ValerieReplyCancel

  • Susan NelMay 12, 2010 - 9:55 am

    Becca you’re driving me CRAZY with your beautiful cards. absolutely fantastic work, your site is really everyday the highlight when i open my mail. wish i could win some candy too sometime,,,,, i made one of these ruffled up cards the other day when you showed us to do it with the fleur de lis pendant, my gf b/day is tomorrow then i’ll give this card to her. Greetings from South Africa.ReplyCancel

  • Debbi ClouserMay 12, 2010 - 9:57 am

    What gorgeousness! You are the Queen of Cardmaking, that’s for sure.ReplyCancel

  • BettyMay 12, 2010 - 10:30 am

    This is just gorgeous Becca!!! Thank you also for sharing your tips! : )ReplyCancel

  • Jan D.May 12, 2010 - 10:38 am

    Oh my goodness…this is beautiful and I just bought the Lotus die…yippee…can’t wait to try this. Thanks so much for sharing your talent.ReplyCancel

  • RebekkaMay 12, 2010 - 10:39 am

    Girl this is fabulicious…I love what you do with these dies.ReplyCancel

  • Sylvia/LittleTreasuresMay 12, 2010 - 10:42 am

    Wow..Simply Amazing..this is sooooooooo beautiful. You made this dreary day full of sunshine. Thanks so much for sharing your special talents.ReplyCancel

  • lois skiathitisMay 12, 2010 - 10:58 am

    WOW! Becca, the focal image just pops right out at you. Just so pretty in pink. Love the all over look. You have such a way with paper that is such a delight to the eyes. As always Becca, TFS!!! :-DReplyCancel

  • Allison PhillipsMay 12, 2010 - 10:59 am

    Really very beautiful, Becca! You never seem to run out of ideas
    and I think that its really a gift. I love learning how to use
    various stacking combinations to always be changing it up a bit.
    Thanks for sharingReplyCancel

  • Judi MarkelMay 12, 2010 - 11:00 am

    Love it, Love it, Love it. Your card is fabalous. Thanks for sharing Becca.ReplyCancel

  • DebraKMay 12, 2010 - 11:12 am

    ‘took my breath away! Most beautiful! I just LOVE these colors–they were my wedding colors 2 years ago. Fabulous bow, too! You are SO artsy!!ReplyCancel

  • Diane LMay 12, 2010 - 11:59 am

    Oh My Gawd!!!!! This is beyond stunning Becca!!!! I also went back to check your tutorial wow all the folding and work is so worth it!!
    Don’t know if mine would turn out as gorgeous but will def try it one day!!! TFS your skills Becca!ReplyCancel

  • AnneMay 12, 2010 - 12:06 pm

    Absolutely beautiful, Becca! Love the card!

    Hugs
    Anne (UK)ReplyCancel

  • Janna SmithMay 12, 2010 - 12:11 pm

    You always come up with something beautiful! I love how you think “outside the box” and find new ways to use our tools!ReplyCancel

  • Carol (Craftingranny)May 12, 2010 - 12:17 pm

    Thanks for the link to the tutorial. I’m loving this card! It is so elegant and awesome. But then, most of your cards are awe inspiring. I’m going to try one soon and hope it turns out just half as beautiful as this one.
    “Hugs” Granny (Carol)ReplyCancel

  • Susan BugalskiMay 12, 2010 - 12:24 pm

    This is one beautiful card once again. You have undoubtedly THE BEST cards I have ever seen.

    I couldn’t leave you a comment about cutting around a Spellbinders but that was awesome – why didn’t I think of that?

    Your tutorials are fantastic.

    Thanks so very much.ReplyCancel

  • DarsiMay 12, 2010 - 12:38 pm

    Wow! Wow! Gorgeous!!ReplyCancel

  • Jean McGeeMay 12, 2010 - 1:40 pm

    W O W ! ! ! B -U -T- FUUUUUUUUULLLLLL!!!!!
    I have that Lotus Pendant coming in the mail any day now and will have to try this flower. Thanks soooooooo much for the tutorial.
    The last few days I have been spending hours going through your archives. It has been soooooo much fun. The ideas are grrreaaaaaaat. Last night I got as far as Aug. 2008. I have notes alllll over my desk (I hope I can read them). Thanks again for sharing your God given talent with us.
    Jean McGeeReplyCancel

  • MicheleMay 12, 2010 - 1:48 pm

    Absolutely gorgeous!!!Do you ever get tired of hearing how talented you are? Cuz you have serious talent!!! : )ReplyCancel

  • ConniecrafterMay 12, 2010 - 2:05 pm

    OH WOW!!!! Stunning, sure to be a pick me up! I just love the layering and such pretty papers and perfect bow!ReplyCancel

  • MarilynMay 12, 2010 - 2:06 pm

    Beautiful card, as always!ReplyCancel

  • Chris R.May 12, 2010 - 2:25 pm

    Amazing as always! I have been wanting the lotus pendant. Now I know I have to get it!ReplyCancel

  • Sabine EdelmannMay 12, 2010 - 2:33 pm

    You are amazing,Becca!!!ReplyCancel

  • Val WMay 12, 2010 - 3:22 pm

    Beautiful card! I always like to see how you layer up your creations. This one is stunning. Love your little tips for mailing a card with a high profile embellishment that you don’t want to get crushed. It’s always nice to know these things in case hand-delivery is not an option.ReplyCancel

  • Marilyn ClarkMay 12, 2010 - 4:07 pm

    I got a banged up twisted knee and am on crutches and I want to thank you for the beautiful card….I am taking this card personally! Your talent is amazing and is such a blessing for all of us readers.

    We appreciate you giving us the details to copy your cards. God bless and have a great day.ReplyCancel

  • Marianne AdamMay 12, 2010 - 4:14 pm

    Another stunning card!ReplyCancel

  • JudyIMay 12, 2010 - 5:19 pm

    Gorgeous as always. Love those JustRites, but now the Lotus pendant is on my must have list.ReplyCancel

  • Donna G.May 12, 2010 - 5:20 pm

    Becca, this is absolutely beautiful!! You are so super talented! This card will be much appreciated by someone who needs a “pick-me-up”!
    Donna GReplyCancel

  • TeresaMay 12, 2010 - 5:49 pm

    I always enjoy visiting your blog, but sometimes you have a creation that is really special. This is one of those. Love this card. You are great!!ReplyCancel

  • Kay G.May 12, 2010 - 6:35 pm

    Becca, I love this card. I always look forward to your cards. Thank you.ReplyCancel

  • Carol FroehlichMay 12, 2010 - 7:08 pm

    I just bought the 2″ circle wide borders. Haven’t received them yet, but now I have a gorgeous card to use for inspiration. I don’t have the Lotus Spellbinders yet, but plan on buying that one soon. I have seen so many cards that use it and it is on my wish list. :)

    Thank you SO MUCH for continuing to inspire me with your BEAUTIFUL creations!!ReplyCancel

  • RufusMay 12, 2010 - 7:49 pm

    I’ve got, and LOVE, the Lotus Pendant. I use it a lot. For some reason I never that to ruffle it. I’ve done it with some of the borders, why didn’t I think of it with this?? Oh, well, I don’t need to ~ since you ALWAYS come up with great ideas! This is gorgeous! I’m loving your Becca Bits too.
    Thanks for being you and sharing with the rest of us!
    R/ReplyCancel

  • Deebi27May 12, 2010 - 9:56 pm

    You have given me plenty of reason to get the medallion Spellbinder now…thank you! I love that outside edge. The inside stuff, I have that covered. GREAT card Becca. You seem to make some the absolutely coolest cards. And them seem so easy to do…when You do them! Thanks!ReplyCancel

  • Deebi27May 12, 2010 - 9:58 pm

    I meant Lotus Pendant not the medallion…no wonder why my creations sometimes look sooo different?ReplyCancel

  • LindaMay 13, 2010 - 1:28 am

    Oh my, drop dead gorgeous as usual! xLReplyCancel

  • emilyMay 13, 2010 - 7:34 am

    This is so beautiful! You always see things a little bit different and more decorative than the rest. I love it!
    Thanks for sharing! :o)ReplyCancel

  • CharletteMay 13, 2010 - 12:49 pm

    Wow! Becca this card is just unbelievable. You always design such beautiful cards and they are so creative. I wish I was your neighbor! To sit and make cards with you would be such a joy! But I gues I’ll just have to keep visiting your blog daily like I always do! As always thanks so much for sharing!ReplyCancel

  • Chris BiljanMay 13, 2010 - 4:07 pm

    How do you come up with these???? I am so in awe of what you’re able to do – thanks for the wonderful inspitarion!!!ReplyCancel

  • SuziMay 13, 2010 - 6:02 pm

    I just got the lotus spellbinder this week! What timing! Can’t wait to try to “frill” it! Thanks for sharing all your great ideas!ReplyCancel

  • Karen LinarezMay 13, 2010 - 11:55 pm

    Thank you so much for sharing the tutorial for that awesome medallion. Love the feminine design and colors of the paper, and paired with that stunning medallion adds the perfect elegance. Even the white punched border is perfect, and I love the layout. What a gorgeous card! You have the perfect touch!ReplyCancel

  • Karen LinarezMay 14, 2010 - 12:00 am

    . . and, I love the bow . . and the pearls . . . and that cute pink circle frame with the cute border stamp . . . and. . .ReplyCancel

  • RubyM:)May 14, 2010 - 1:37 am

    UTTERLY STUNNING!!!!!!! BEST CARD EVER WOW!!!!!!!!RubyM:)ReplyCancel

  • MarcieMay 14, 2010 - 9:20 pm

    Becca,

    What beautiful cards. Luv the use of the lotus pendant. It made such a lovely flower petal look. Never would of thought of accordian pleating it. Absolutely stunning. Thanks for the idea and the tutorial. Your the best.
    MarcieReplyCancel

  • MargMay 15, 2010 - 8:05 am

    This card is beautiful as you always do them. Thanks so much for the tip on how to mail the cards that have high embellishments. Never would have thought of the ribbon spool.ReplyCancel

  • Peggy AllenMay 15, 2010 - 6:43 pm

    Wow, I absolutely love everthing about this card. The paper, SB die, ribbon, pearls and punches. Well done. God bless!ReplyCancel

Okay, several of you have emailed to ask how I get such tight or thin mats on some of my Spellbinders Projects.  It’s a quick and easy fix and once I figured out the best way for “me” it’s a method that I use all the time.  I’ve tried tracing and and cutting by hand, but my manual cutting is not quite up to par with a kindergartner (thank you Grammar Girl!), lol!!  This is a brief one – if you blink you’ll miss it.

See you soon!!

pinTHIS SHAREthis TWEETTHIS EMAILthis
  • TammiMay 11, 2010 - 4:09 pm

    I just LOVE Becca’s bits. Thanks for that!
    xoxoxoReplyCancel

  • Sherry CheeverMay 11, 2010 - 4:09 pm

    Great tip Becca and fabulous video! That gap has bothered me and now I know what to do! Thanks!ReplyCancel

  • lois skiathitisMay 11, 2010 - 4:13 pm

    I flunked cutting 101. I so appreciate you showing us what you do to get the smaller mat. I just love your Becca Bits, Becca. As always TFS!!! :-DReplyCancel

  • Gerri KMay 11, 2010 - 4:13 pm

    Wow!! Finally, a method that will work for me! I’ve tried cutting down the mat freehand with scissors. I too am a remedial cutter. Thanks so much for sharing this.ReplyCancel

  • cookieMay 11, 2010 - 4:14 pm

    I’ve always wondered how you did that…. what a fantastic tip. I’m gonna save it for future reference… thanxxxxxxxxxxxxReplyCancel

  • Carla SutoMay 11, 2010 - 4:14 pm

    Thanks, Becca! I always wondered how your tight mats looked so perfect! Definitely going to give this a try!ReplyCancel

  • GraceMay 11, 2010 - 4:17 pm

    What a fabulous tip! I can’t believe how quickly and easily you did that Becca.
    Many thanks.ReplyCancel

  • Susan GMay 11, 2010 - 4:18 pm

    Great idea. Thanks for sharing that tip.ReplyCancel

  • Sabine E.May 11, 2010 - 4:19 pm

    Oh , how easy is that! Thanks Becca ! love your bits!ReplyCancel

  • EdnaMay 11, 2010 - 4:21 pm

    Interesting, hadn’t thought of doing that. Thanks for the tip. EdnaReplyCancel

  • Diana CrickMay 11, 2010 - 4:22 pm

    Great video clip, I always learn a lot from you…
    hugs, DianaReplyCancel

  • SandyMay 11, 2010 - 4:23 pm

    I use an exacto knife more than scissors. Don’t know why I didn’t think of that technique. Thanks, Becca.ReplyCancel

  • MehrllMay 11, 2010 - 4:24 pm

    Thanks for the tip. You did it so easily. I hope it goes that well for me.ReplyCancel

  • SparklesMay 11, 2010 - 4:28 pm

    Thanks so much for sharing that one – gives even more possibilities for our spellbinders! You are sooooo creative!ReplyCancel

  • RobMay 11, 2010 - 4:29 pm

    Thanks so much for this Becca, I just made a card yesterday and was thinking that I would love a tighter mat, so am off to try it out today.

    Cheers,ReplyCancel

  • Tracy McAlisterMay 11, 2010 - 4:32 pm

    Thank you for sharing beats free hand cutting any day. Another amazing Becca Tip Bit.ReplyCancel

  • LindaMay 11, 2010 - 4:38 pm

    Fabulous….it always looks so much better with the narrower mats I think…..thanks for sharing….now why didn’tIi think of that…der! LOL.ReplyCancel

  • SusanMay 11, 2010 - 4:39 pm

    Love the tip Becca I had tried trimming with scissors after attaching the top mat but could never get an even mat. You are the greatest and such an inspiration to so many.ReplyCancel

  • MichelleMay 11, 2010 - 4:43 pm

    Thanks for sharing this! What a fabulous idea! I prefer the tighter matsReplyCancel

  • Billie AMay 11, 2010 - 4:44 pm

    Love the Becca Bits they are so helpful. Thanks for taking the time you are so talented thanks for sharing.ReplyCancel

  • Cheryl RandallMay 11, 2010 - 4:58 pm

    Becca

    I just wanted to take the time to tell you how much I appreciate your willingness to share these extra “tidbits” with all of us. I really do learn alot when you share them.

    Thank you for sharing with us.

    Cheryl RandallReplyCancel

  • Debbie PammentMay 11, 2010 - 5:01 pm

    oooh thanx Becca – I too hate to handcut around shapes – and often leave pencil marks too – so I’ll be giving this a go soon! You are soo inspiring!
    xXxReplyCancel

  • Tonya FMay 11, 2010 - 5:07 pm

    Becca,

    You are fantistic. I look forward to each post with another beautiful card or tip on how to do our craft better.ReplyCancel

  • MaryMay 11, 2010 - 5:08 pm

    Wow so simple and yet I never would have thought to do that in a million years. Thanks so much for sharing your ability to think outside the box Becca :)ReplyCancel

  • Marion (Australia)May 11, 2010 - 5:08 pm

    Wow! I couldn’t believe it when I saw this video. I have been thinking of this for the last few days and here it is. I can’t believe I didn’t think of doing this. Thanks so much for your time Becca. I am just going to do your sketch for Magnolia-licious so will do this nice tight mat.

    Hugs MarionReplyCancel

  • Patricia GessnerMay 11, 2010 - 5:10 pm

    Thank you so much Becca. I never would have thought of that!!!!ReplyCancel

  • ChinnuMay 11, 2010 - 5:11 pm

    Wow, so easy! Whodathunkit! Thanks for sharing, Becca. I love your Becca Bits. I’d been wanting to make a butterfly card like the one you’d made with the large embossed scallop punch… and finally did… it turned out so pretty! I decided I couldn’t give it away! LOL! Many many thanks for sharing your talent and tips with us.ReplyCancel

  • Lynne PhelpsMay 11, 2010 - 5:14 pm

    Smacking self in forehead thinking, why did I never think of that! Thanks so much for the lightbulb moment, LOL!!!ReplyCancel

  • LuAnn in AZMay 11, 2010 - 5:15 pm

    Love your Becca bits… thank you for sharing again and again. With practice, perhaps we can be more like you and our cards can look professional and pretty.ReplyCancel

  • Marilyn ClarkMay 11, 2010 - 5:19 pm

    Girlfriend, thanks for the video. Love your Becca Bits. I never thought of doing what you showed us. Creatively, you are on a different level than me. Thanks for taking the time to explain everything. God bless and have a great day.ReplyCancel

  • BernieMay 11, 2010 - 5:30 pm

    Thanks, Becca, for your wonderful videos and sharing your ideas. I need someone else to “think outside the box” for me since I am quite regimented.You are light years away from most of us with your talent.ReplyCancel

  • CarlaMay 11, 2010 - 5:31 pm

    Thank you Becca – this is really REALLY helpful. I love how that looks. Thank you also for your videos, you do a wonderful job and I really appreciate all your great tips. 8)ReplyCancel

  • Beth GrecoMay 11, 2010 - 5:32 pm

    Awesome Beccabit!!! I love that and can’t wait to try this. I always use scissors but don’t often like the look.
    BethReplyCancel

  • Linda CMay 11, 2010 - 5:32 pm

    Becca, your cards always look very professional. I had tried drawing around and cutting and I don’t always get the smooth edge. Great tip. Thanks for sharing. Linda CReplyCancel

  • sheenaMay 11, 2010 - 5:32 pm

    Thanks for sharing this Becca! I too am a remedial scissor user and tracing the dies and hand-cutting always looks terrible for me! I will definitely give this a try!ReplyCancel

  • bonnie weissMay 11, 2010 - 5:36 pm

    Love those Bits, Becca! Thanks!ReplyCancel

  • Jessica B.May 11, 2010 - 5:54 pm

    wow!! I never knew how people did that other than tracing and cutting by hand! how awesome, thanks for the great tip!!ReplyCancel

  • Tomi JoMay 11, 2010 - 6:17 pm

    Oh how I agree with all the rest of your “friends”—your bits are just great. I will try this for sure.
    Was just wondering—-on the basic shapes ie the square, circle etc.—if we had both the large and small could we use the ones that fit between the others—-hope that makes sence.
    You are great , Bless you, Tomi Jo
    Hope you can answer this question on the site.ReplyCancel

  • KateMay 11, 2010 - 6:18 pm

    Thanks so much for sharing! I love the look but never thought of doing that. You’re so smart!ReplyCancel

  • Sally McDonaldMay 11, 2010 - 6:24 pm

    WOW! Thanks!ReplyCancel

  • Shelly SchmidtMay 11, 2010 - 6:27 pm

    That is such a great tip- thanks for sharing it!ReplyCancel

  • DeniseMay 11, 2010 - 6:37 pm

    Great tip.. thanks so much!ReplyCancel

  • debbMay 11, 2010 - 6:51 pm

    Love this! Thank you Becca!ReplyCancel

  • SuziMay 11, 2010 - 7:50 pm

    Love it! Would never have thought of it. Will use it soon! Thank you!ReplyCancel

  • JannaMay 11, 2010 - 8:12 pm

    Why is it that something can be so obvious, and yet we overlook it every time? As others have already said, “Why didn’t I think of that?” Thanks for sharing your ideas and your beautiful cards!ReplyCancel

  • VioletMay 11, 2010 - 8:32 pm

    Thanks for sharing that. I’ve tried cutting around it to and it just looks, well, cut out. I’ll try your method. Nice tutorial.ReplyCancel

  • KarenMay 11, 2010 - 8:43 pm

    You are the best with sahring famtastic tips. I have tried to figure this out many times. You made it look so simple so :) Now to put it into action!ReplyCancel

  • Gloria WestermanMay 11, 2010 - 9:22 pm

    Wow,….I didn’t know that……I learn so much from you Becca…..thank you so much and I can’t wait to try this……ReplyCancel

  • EarlineMay 11, 2010 - 9:23 pm

    Thanks Becca so much for this technique going to try this one.ReplyCancel

  • SophiaMay 11, 2010 - 10:41 pm

    Thanks for the wonderful tip! You’re a genius!

    I can cut pretty good, but it’s tedious and I’m all about fast (and simple) tricks. I’m going to try this soon!ReplyCancel

  • RebekkaMay 11, 2010 - 11:11 pm

    Well I have to say “Thank You”.. But you know what?! I never noticed :). I thought you just had spell binders that I did not have, what I nut I am.ReplyCancel

  • BarbaraMay 11, 2010 - 11:18 pm

    Thank you for a great tip !! I also LOVE ” Becca Bits”ReplyCancel

  • Charmaine StackMay 11, 2010 - 11:40 pm

    Brilliant! And so fast, too!ReplyCancel

  • DorothyMay 12, 2010 - 12:53 am

    greetings from the uk Becca, you said this tip isnt new, but thank you so much as it is new to me, and like many others I have tried to cut it out with scissors and made a mess of it Dorothy xxReplyCancel

  • pat poskMay 12, 2010 - 1:42 am

    What a great Becca Bit…having the frame there really will help me to stay on the line better..Now why didn’t I think of that..
    I needed the Becca Bit to tell me.. ha ha ha ha

    patReplyCancel

  • HeatherMay 12, 2010 - 2:29 am

    Hi Becca – Thanks for the video, using the knife is much easier than cutting round the embossed image. Like everyone else says ‘why didn’t I think of that….’!!
    You are so savvy.
    HW(UK)ReplyCancel

  • Glenda BrooksMay 12, 2010 - 2:37 am

    I too love the look of tight mats, but it never entered my poor mind to do this! Thanks for the heads up!ReplyCancel

  • DebbieMay 12, 2010 - 4:04 am

    I love Becca Bits! This is a really great one. I wondered how you got your mats so much smaller. Thanks!ReplyCancel

  • KatMay 12, 2010 - 5:07 am

    Great tip! I love that you are able to show your readers how to get more milage out of their tools. These Becca Bits are fantastic!ReplyCancel

  • LaurieMay 12, 2010 - 5:29 am

    Becca, thanks so much. I’ve traced and hand cut with various results, but never thought of using the knife – great idea. Love your work!ReplyCancel

  • janeyMay 12, 2010 - 5:36 am

    As usual, you have provided a great tip that is ‘doable’ and is economical. Thanks, BeccaReplyCancel

  • MarshaMay 12, 2010 - 6:16 am

    Becca, thank you! This is a wonderful tip :DReplyCancel

  • KathyMay 12, 2010 - 6:49 am

    Thanks for this great tip. I just asked a group the other day how to get more out of the dies you have and now this tip. I have labels 8 and wished they had more sizes to make mats and now I know how to do it. This is a gem.ReplyCancel

  • mom2hMay 12, 2010 - 7:46 am

    I am a good cutter, if I do say so myself, but it is very hard to get smooth curves unless you have a guide, such as you demonstrated. Thanks for letting us in on this little secret. I love it and will use it soon!ReplyCancel

  • Beth SMay 12, 2010 - 7:47 am

    Hi Becca… Thanks for that great tip and tutorial. I’ve been trying to figure out how to do that for sometime now and like others when I tried cutting with scissors it just didn’t turn out right.ReplyCancel

  • mom2hMay 12, 2010 - 7:52 am

    Oh, yeah. One more way to get a thin mat/border/outline is to ink the edge of your die before you cut and emboss. Some folks call it a “letterpress” technique. That makes the inked outline on the actual size of the die…from the embossed border out to the edge. That’s good for times when you want a border, but don’t have the space to spare to make everything larger. Becca, I can’t remember if you showed this technique at some time, or if I saw it somewhere else.ReplyCancel

  • LizetteMay 12, 2010 - 8:03 am

    I have just had another one of those questions to myself :”why didn’t I think of that?” Thank you Becca for being the one who thinks of all these great ideas! Love them al! You are an inspiration and I am so happy that I am one of the lucky ones who discovered your blog!
    THANKS!!!!!
    Desert wishes
    LizetteReplyCancel

  • Debbi ClouserMay 12, 2010 - 10:02 am

    Love this tip! So glad creative types like you are there to help some of us who need it!ReplyCancel

  • Julie EMay 12, 2010 - 10:20 am

    Thanks! I have always thought that the sizes needed to be closer together – now you have solved that problem!ReplyCancel

  • kraftychicMay 12, 2010 - 10:42 am

    Great tip Becca! TFS!ReplyCancel

  • LesleyMay 12, 2010 - 12:44 pm

    I always wondered how that was achieved! So wanted slimmer mats for my labels sets. Thanks.ReplyCancel

  • lorililacMay 12, 2010 - 1:12 pm

    Becca ! Thank You SOOOO Much ! I’ve been looking for help!

    You’re WOnderful !ReplyCancel

  • Jean McGeeMay 12, 2010 - 1:51 pm

    OH OH OH OH! ! ! ! Thank you soooooo much for that tip WOW!!!!
    Ditto with the “why didn’t I think of that?” That’s like a DUH!!!! I am anxious to use that tip. Thanks again for sharing alllllll of your B-U-T-FUUUULLLLL cards.
    Jean McGeeReplyCancel

  • Carrie CMay 12, 2010 - 3:07 pm

    Thanks for sharing a great tip!ReplyCancel

  • Val WMay 12, 2010 - 3:11 pm

    Thanks for sharing that tip. I will certainly use it, as my collection of Spellbinder nestiblilities grows. I usually like to have the narrower mat, so this will work great.ReplyCancel

  • Linda wMay 12, 2010 - 4:12 pm

    Left handed crafters have always got to come up with ways that do not involve cutting with scissors. Thanks for this great idea Becca.

    stamp on…ReplyCancel

  • HeatherMay 13, 2010 - 2:49 pm

    Genius!
    I’ve done that the blonde way : trace around that very edge with a just sharpened pencil ‘then’ cut it out all squiggely-like by hand :D
    Go figure. It’s natural so I can’t hide it-lol!
    Thanks for sharing your oh so useful Becca Bits!ReplyCancel

  • Ann WallMay 14, 2010 - 4:22 am

    Thanks for all your “Becca Bits” you seem to come up with all the solutions that I am looking for!!!

    Ann in the U.K.ReplyCancel

  • CynthiaMay 14, 2010 - 8:42 am

    Love it, girlfriend! I will be using this tip to the max, as I love Spellbinders. Blessings!ReplyCancel

  • Joan KMay 14, 2010 - 7:32 pm

    What a great tip! Thanks for sharing.ReplyCancel

  • ZacksNanaMay 17, 2010 - 1:22 pm

    WOW! You sure made quick work of that!
    Thanks for the ‘Spellbind’ ing video tutorial.ReplyCancel

  • Dream «May 17, 2010 - 9:31 pm

    […] the labels #9 nesties.  Then I used Becca’s technique to cut the 1/8″ mat below it. (see Becca’s tutorial here)   The gold panel was punched with a Fiskars punch around the edges.  And I added some coppery […]ReplyCancel

  • JaquiMay 19, 2010 - 12:16 pm

    What a fantastic tututorial. I’ll definately be following this for my cards from now on. Brilliant.ReplyCancel

  • TraciMay 20, 2010 - 8:52 am

    Dang! This is so simple! Thanks, Becca! Now I have another great technique to add to my “arsenal”….you rock!ReplyCancel

  • […] on how to create the tight mat around the Labels Eight die cut, I have a tutorial for that HERE.  If you’d like to know how to make a double tied bow, I have a tutorial for that […]ReplyCancel

  • MarianJune 1, 2010 - 8:29 am

    Thanks so much. I have always admired that matting and suspected that you did it that way, but really wondered HOW…how could it be so neat!
    TFS…as usual…gorgeous :)ReplyCancel

  • […] that I thought would fit well with a flower girl.  I cut a Spellbinders Labels Ten panel and cut a tight mat to frame her with.  Lastly, I took two ribbons – the lace ribbon is slightly wider than […]ReplyCancel

  • Peggy DollarJune 30, 2010 - 11:38 am

    Becca, you are my favorite person of all on the Splitcoast site. You make the most incredible cards, you have amazing ideas and techniques that you generously share and your sweet spirit comes through in everything you say on your blog. Thank you for sharing your many gifts with all of us.

    PeggyReplyCancel

  • donna mikasaAugust 16, 2010 - 3:05 pm

    What a great tutorial, Becca! Thank you!ReplyCancel

  • Lorie B.December 2, 2010 - 8:32 pm

    Thank you for sharing your tips and tricks. You are such a talented and generous person! :o)ReplyCancel


Hey there!  Another card for all those graduates around the corner.  There are none in my family this year, but I’m ready with a little stash if I’ve over looked someone.  I’m using one of the May release sets from Our Daily Bread Designs; this one is called As You Graduate.  I’m using more of the paper I used yesterday with the DCWV Linen – I love that stuff and yes, it is a stack.
For the focal point I used one of my Spellbinders fav’s – Fancy Tags.  I tried ribbon around two of the tags at the top and two of the tags at the bottom to make opposing ribbons.  It left just a little bit of space in the middle to nestle a sentiment.  On each edge I punched a fan motif with a Martha Stewart punch just to break up the print.

Card Recipe:
Stamps:  Our Daily Bread Designs – As You Graduate
Paper:  The Paper Company, DCWV – Linen
Ink:  Versafine – Onyx Black
Accessories:  Spellbinders™ Labels Eight, Spellbinders™ Fancy Tags, Spellbinders™ Petite Scalloped Oval SM, Spellbinders™ Petite Ovals SM, Pearls, Ribbon, clear embossing powder

Thanks so much for stopping by! 

pinTHIS SHAREthis TWEETTHIS EMAILthis
  • Sharon FieldMay 10, 2010 - 6:38 pm

    Lovely card….thanks for sharing.ReplyCancel

  • Joanna L. MMay 10, 2010 - 6:55 pm

    OMgosh … WOW. That is stunning.ReplyCancel

  • DebraKMay 10, 2010 - 6:58 pm

    I love the Fancy Tags, too, but don’t have them yet. Everytime I see you use them I get anxious to get them. Awesome card–yours are always so “clean”. I seem to get too carried away with mine. I’ve got to learn to restrain myself. Less always seems better…and cleaner. Where do you buy your half pearls–bulk or by the package? I have to try stitching, too–one thing I’ve not attempted yet. Great job, Becca–you are the best! Hugs…ReplyCancel

  • Shelly CameronMay 10, 2010 - 6:58 pm

    SUPER FANCY Girl! Its is just beautiful!ReplyCancel

  • ColoradoMay 10, 2010 - 6:58 pm

    It took me a while to spot the “fan motif”! LOL!! You never cease to amaze me with how you put various elements together to make such unique cards. I wish I had your artistic touch!ReplyCancel

  • Kelly MassmanMay 10, 2010 - 7:16 pm

    Nice card!ReplyCancel

  • Monika/buzsyMay 10, 2010 - 7:30 pm

    Oh so pretty! Love the colors… the dies you used… the gorgeous ribbon! :o)ReplyCancel

  • LuAnn in AZMay 10, 2010 - 8:46 pm

    Absolutely LOVE the way you layer paper and embellishments Becca!
    SOOOOO pretty!ReplyCancel

  • MarisaMay 10, 2010 - 8:55 pm

    Wonderfully done, Becca! Love the bows and the way you used the three dies.ReplyCancel

  • Lori AragonMay 10, 2010 - 9:09 pm

    This is wonderful, Becca. I love how you come up with the most creative ways to use tools!

    Love and hugs ~
    LoriReplyCancel

  • AndreaAMay 10, 2010 - 9:40 pm

    As always Becca, I love this card!!
    Very pretty!!ReplyCancel

  • Carol FMay 10, 2010 - 11:19 pm

    The bows definitely add the gorgeous touch. Beautiful as ALWAYS!!
    Just today I used one of your ideas for a card.
    Thanks so much for your inspiration.ReplyCancel

  • RebekkaMay 11, 2010 - 12:21 am

    This is beautiful Becca, love the dp and the colors.ReplyCancel

  • patounineMay 11, 2010 - 1:04 am

    trop belleReplyCancel

  • emilyMay 11, 2010 - 3:57 am

    What a lovely card and perfect timing. The ceremonies have already started!
    Thanks for sharing! :o)ReplyCancel

  • lois skiathitisMay 11, 2010 - 4:45 am

    Beautiful card Becca, how ingenious to use the labels north to south verses east to west. Such lovely colors chosen. I love how you put the bows to frame the focal point. It is just an all over beautiful design. As always Becca, TFS!!! :-DReplyCancel

  • MarcieMay 11, 2010 - 5:01 am

    Becca,

    Gorgeous as always. Your cards are always so lovely. I just can’t wait to look you up every morning to see what your latest creation might be. Thanks for being you!
    MarcieReplyCancel

  • Miss GMay 11, 2010 - 5:46 am

    Awesome card Becca, I love the fancy tags, I haven’t been able to find
    them in my area but I am still looking.ReplyCancel

  • janeyMay 11, 2010 - 5:55 am

    Very simple, very clever! I love the blue fans peaking out at the corners – almost missed them! Thanks, Becca.ReplyCancel

  • LynMay 11, 2010 - 9:01 am

    Gorgeous! Love the use of the tags!

    If I’m not mistaken, you have a blog candy to award, yes? I believe you said you were going to pick a random number last friday.ReplyCancel

  • VikiMay 11, 2010 - 9:44 am

    Beautiful! I have a question for you :) How do you send your cards. I know you spend alot of time on your bows and such. Is there a packaging secret so they don’t get squashed?ReplyCancel

  • JeannieMay 11, 2010 - 10:19 am

    I really love your style. Your designs are so precise and so complete. Thanks for sharing :)ReplyCancel

  • Pam SpradlinMay 11, 2010 - 10:22 am

    Your card is fantastic. You have such a beautiful style.ReplyCancel

  • EarlineMay 11, 2010 - 10:29 am

    Love your card it that time of year and I am still behind makeing mys so got to get on it.ReplyCancel

  • ConniecrafterMay 11, 2010 - 10:31 am

    Fantastic, love the bows and how you wrapped the middle tag!ReplyCancel

  • LisaMay 11, 2010 - 6:58 pm

    B- What a sweet, elegant, big-girl graduation card. I must steal-away this idea for my little-girl, grown-big (my college graduate this past weekend).ReplyCancel

  • KelleyMay 16, 2010 - 11:00 pm

    Love it! The bows are gorgoues and I love the FT used that way!ReplyCancel

I N F O