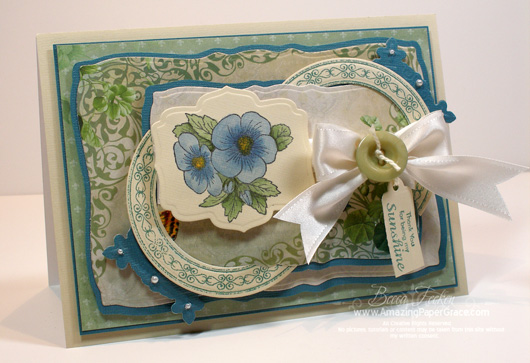
As thoughts of bitter cold depart and I dream about the upcoming spring what better time to share the newly released Plant A Little Love from JustRite Stampers.   This set is chock full of beautiful flowers to shade and color to ones delight!  I layered mine with some new paper from DCWV called Mimosa – it helped me pick the lush colors for the flowers which are bluish green.  This set was just revealed yesterday and wiill be available for preorder on the JustRite Stampers site on January 18th.
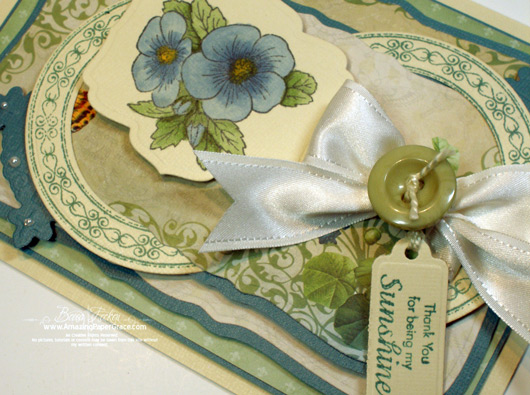
I got a little bit carried away with the layers, so let me explain what I did.  I mounted two layers of Spellbinders™ Curved Rectangles #4 and #6.  To get each mat layer I simply traced around the template and cut that particular layer out with scissors.  On the upper Curved Rectangle, opposite corners, I nested a round frame made with Spellbinders™ Standard Circles LG #4 and #6.  On the same opposite corners I used that wonderful new Spellbinders™ Cross Collection (S4-265) and cut the filigree cross as a corner embellishment.   For the focal image I used Spellbinders™ Labels Five #4, instead of a circle.   I pulled the sentiment from another new JustRite Stampers Release called Romantic Sentiment Centers.  I discarded part of the sentiment while cutting out the Spellbinders™ Double Ended Tags and lopped off the long end.

For the focal image, I actually used Copics directly on my Coredinations paper.  It’s very absorbent and was a different feel from other papers I’ve used and I actually like how it reacted to the markers!!

Card Recipe:
Stamps:  JustRite Plant A Little Love, JustRite Romantic Sentiment Centers
Paper:  Cordinations, DCWV Mimosa
Ink:  Black Memento,  Pine Needles Distress Ink
Accessories:  Spellbinders™ Curved Rectangles, Spellbinders™ Standard Circles LG, Spellbinders™ Cross Collection (S4-265), Spellbinders™ Labels Five, Spellbinders™ Double Ended Tags, Copic Markers, Ribbon, Button, Pearls

Thanks for stopping by today!!

pinTHIS SHAREthis TWEETTHIS EMAILthis
  • Kathy J (Wattle)January 12, 2010 - 5:05 am

    WOW Becca!!! Love how you used the borders for rings, the beautiful button bow and tag and divine colours!!!ReplyCancel

  • NancyJanuary 12, 2010 - 5:43 am

    Becca!!!! Girl you are amazing! I think I would cry if I ever received a card that beautiful!ReplyCancel

  • MicheleJanuary 12, 2010 - 6:09 am

    Simply beautiful……ReplyCancel

  • Kitty RodahlJanuary 12, 2010 - 6:25 am

    This card is beautiful! I love all the layers! Do these get kind of spendy to mail because of the weight or do you hand deliver these? :) You can hand deliver it to MN-we are having a heat wave this week-highs in the 30s! WooHoo!!!ReplyCancel

  • DianeJanuary 12, 2010 - 6:31 am

    Becca,
    WOW!!!! That’s beautiful. I love all the layers, and your coloring is wonderful. Really, a very pretty card.

    ~~Diane~~ReplyCancel

  • PeggyJanuary 12, 2010 - 6:35 am

    Absolutely gorgeous! Love all the layers, coloring, & details. God bless!ReplyCancel

  • SandraJanuary 12, 2010 - 7:15 am

    you are amazing!
    SandraReplyCancel

  • EllenJanuary 12, 2010 - 7:21 am

    Wowwwww Becca, this is sooooooo beautiful.

    Hugs,
    EllenxxxReplyCancel

  • LaurieJanuary 12, 2010 - 7:28 am

    I look forward to your cards everyday. This is incredibly beautiful. Thanks for sharing.ReplyCancel

  • Elaine AllenJanuary 12, 2010 - 7:30 am

    Becca –

    I’m in love with this card. The colors are beautiful and your design is simply breathtaking! Beautiful!

    Elaine AllenReplyCancel

  • CarolJanuary 12, 2010 - 7:42 am

    Once again, a great project – such talent!ReplyCancel

  • HeatherJanuary 12, 2010 - 8:15 am

    I agree with all of the above Becca. You see much more into these dies than I can – I am so grateful for all your inspiration. tfs
    Hugs
    HW(UK)
    xReplyCancel

  • Betty BolandaJanuary 12, 2010 - 8:17 am

    WOW,WOW, WOW, You are so good with colors.ReplyCancel

  • MargaretJanuary 12, 2010 - 9:09 am

    Beautiful as always! Your artwork is in another domain. Truly.
    I love the colors you used too. That blue is special. Everything you make is so neat and stylish. Your inspirational! Love, Margaret.ReplyCancel

  • annekeJanuary 12, 2010 - 9:29 am

    so beautyfull Becca!
    annekeReplyCancel

  • KarenJanuary 12, 2010 - 9:46 am

    You are just incredible, day after day, week after week, month after month you consistently come up with the most creative, beautiful works of art. It is a joy to visit your website each day.ReplyCancel

  • Pam HeroldJanuary 12, 2010 - 9:55 am

    I’m speechless! There are no words that can express the emotions and praise that I have. It’s true – A picture is worth a thousand words and I think that is what it would take to begin to express this.ReplyCancel

  • TeelaJanuary 12, 2010 - 10:38 am

    Becca, this must have taken a lot of time. I hope that if you give it to someone, they will appreciate your work of love! The mimosa papers are really pretty! You’ve so creative, thank you for sharing this.ReplyCancel

  • ToshJanuary 12, 2010 - 10:39 am

    Oh Becca!! This is so beautifully elegant and wonderfully full of exquisite details!! LOVE this stunning work of art!!ReplyCancel

  • RebekkaJanuary 12, 2010 - 11:03 am

    Becca this is stunning, your work always look so elegant.ReplyCancel

  • Elizabeth S.January 12, 2010 - 11:25 am

    Becca, just absolutely gorgeous!! I just love your blog. Your work is amazing.ReplyCancel

  • miluJanuary 12, 2010 - 11:31 am
  • Betty GoodsonJanuary 12, 2010 - 11:40 am

    I’m so in awe. This is an amazing piece of art. Your mind must be spinning all the time to come up with so many beautiful creations.ReplyCancel

  • ConniecrafterJanuary 12, 2010 - 1:16 pm

    so very pretty, neat layering!ReplyCancel

  • MrsHJanuary 12, 2010 - 3:38 pm

    Good evening, Becca – simply and utterly stunning!ReplyCancel

  • Chris KJanuary 12, 2010 - 5:59 pm

    Stunning! The colors, the shading, the layering – absolutely gorgeous.ReplyCancel

  • Candy MillsJanuary 12, 2010 - 6:11 pm

    Ohhhh Becca!
    Your work brings tears to my eyes it is always so beautiful.
    I don’t know how you do it day after day with something better each time. I can hardly wait to see your posts each day………You are AMAZING !!
    Love CandyReplyCancel

  • Lisa D. Atha (inspired by purple)January 12, 2010 - 7:09 pm

    Wow Becca, this is amazing! Absolutely stunning!

    Hugs,

    Lisa AthaReplyCancel

  • Sue (Australia)January 12, 2010 - 7:24 pm
  • Billie AndersonJanuary 12, 2010 - 8:45 pm

    Beautiful work, I just love what you do you are so talented and shows that you love your craft. I am so impressed. Thanks for all you do and share.ReplyCancel

  • Val WJanuary 12, 2010 - 9:17 pm

    Gorgeous card! I’m loving the new flowers from Justrite.ReplyCancel

  • CherieJanuary 12, 2010 - 9:36 pm

    Becca, This is simply stunning! It’s like everything you touch turns into beautiful! You are really making it hard for me to keep my New Year’s Resolution to quit spending so much $ on crafts! :) Thanks for sharing your wonderful creations with us!

    CherieReplyCancel

  • Patty WJanuary 12, 2010 - 10:30 pm

    Becca, Thank you for sharing this beautiful work of art with us! What an awesome talent God has given You. You truly inspire. I also appreciate all the hard work that goes into each project, a labor of love obviously! Blessings! Patty W.ReplyCancel

  • CindyJanuary 12, 2010 - 11:04 pm

    Knowing your work, I always know it’s going to be exceptional – but if I didn’t know you and I saw this card – I’d find it so hard to believe it’s all handmade. Absolutely beautiful!!!ReplyCancel

  • lengowJanuary 13, 2010 - 3:26 am

    W !!!!!!!
    O !!!!!!
    W !!!!!ReplyCancel

  • lois skiathitisJanuary 13, 2010 - 4:41 am

    This is gorgeous Becca, I say the more layers the better. The DP is so pretty. I love this composition with beautiful colors chosen TFS!!!ReplyCancel

  • AngelaJanuary 13, 2010 - 5:48 am

    beautiful card Becca!!!

    TFS,
    AngelaReplyCancel

  • Beth NormanJanuary 13, 2010 - 11:58 am

    This is so beautiful. The colour combination is awesome. Very creative as always.ReplyCancel

  • Marlene IacuzziJanuary 13, 2010 - 12:46 pm

    In this gray winter we are experiencing in Oswego, New York, it is like a bit of Spring to go to your site and see creations like this one. Thanks so much.ReplyCancel

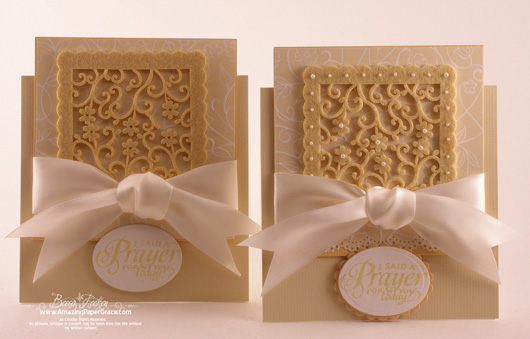
I’m so glad that you all seem receptive to my bargain bin creations, I have another to share with you today :-)  I made two versions of this card from a set of felt coasters I found in the $1.00 bin at Michaels.  No,  I don’t work for them but I have a serious, serious addiction to that darned bargain bin.  This is another last season card and I only purchased one set of these coasters and spent the rest of the year looking for more.  I’ve learned that once an item is out, it’s out.  So, imagine my surprise when I found new felt coasters for this upcoming spring.  I hope to have more cards made with the new sets in the coming weeks.

The name for this type of card escapes me, but the decorative panel extends above the fold of the card itself.  I tried a ribbon on and embellished with a small medallion made from .  One of the cards is fairly plain and the other is covered with pearls – the pearls one is my favorite but I bet you’re not at all surprised.

Card Recipe:
Stamps:  Retired PSX
Paper:  Bazzill, 140lb Strathmore Watercolor, NRN Design Paper
Ink:
Colorbox Parchment
Accessories: 
Spellbinders™ Classic Ovals LG and Spellbinders™ Classic Scalloped Ovals LG, Martha Stewart Lace Doily Border Punch, Ribbon, Pearls, Felt Coasters

Brrr . . . off to get more hot chocolate.  Please stay warm!!

pinTHIS SHAREthis TWEETTHIS EMAILthis
  • Donna in AKJanuary 11, 2010 - 2:14 am

    Lovely projects! I’m partial to the pearl card too. I don’t know about your Michaels store, but ours puts the bargin bins right at the front door…..where I always find something! that I know I can use! :-)ReplyCancel

  • Vickie DoswellJanuary 11, 2010 - 2:36 am

    I like both cards but I think the pearls would be my choice also! I love bling and tend to over do it sometimes but hey! life only comes around once. I am a big bargin bin shopper also and I tend to leave the store with more than I came for! Thank you for sharing all your beautiful works with us.ReplyCancel

  • HelenaJanuary 11, 2010 - 4:16 am

    Awesome Becca! You amaze me everyday!

    Hugs, HelenaReplyCancel

  • Christy HJanuary 11, 2010 - 6:09 am

    Those darned bins!!! I got a Michaels gift certificate for Christmas and spent most of it in the bargain bins.

    I love the cards! I guess I’d better scoot BACK to M’s and grab up those coasters that I touched and admired then put back.

    Thanks for all your beautiful ideas!! I’m a big fan!ReplyCancel

  • lois skiathitisJanuary 11, 2010 - 6:31 am

    I think we all know the one with the pearls is your favorite Becca, LOL! you have a style that we all love. These are so elegant looking. TFS!!!ReplyCancel

  • Kelly LandersJanuary 11, 2010 - 6:57 am

    This is just gorgeous Becca! And it is always a bonus when we can find embellishments so reasonably! I love the Dollar Bin too.

    I think the name of the card style you made is called the Tent Topper. There is a resource for it on SCS!!

    Thanks for sharing!ReplyCancel

  • annekeJanuary 11, 2010 - 7:06 am

    hoi Becca
    what a beautyfull card!!
    gretings annekeReplyCancel

  • HeatherJanuary 11, 2010 - 7:28 am

    Beautiful cards Becca – again!! Michaels must love you…. pity we don’t have them in UK. I too think the one with the pearls will be everyone’s favourite!!!
    Hugs
    HW(UK)
    xReplyCancel

  • RebekkaJanuary 11, 2010 - 8:00 am

    These are beautiful, my fav is the pearl one too :)ReplyCancel

  • Miss GJanuary 11, 2010 - 8:11 am

    Love them, I too am addict to the Michael’s dollar bin. Thay are beautiful as usual. Thanks Becca for sharing!!!ReplyCancel

  • ValJanuary 11, 2010 - 8:21 am

    These are absolutely beautiful! I love your work.ReplyCancel

  • Susan PearsonJanuary 11, 2010 - 8:35 am

    Isn’t this card called an Easel Card. I just made some and that is what it looks like from your photo. Love your cards. They are more like a gift than a card.ReplyCancel

  • Elaine AllenJanuary 11, 2010 - 8:39 am

    Hi Becca –

    What lovely cards! So very pretty. I understand completely your addiction to the bargain bins. I share the same addiction. I’m on 1st name basis with the manager, since I’m there so often. I love the bargain bins and I also love hunting around the store for their clearance items (they never have them in just one spot). I’ve gotten some really neat things there.

    Elaine AllenReplyCancel

  • Wendy MooreJanuary 11, 2010 - 9:08 am

    Hi Becca,

    I love this project. I found these at Michael’s also and I wasn’t quite sure what to do with them. (Michael’s is my second home too so to speak). I cut one apart and used it on a card but I like the idea of using the whole thing. Thanks once again for the inspiration. I’m partial to pearls too!ReplyCancel

  • MargJanuary 11, 2010 - 9:18 am

    This is the difference between your creative mind and mine. I saw the felt coasters and thought they are different and then walked on. Didn’t see any possibility with them at all! Thank you for expanding my mind.ReplyCancel

  • Cindy H.January 11, 2010 - 11:19 am

    How beautiful these cards are!!ReplyCancel

  • DanaJanuary 11, 2010 - 11:45 am

    These cards are gorgeous!ReplyCancel

  • ToshJanuary 11, 2010 - 12:08 pm

    Love the felt Becca!! So gorgeous and elegant!!ReplyCancel

  • TeresaJanuary 11, 2010 - 1:13 pm

    Becca, you make the most beautiful cards! My eyes went for the card with pearls first. My cards never seem complete without pearls or something along that line.ReplyCancel

  • Betty BolandaJanuary 11, 2010 - 1:33 pm

    Love the cards Becca, Well done again. You are so good at puting things together.ReplyCancel

  • DianeJanuary 11, 2010 - 4:06 pm

    Becca,
    No I’m not surprised at all that the one with the pearls is your favorite.
    I love both of them. I find you so amazing [ ;-) ] that you can look at something so plain and make it into an incredible creation. You are truely blessed. And we are all blessed that you choose share your talents with us. Thank You Becca, if I haven’t said it enough. Off to get some hot chocolate myself. It’s mighty cold up here in Michigan. BRRRRR

    ~~Diane~~ReplyCancel

  • MrsHJanuary 11, 2010 - 4:57 pm

    Good evening, Becca – two beautiful cards. I love them both although as with you I think I would lean more towards the pearls one.ReplyCancel

  • LuAnnJanuary 11, 2010 - 8:51 pm

    Such simple beauty.ReplyCancel

  • CindyJanuary 11, 2010 - 8:56 pm

    Pearls for me…Michaels – now that we have one 5 minutes from me – BAD news (for my purse). Actually I know just about all of the employees very well, we’re all on first name basis’, and when I had my surgery and mentioned I might be missing out on special deals, 50% , etc, the manager said no problem – just call and let him know and he’d take care of me. Needless to say, I’ve got craft friends, so I was able to get to the store in time to reap the bennies. They even seek me out from time to time to answer other customer’s questions…ReplyCancel

  • jami {sgtStamper}January 11, 2010 - 10:00 pm

    Those are both gorgeous Becca! I love the pearls too! Those bargain bins sure are hard to stay away from….I usually end up buying more than I can use! I could probably open my own dollar store! LOL!!ReplyCancel

  • Candy MillsJanuary 11, 2010 - 11:13 pm

    Oh Becca these are wonderful – I too like the one covered in pearls the best! LOL
    I guess all the ladies on the blog live in the States? I don’t live close to a Micheals but the odd time I get to one I never find delightful things like these coasters….. Either we don’t have the same items in Canada or I simply miss out by not living close to one.
    Hugs, CandyReplyCancel

  • Leslie MillerJanuary 12, 2010 - 12:23 am

    Becca, you could make a silk purse out of a sow’s ear! Imagine… what an eye you have. These are gorgeous!ReplyCancel

  • Linda EJanuary 12, 2010 - 7:17 am

    I love what you did with the coasters. I have the same ones from last season still sitting in my stash. I think it’s time I put them on a card!ReplyCancel

  • Susan LankfordJanuary 12, 2010 - 8:34 am

    Beautiful….how do you attach those teenie pearls without the glue showing?? I find that sometimes the self-stick ones do not really stick for long!ReplyCancel

  • Bridget FariaJanuary 12, 2010 - 11:28 am

    A friend has taught me to see beyond the scrapbook aisles. See that you can rework almost any little tid bidy thing that you find into a work of art. How cool is that?! That is true creativity! Love your idea.ReplyCancel

  • Janet CastleJanuary 12, 2010 - 12:26 pm

    B-E-A-U-T-I-F-U-L!!!!!!ReplyCancel

  • CaroleJanuary 12, 2010 - 6:19 pm

    Wow. I love the bling, but I probably would have made the non-bling. I just don’t have your flair.ReplyCancel

  • SophiaJanuary 12, 2010 - 8:32 pm

    I’ve seen these so many times in the $1 section and didn’t know what to do with them. I’ll keep my eye out for them now! :)ReplyCancel

  • Val WJanuary 12, 2010 - 9:10 pm

    I recently saw the new coasters that are out and thought to myself, could I use these on cards? You’ve proven they they can indeed be used beautifully in a card. I guess I need to give those dollar bins another look!ReplyCancel

  • Patty WJanuary 12, 2010 - 10:57 pm

    Becca, You’ve done it again Girl! You have that creative eye that I wish for. I need those coasters! We don’t have a Michael’s near us either. I really wish we did. That store is like a playland for me when I do occasionally get to one. My honey’s probably happier though. Your card is just beautiful! Love the soft colors and the way you used the rings. And I wouldn’t have recognized the cross if you hadn’t pointed it out. I so look forward to your next card!!! Blessings! Patty W.ReplyCancel

  • mom2hJanuary 13, 2010 - 8:36 am

    I have these coasters, too! Mine came in 4 pastel colors, and I planned to use them (one of each color) on a 12×12 scrapbook page as grid background for an Easter photo. I just haven’t had the right photo yet.ReplyCancel

  • Loni ReynoldsJanuary 13, 2010 - 7:43 pm

    Gorgeous, luv! And I like the pearly one best, too, even though I generally like less bling rather than more. Bravo!ReplyCancel

  • SandiJanuary 14, 2010 - 10:04 am

    Love the cards, I also am addicted to the dollar bin @ Michaels. I see things like this and don’t get them, then later realize something I could have made with them and it’s too late. So have a lot of things I have to figure out what to do with.ReplyCancel

  • Nellies NestJanuary 15, 2010 - 5:41 am

    Oh Becca, you are so creative, I looked at those too and thought, what can I do with them…now I know…now you have enabled me to go today and grab a few….thanks…LOL…..love how yours turned out, beautiful!ReplyCancel

  • CindyJanuary 16, 2010 - 8:25 pm

    Today my Michael’s had the coasters – had to rush home and bring up your blog again for ideas…thanks!!!ReplyCancel

  • JodiJanuary 17, 2010 - 11:57 am

    I love everything you make. I am more impressed with everything I see. You are a genius!!!!ReplyCancel

I have another project to share that I’ve been keeping until the appropriate season – a perpetual calendar.  I hope you don’t mind, it’s a thrifty project (*wink*).  This was made during my days in the Dirty Dozen and the thought behind it was to recycle something unused in my craft room and who doesn’t have an . . . ahem . . .extra thing or two laying around in their craft room (rolls eyes). 

So here’s the quick rundown.  In my stash I found these little $1.00 boxes that I had purchased at Michaels as well as wooden blocks,  I’m not remembering the exact size on the blocks but they were between 3/4" and 1".  I spray painted all the items with cream paint and let dry.  Then I covered all the surfaces I wanted to apply design paper to with Modge Podge then put the design paper on the Modge Podge layer.  I let that dry and sanded the edges of everything and followed up with a coat of Modge Podge on top to seal the paper in.  For the months I cut 12 pieces of paper the size of the inside lid of the box.  I stamped my months on each of those twelve pieces of paper then stacked them inside the lid for storage.  Now for the numbers on blocks I used rub ons because I didn’t have stamps the size I wanted – you can use either and if you are in a pinch, generate them on your computer.  

This is what the calendar looks like stored, with everything inside.  When ready for use, pop the blocks up and sit them tilted in the top!!  I have two different looks here.  The one on the left has been scuffed and tarnished up with a little bit of Antique Linen Distress Ink and the one on the right is a crisp clean look.

Now I have to admit there’s a trick to getting the numbers on the blocks so that you can use them to display each day of the month.  Walk through your settings before you adhere them permanently.  On one cube include the following numbers: 0, 1, 2, 3, 4, 5 and on the other cube include these: 0, 1, 2, 6, 7, 8.  The 6 will be used for both 6 and 9.

Project Recipe:
Stamps:  Months of the Year – CTMH
Paper:  K & Co
Ink:  Antique Linen Distress Ink, Black Brilliance
Accessories:  $1 Wooden Box – Michaels,  Wooden Blocks, Modge Podge, Ribbon, Rub on Numbers, Ivory Spray Paint

Thanks for letting me share.  I have couple of these slotted to make since we’re in to the new year, but the truth is since these are perpetual, they can be given year round.

(Note: My hubby reminded me that he had to do a bit of sanding for me when I did this project.  The blocks were a tight fit, so he took a little bit of sand paper and sanded on one side of each of the blocks so that it would fit in the box).  So if yours are to big, grab that man of yours and put him to work for a good project cause!)

Don’t forget there are still new Spellbinders dies being revealed each day.  If you haven’t seen the samplings from the Spellbinders Surprise Party, be sure to see the list of designers HERE.

Stay warm friends!!

pinTHIS SHAREthis TWEETTHIS EMAILthis
  • AmericaJanuary 10, 2010 - 8:59 am

    SUPER CLEVER!!!!!!! great thrifty work GF! Lovely as can be!ReplyCancel

  • josie walrathJanuary 10, 2010 - 9:06 am

    Another great project! tfsReplyCancel

  • CherieJanuary 10, 2010 - 9:12 am

    Becca, Those are just too darn cute! You are so-o creative! TFS!ReplyCancel

  • Donna MundingerJanuary 10, 2010 - 9:41 am

    OMG how CUTE! Love the fact it can be given year round. TFS, I love it! xxDReplyCancel

  • ConniecrafterJanuary 10, 2010 - 10:04 am

    Beautiful, so creative, Love it!ReplyCancel

  • DianeJanuary 10, 2010 - 10:08 am

    Becca,
    Another great idea. I love the fact that your hubby involved.

    {{Hugs}}
    ~~Diane~~ReplyCancel

  • CharmaineJanuary 10, 2010 - 10:12 am

    Brilliant! Love this idea.

    CharmaineReplyCancel

  • Diane GJanuary 10, 2010 - 10:29 am

    What a great project! TFS!ReplyCancel

  • Betty BolandaJanuary 10, 2010 - 10:32 am

    I just don’t know how you come up with all these things. But I’m glad you do.ReplyCancel

  • ElaineJanuary 10, 2010 - 10:41 am

    Great decor and a fun project!ReplyCancel

  • MelanieJanuary 10, 2010 - 10:45 am

    I LOOOOOOVE this!ReplyCancel

  • Elaine AllenJanuary 10, 2010 - 11:26 am

    Great Idea Becca! So pretty and guess what? I have about 6 of those boxes. Hmm don’t have any wooden blocks, let me scour my studio and see what I can substitute – LOL!

    Elaine AllenReplyCancel

  • DamjanaJanuary 10, 2010 - 11:37 am

    Great project, this would make a wonderful gift. Thank you.ReplyCancel

  • LynnJanuary 10, 2010 - 11:57 am

    How adorable, and DITTO to all the comments already left. I have always wanted one of those calendars ~~~ now I know how to make one for myself!. I may even some some blocks in my ‘stash’, just need to get the strogage box portion. TFS. !ReplyCancel

  • Jill HaddadJanuary 10, 2010 - 12:53 pm

    These are wonderful! I’d love to have one of these on my desk at work! Now I just need to find the boxes (I have the blocks!).ReplyCancel

  • WritingEliJanuary 10, 2010 - 1:11 pm

    Becca,
    I love this idea. So cute, not too complicated, uses some stash…all things I love.

    Thanks for always inspiring me.ReplyCancel

  • CarolJanuary 10, 2010 - 1:42 pm

    Becca, I’m going to make this – and since I don’t have a man in my toolbox, I’ll handle the sanding! (it was cute, I’m glad he’s supportive of you!) ;-)ReplyCancel

  • TeelaJanuary 10, 2010 - 2:03 pm

    Clever idea! Love the colors, too.ReplyCancel

  • FemyJanuary 10, 2010 - 2:14 pm

    Pretty and clever. I have to try this. Thanks for sharing.ReplyCancel

  • Mary Cardini- AndersonJanuary 10, 2010 - 2:26 pm

    What a wonderful idea and so beautiful too.

    MaryReplyCancel

  • Tracy McAlisterJanuary 10, 2010 - 2:31 pm

    A fantastic project that can be viewed all year long.ReplyCancel

  • Candy MillsJanuary 10, 2010 - 2:35 pm

    Becca,
    These are just an awesome gift. So very pretty the way you decorated them. You always have the BEST ideas anywhere!!
    Love, CandyReplyCancel

  • Peggy MaierJanuary 10, 2010 - 2:48 pm

    Neat idea! Would make a nice gift – practical, too!ReplyCancel

  • Margaret ThompsonJanuary 10, 2010 - 3:22 pm

    Extremely cleaver idea! It surely won’t take up much room on a kitchen counter or even a desk. Won’t the children just love to change the date every morning before school and it will also be educational for them – they will already know the date when they arrive at school that day.
    Good work Becca.ReplyCancel

  • Barb HardemanJanuary 10, 2010 - 3:43 pm

    Thank Y_O_U for sharing with us. You work is just so fabulous, so creative and I love visiting your blog daily. I will be looking for a wooden box and block at Michael’s ASAP and see if I can create something nearly as gorgeous as your.ReplyCancel

  • BirdJanuary 10, 2010 - 4:10 pm

    you never cease to amaze!ReplyCancel

  • MrsHJanuary 10, 2010 - 4:17 pm

    Good evening, Becca – a great project!ReplyCancel

  • MaryJanuary 10, 2010 - 8:32 pm

    I know I’ve been saving the cigar boxes for a reason! I just love this idea, you are so creative!!ReplyCancel

  • Mod Podge AmyJanuary 10, 2010 - 8:34 pm

    So pretty! I love them.ReplyCancel

  • Donna in AKJanuary 11, 2010 - 2:10 am

    These would make such nice gifts for our secretaries. I love to recycle & reuse to make new things. Thank you for bringing us new ideas.ReplyCancel

  • veronicaJanuary 11, 2010 - 2:38 am

    Absolutely brilliant, now to tackle the project – put thinking cap onReplyCancel

  • NancyJanuary 11, 2010 - 4:12 am

    Great project Becca, I’ve always loved the pretty perpetual calendars and now I know an inexpensive way to make one!!! Likely won’t be as pretty as yours though lol , thanks for sharing the project!ReplyCancel

  • lois skiathitisJanuary 11, 2010 - 6:25 am

    You certainly are a crafty crafter. Love this perpetual calendar it is so pretty. I bet your craft room is just a warm and inviting place to be. TFS!!! Becca.ReplyCancel

  • Wendy MooreJanuary 11, 2010 - 9:13 am

    What a great project. This is definitely one I am going to put together. TFS!ReplyCancel

  • Leslie MillerJanuary 12, 2010 - 12:25 am

    Oh, how I love these little boxes! What fun, and so beautiful!ReplyCancel

  • SophiaJanuary 12, 2010 - 8:33 pm

    I love them! I’m always looking for inexpensive little gifts, and they’re adorable!ReplyCancel

  • Lacey BortvitJanuary 13, 2010 - 2:02 pm

    How amazing! My boutique features boxes and creative ways of packaging…I will be trying this ASAP!ReplyCancel

I N F O