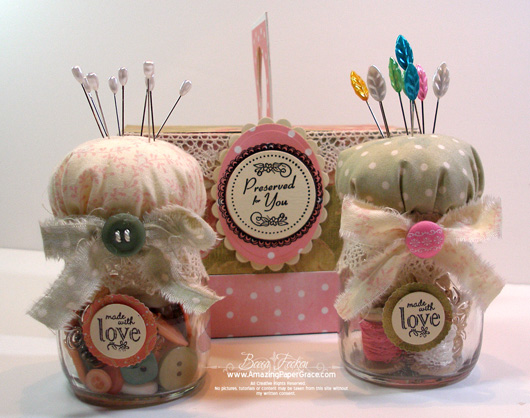 
Hi there!! Today marks another fabulous JustRite Stampers Blog Hop. Today we are sharing gift ideas using JustRite. I have an altered item to share with you today and something that will hopefully come in handy for the crafter. Using JustRite Tiny Words Borders and Centers I created a set of pincushions using canning jars and with JustRite Preserves Borders and Centers I put together a tote to cover and carry them. 
Here is the whole set stored and ready to put away. :-) 
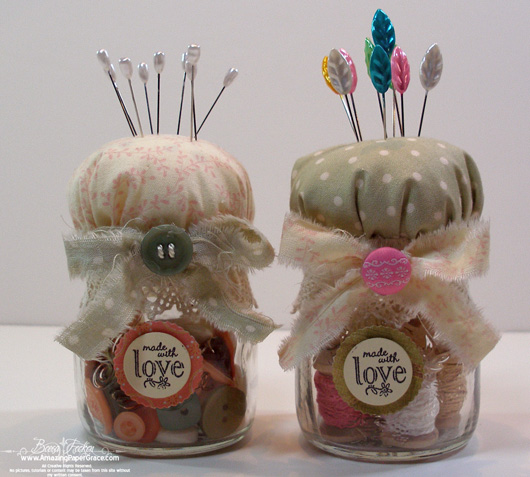
Here are the pincushions themselves, they contain buttons and perle cotton plus pins. They were made using little canning jars I purchased at the Container Store.
 
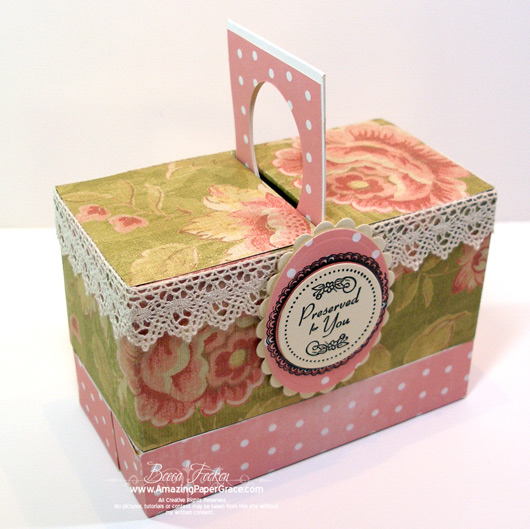
Here are the pincushions in their tote around caddy. When finished the lid can just be put over them and back on the shelf they go.
 
Are you surprised to see a recipe box? The recipe box makes the caddy. This one was purchased for $1.00 at Michaels. I turned it over, covered it with paper then added the handle :-)
|
Project Recipe:
Stamps: JustRite Tiny Words Borders and Centers, JustRite Preserves Borders and Centers
Paper: K & Co, The Paper Company
Ink: Versafine Onyx Black
Accessories: Spellbinders Classic Scalloped Ovals Large, Spellbinders Classic Ovals Large, Spellbinders Standard Circles Large, Spellbinders Petite Scalloped Circles Small, Fabric (5" circle), two canning jars (mine were Quattro Stagioni – 0,15l), Lace, Recipe Box, Hot Glue Gun, Stuffing, For Inside Containers – Buttons, pins, perle cotton
|
Be sure to see what the other designers have up their sleeves. You will not want to miss these locations on the hop!
JustRite Blog
Angela Barkhouse
Barb Schram
Becca Feeken (that’s me)
Debbie Olson
Heidi Blankenship
Kathy Jones
Kellie Fortin
Lauren Meader
Lisa Somerville
Michele Kovack
Michelle Wooderson
Sharon Harnist
Sharon Johnson
Terre Fry
 
Well hey there! Today finds us with a new release at Our Daily Bread Designs and a blog hop to celebrate the occasion. Two new sets are being released today called Peace and Joy and His Gift. Awesome new sets, right!
Now you if arrived here from Angella Crockett at Body, Mind, Spirit and Stamps then you are in the right place. If not, then I encourage you to go back to the Our Daily Bread Designs Blog so that you can hop in the correct order. Why hop in the correct order? Lucky you, there are secret words along the way paired with the name of each Designer. When assembled the words will make a saying that you can submit for a prize!! When you have finished the hop you will return to the ODBD Blog and leave a comment that you have visited all the blogs and a special email address will be given to you so you can email the secret words you found in the correct order. That’s all you have to do for the chance to win the set of your choice this month!
For my card today, I used a sentiment from the Peace and Joy set – another perfect one for Christmas!! I was in the mood to create medallions so I used simple elements from Spellbinders Fancy Tags and the companion pieces to Spellbinders Renaissance Hearts Pendant.
|
Card Recipe:
Stamps: Our Daily Bread Designs – Peace and Joy Set
Paper: K&Co., The Paper Company
Ink: Versafine Onyx Black
Accessories: Spellbinders Fancy Tags, Spellbinders Renaissance Hearts Pendant, Pearls, Martha Stewart Border Punch, Clear Embossing Powder
|
Here are the Rules for the Blog Hop Contest. In order to be eligible to win, you must:
- Write down each DT name and their secret word or words
- Comment on each blog on the hop
- Return to the ODBD Blog and leave a comment there that you left a comment on each blog (but don’t mention the secret words!)
- Email gnywening@yahoo.com 8:00pm EST on December 2nd, giving the DT names and their secret word/words.
- Grace will verify that all requirements are met and then randomly choose a winner.
- The winner will be emailed at the email address they used to email their submission.
Remember …Two LUCKY WINNERs will win a set of their choice!
Thanks for visiting with me! My secret word is BREAD and the next stop along the way is Debi Southard with Debi’s Crazy Life.

Hello there!! I had the idea floating around in my head that I wanted to do another ornament box, but something easy. So I purchased one of the $1.00 or $1.49 square gift boxes at Michaels and altered it so that it would be an ornament box that opens on all sides to reveal the ornament inside. It’s very similar to those little scrapbook boxes that open up on all sides. I used the new JustRite Decorative 2" Round Wide Borders and created a medallion using Spellbinders Stars Five, Spellbinders Standard Circles Large and Small, and Spellbinders Petite Scalloped Circles Large. On the inside of the medallion I’ve used JustRite Merry Little Christmas Borders and Centers.
 
Using a round clear ornament, I filled it with strips of curlicued ribbon and tied a bow on top. The face of the otherwise round ornament is flat, so I created another medallion using the same die templates and JustRite sets, just in a different order. Below ou see a picture looking down on the box when it is opened up and laying flat.
 
To make the matching box for the ensemble, I took my exacto knife and cut down through each corner of the box so that it would lay out flat. I then took my design paper and covered both the bottom and lid making sure that the box could flex back in to an upright position. This box was already covered with decorative paper, so I had to make sure that my paper covered the original decorative paper. To get the ornament to stay put I took a round label holder piece of hardware that pretty much looks like a ring and glued it to the bottom of the box. The box is much more study than if I had made my own – and cheap!!
|
Project Recipe:
Stamps: JustRite Decorative 2" Round Wide Borders, JustRite Merry Little Christmas Borders and Centers
Paper: K&Company, Wausau Metallic, The Paper Company – Cream White
Ink: Versamark, Versafine Onyx Black
Accessories: Spellbinders Stars Five, Spellbinders Standard Circles Large, Spellbinders Standard Circles Small, Spellbinders Petite Scalloped Circles Large, Clear Embossing Powder, Gold Embossing Powder, Glass ornament, ribbon, Making Memories Label Holder Hardware, Small Gift Box
|
Be sure to hop over to Stampers Dream this week. They are having a JustRite Stampers week and oh the ideas that’ll come out of those gals during the week are well worth the time to visit!!! Have a marvelous week you all!!
|


very cute idea Becca.
TFS,
Angela
Oh my gosh — I am seriously drooling over your pincushions! You won’t believe this, but I have a pincushion project 1/2 done for another post! I am seriously jealous of your pretty pins — they are SO gorgeous!!! I’ve never seen any so pretty! Just LOVE this vintage feel project — WAY TO GO!!!! FAB gift idea!!!
What a wonderful idea, the pin cushion and caddy. Need to make one for my quilt group gift exchange. Thank you so much for sharing.
Wow! These are really fabulous! Love them
I love your pincushion set – it’s adorable! And, I love the recipe box transformation, it’s perfect! Great ideas!!
You are awesome! I love following your site. It is so much fun to see what you will create next. Thanks for sharing and have a blessed day.
You are THE clever girl, Becca! This is just adorable, and something that can easily be done by us mere mortals! Thanks for sharing your creativity with us today.
Becca –
You are a genius, what a wonderful idea! And such a lovely item to gift someone with. Thank you for sharing.
Elaine Allen
Amazing!!! And so beautiful!!
So creative and gorgeous Becca!! LOVE your ideas!!
I just absolutely love this! Such a great idea! I knew I should have purchased some of these recipe boxes. I guess I will just have to go back and get some. Thank you for the great idea!
I adore this project. I was reading and so hoping you had posted what you used for the box. Very clever. Genius actually. Thanks so much!
Creatively blowing my mind over, and over, and over….. Thanks!
Becca,
Those pincushions are soooo cute. And talk about clever. How in the world did you see a tote out of a recipe box???? Can I come over and nose around your brain for a while? ;-)
Happy Wednesday,
~~Diane~~
First off, your gift idea is just amazing and beautiful-2nd I have some of those recipe boxes and what a great idea you have given me. Thank you so much for the inspiration. Alice R.
Could these seriously be any cuter???
What a fabulous idea, Becca!! I love the jars filled with goodies and the pincushions toppers! Very clever! Love the vintage look!!
This is so clever! I love it. I popped on over to your blog from Amy Sheffer (pickledpaperdesigns.blogspot.com) and I’m glad I got to some a look around your blog. Thanks for your inspiration.
Very nice, so beautiful. This is just the the thing I need for my new scrap room. thanks Becca again.
Oh Becca, this is gorgeous – I’ve always thought you were the queen of crafts and now I believe your the queen of altered craft too!! You do make some fantastic presents out of items found in the sale bin – I wish I could think ‘outside the box’ like you do. tfs
Hugs
HW(UK)
x
You totally amaze me Becca. These are wonderful, each and everyone of them, you are so creative. TFS!!!
Very neat idea. Makes a great gift and so useful. Pretty colours too.
Bernice
I have one of those recipe boxes sitting on a shelf waiting to be altered! Problem was I had it right side up! Thanks for sharing your creativity! Love it!
Oh my goodness. I love those pincushion sets! They are the cutest!! Can I be on your Christmas list..
Thanks for sharing your creativity!!
Absolutely adorable – love these (and the buttons inside – too perfect!)
This is just lovely, Becca–perfect!