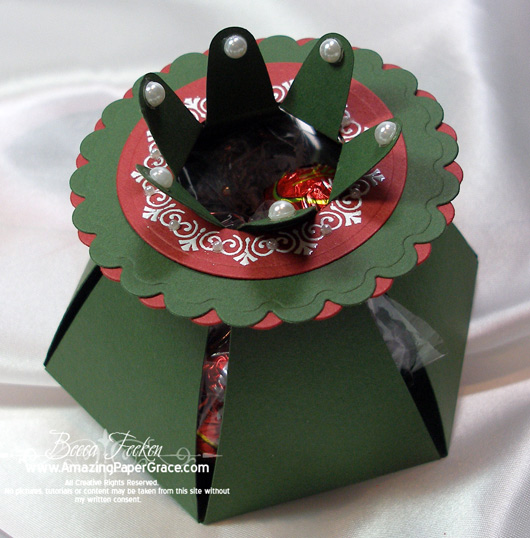
Greetings!  I’m back to share some party favors I made using one of my new favorite new JustRite Stamper Sets.  When I saw the Decorative 2" Round Wide Borders that were coming out it struck me how perfect they would be for a collar on this favor.  After I worked on them it seemed to me that the round collars looked like little Christmas wreaths!  
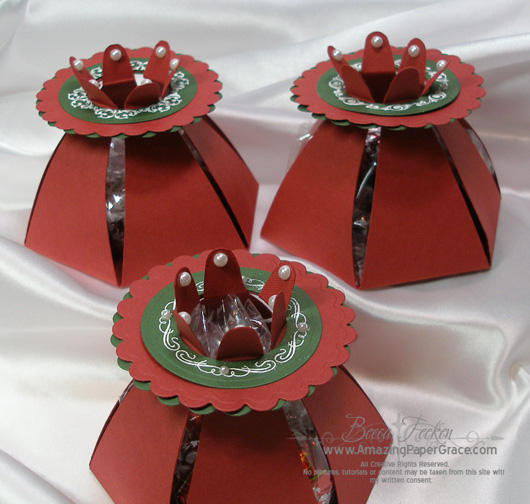
Using JustRite Decorative 2" Round Wide Borders as a guide, I cut/emboss six circles using Spellbinders Standard Circles Large then cut/embossed 12 scalloped circles using Spellbinders Classic Scalloped Circles Large.  With a tiny bit of glue to secure the layers, I stacked them to resemble a wreath then used them to enclose all the points on the favor.  Making three of each color, I stashed away six delicious Lindt chocolates in each favor. 
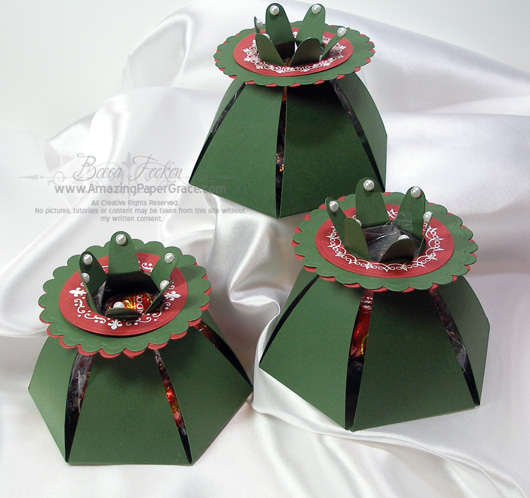

The picture below will give you an idea of what I started with.  In my internet meanderings I came across this favor.  Not having this pattern or die in my collection, I simply drew out a six pointed star that spans 11" across.   I didn’t keep the original template but as you can see it can easily be replicated to any size or scale.  Once each star was cut out, I scored across the wide base of each point and the tip of each point, folded along my score lines then corralled those chocolates with my little wreaths.


Each favor makes a nice place setting for a party!  Oh yeah, I have one of those coming up in a couple of weeks.  Six more of these and I’ll have enough for each place setting :-)

Project Recipe:
Stamps:  JustRite Decorative 2" Round Border Wide
Paper:  Bazzill
Ink:  Versamark and White Embossing Powder
Accessories:  Spellbinders Standard Circles Large, Spellbinders Classic Scalloped Circles Large, Pearls, Homemade star template

Thanks for peeking in to see what I’m up to!

pinTHIS SHAREthis TWEETTHIS EMAILthis
  • DianeNovember 20, 2009 - 11:48 am

    Becca,
    I’m in awe of how your mind works.
    Thank you once again for the picture tutorial.

    Have a fabulous weekend dear friend.
    ~~Diane~~ReplyCancel

  • NancyNovember 20, 2009 - 11:50 am

    The favors are wonderful! I doubt that I can drawn the 11″, 6 pointed star. I’ll try and find a template. Thank you for sharing so many great things to do.ReplyCancel

  • Janis UNovember 20, 2009 - 12:06 pm

    This is awesome!! Hope you do not mind me casing!!ReplyCancel

  • CindyNovember 20, 2009 - 12:45 pm

    Love this – but like Nancy said, there is no way I’d make a star that was even close or useable. If anyone is able to do so, I’d be thrilled to receive the template. My email (casmiles@hotmail.com). I’m home recovering from surgery and as a major workaholic I’m bored. Making this would give me a headstart as I definitely want to make them for friends and neighbors. As always, Becca – you’ve come up with another amazing project. Thanks!ReplyCancel

  • BarbaraNovember 20, 2009 - 1:32 pm

    Wow Another fabulous project. Love it!! You are amazing! Where do you come up with these clever things?

    Easily draw a 6 pointed star??? Ya sure! Geometry was never my strong suit.
    I can see the base is a hexagon. So now I will let myself get crazy trying to figure out the rest of the template LOL I already Googled a 6 pointed star template and came up empty. TFSReplyCancel

  • SylviaNovember 20, 2009 - 2:09 pm

    Simply the best creative mind around. You out due yourself everyday…These are so cute. I hope your friends and family appreciate all that you do. I so much enjoy each day just to see what you have got up your sleeve for little goodies for all your followers. You never disappoint me…Thanks so very much.ReplyCancel

  • Cheryl RandallNovember 20, 2009 - 2:13 pm

    Becca

    Awesome favor. YOu are just so creative. I love to look at your designs.

    Since so many of us are just NOT that geometrically inclined could we convince you to share your pattern with us in a smaller form and then we could enlarge it?

    Thank you for sharing your designs with us.

    CherylReplyCancel

  • christiNovember 20, 2009 - 2:57 pm

    this is so cute. i love little projects to put goodies in.ReplyCancel

  • MrsHNovember 20, 2009 - 5:37 pm

    Good evening, Becca- just adore this little box; it is so very cute. You are so, so innovative it takes my breath away.ReplyCancel

  • BarbaraNovember 20, 2009 - 9:22 pm

    Woohoo !! I found a template for a petal hexagon that we can use and just elongate the petals to form the points of the star :) Becca I hope you don’t mind I plan to CASE this for my Christmas dinner table.
    Here is the link

    http://www.homeschoolshare.com/docs54478/minit%20book%20templates/petal_hexagon.pdfReplyCancel

  • kafranNovember 20, 2009 - 10:42 pm

    que c’est beau. il serait vraiment intéressant de pouvoir avoir le gabarit, j’ai tenté de le faire,mais je n’y suis pas arrivé…
    tu as vraiment de bonnes idées…merci pour tout

    It is beautiful. It would be really interesting to be able to have the master, I tried to do so, but I am not finished there…
    you’re really good ideas… thank you for allReplyCancel

  • Marilyn ClarkNovember 20, 2009 - 10:58 pm

    Christmas Party Favors…at my home. I am laughing at myself because they wouldn’t look like your example. I do have a Score-pal but not your ability. You are so talented and inspire us but right now my mind is trying to convince myself to give this a try and if I do I will let you know.

    I agree with the comments of Nancy and Cindy.

    Would like to CASE but I don’t own any Just Rite Stamps.

    Thanks for sharing your talent with us and giving us the nudge to step outside our comfort zone. God bless.ReplyCancel

  • MarleneNovember 20, 2009 - 11:04 pm

    Found a six point star pattern at http://highhopes.com/6pointstar.html. I plan to use this method to make a template and make Christmas dinner place setting favours. Thanks Becca for your wonderful creations.ReplyCancel

  • Lisa D. Atha (inspired by purple)November 21, 2009 - 12:20 am

    Becca,

    Wow. Those are the most interesting party favors that I have ever seen. They are so pretty and elegant, your guests are going to love them!

    Hugs,

    Lisa AthaReplyCancel

  • lois skiathitisNovember 21, 2009 - 4:30 am

    I’ve never seen favors looking so beautiful. Does your mind ever shut off? Lucky for us it doesn’t. Creatively done. TFS!!!ReplyCancel

  • SharonNovember 21, 2009 - 8:07 am

    Oh, my goodness, Becca! You’ve done it again. I get so many wonderful ideas from you – of course they don’t always look as good as yours do but I try! I’m going to attempt the 6-pointed star but am not sure what it will look like. Thanks for the inspiration.ReplyCancel

  • HeatherNovember 21, 2009 - 11:17 am

    How wonderful Becca – but like everyone else I’m dubious about creating the star!!! Lovely idea. tfs
    Hugs
    HW(UK)
    xReplyCancel

  • Judy DunavenNovember 21, 2009 - 3:36 pm

    Thank you Becca for the wonderful idea. These are going to look so nice on the Guest table. I love the little wreaths atop the six pointed star.
    Hugs, JudyReplyCancel

  • CindyNovember 21, 2009 - 6:16 pm

    Thanks again, to Becca for the great idea, and to Barbara and Marlene for sharing their links for templates with us. I’m off to play….CindyReplyCancel

  • ChristyNovember 21, 2009 - 6:32 pm

    OMGsh How cool is this !!ReplyCancel

  • Viki BanaszakNovember 22, 2009 - 9:09 pm

    Those are beautiful! Anyone would be lucky to get one :) I can send you my addy if you like :P LOLReplyCancel

  • angela sNovember 23, 2009 - 8:30 am

    Hello. These stars are amazing! I also love the first card and looked up the bits you used-=how clever. thanks for sharing! AngelaReplyCancel

  • ToshNovember 23, 2009 - 9:35 pm

    So clever and cute!! Your creativity knows no bounds Becca!! You always amaze me!!ReplyCancel

  • JeanneDecember 14, 2009 - 7:27 pm

    Hi Becca,

    Love these! I also thought this would look great as a snowflake with
    cut outs in the star part. A snowflake could also be used instead of the
    wreath for the top piece. I can’t wait to try it. Thanks for the inspiration. JeanneReplyCancel

Popping in to share another quick card I made using the Christmas releases from Our Daily Bread Designs from the set called Blessed Christmas. One can never have enough Christmas cards ready to go, right?!?  In addition to scripture there are many classic Christmas sentiments in this set and the fonts are gorgeous!

I framed the sentiment by adding two strips that I pierced with an Ornare template then tied a bow in between.  The sentiment is backed with Spellbinders Ribbon Tags Trio Two and I attached a Martha Stewart Photo corner on each corner.  I have gotten marvelous usage from a small K&Co pad of paper called Evergreen.  The pages seem just the right size to handle most cards and I simply adored all the pages which seem to be colored more towards what I call traditional Christmas.

Card Recipe:
Stamps: Our Daily Bread Designs – Blessed Christmas
Paper:  The Paper Company, K & Co. – Evergreen Mat Pad
Ink:  Colorbox Pigment – Chianti
Accessories:  Ornare Template PR0583, Spellbinders Ribbon Tags Trio Two, Martha Stewart Photo Corner Punch, Ribbon.

 I hope you are all ramping up for a fabulous time with your families for this Thanksgiving.  Thanks for stopping by today, as always, you bless me.

pinTHIS SHAREthis TWEETTHIS EMAILthis
  • DianeNovember 19, 2009 - 7:58 am

    Becca,
    Such a pretty creation.
    I love how all the elements came together.

    Blessings to you on this day.
    ~~Diane~~ReplyCancel

  • AnitaNovember 19, 2009 - 8:57 am

    Beautiful, again. This would be a lovely design for a money card, as well.ReplyCancel

  • Judy DunavenNovember 19, 2009 - 10:14 am

    Okay Becca I’ ve got to hand it to you girlfriend this one is for the show case. I love the paper piercing. You don’t see to much of that because it is so time consuming. Thank you for giving of yourself in a way that really matters. Your card is a delight and of course I love the added touch of the ribbon.
    I was at Birch Run this last week end and bought the exact same stamps from ODBD. I have the Onare stencils that are similar so this is a real joy to see for me. Its off to create for me. Thanks for the inspiration.
    Hugs, JudyReplyCancel

  • Bernice BarnesNovember 19, 2009 - 11:13 am

    Very nice card. Like the paper piercing Ornare and the way you have framed the sentiment.
    BerniceReplyCancel

  • fabienneNovember 19, 2009 - 1:23 pm

    I like this card very much.ReplyCancel

  • Marion (Australia)November 19, 2009 - 1:55 pm

    Hi Becca!
    I think what really stands out for me is the colour you have used. it looks stunning. the ornare panels look terrific with the background paper. And yes! the font on that sentiment is beautiful.
    hugs MarionReplyCancel

  • denise (peanutbee)November 19, 2009 - 4:22 pm

    Gorgeous! I love those two strips with the ornare piercing!!ReplyCancel

  • MrsHNovember 19, 2009 - 4:53 pm

    Good evening, Becca. This is such a pretty card- love the ornare panels and the beautiful colours you have used- very christmassy!!ReplyCancel

  • NY DebbieNovember 19, 2009 - 5:15 pm

    Another gorgeous creation. I love how you framed it You have such a creative eyeReplyCancel

  • DonnaNovember 19, 2009 - 5:32 pm

    oh my goodness this is beautiful, but what would one expect from your wonderful talent. I love how you used the punch in the frame area. I may have to do this myself…..awesome work as always!ReplyCancel

  • lois skiathitisNovember 20, 2009 - 4:56 am

    Beautiful card Becca, I love how you framed the focal point with the Onare design. Such a delight to see. TFS!!!ReplyCancel

  • Lisa D. Atha (inspired by purple)November 21, 2009 - 12:17 am

    Becca,

    Hello. I am so behind on my blog browsing, I have been stamping and carmaking my little fingers off. If I missed a post or two, please forgive me.

    I love this card! I love the layout, the DSP, the paper pierced pieces, the sentiment! Geez, I love the whole card. Can I have it? LOL. I love it when you work those ornare templates into your card designs. I have only one of them in my collection so far. Well, off to check out your next post.

    Hugs,

    Lisa AthaReplyCancel

  • HelenaNovember 21, 2009 - 2:28 am

    Another gorgeous card!!
    Stunning as always …

    Blessings for a wonderful week,ReplyCancel

  • DebiNovember 23, 2009 - 11:20 am

    Beautiful card Becca, love the paper piercing!ReplyCancel

  • ToshNovember 23, 2009 - 9:35 pm

    Beautiful!! Fabulous piercing!!ReplyCancel

  • KelleyNovember 24, 2009 - 1:06 pm

    Gorgeous, Becc!! The piercing is so pretty!!ReplyCancel

I’ve been a little bit quiet :-) I’m working on stuff and thought that while working I would share a project that I pulled together earlier this year to share as a Dirty Dozen project.  This is a little  purse I made from a hollowed out book cover to hold a set of cards that I made (those will be seen soon).    I’ve decided this is one of my favorite repeatable projects.  In other words it was easy enough to make that I can see making them for special occasions.  In fact, I made another one recently using JustRite Stamps to hold my Christmas Card Log – it can be seen HERE.  The one I’m showing today is actually the first one I made.  As with most things, it gets much easier on subsequent tries :-)

I purchased the book at the Dollar Tree, I just held out for one that had a fairly thick spine.  I stamped the lovely motif on the front using a Judikins Bolio stamps and embossed with gold embossing powder.  After gutting the book, I created a gusset on each side and glued upholstery fabric to the inside.  Before sealing everything down with red sticky tape, I glued loops to hold the plastic handles.  What an occasion to trot out some of the tasseled trim from my stash – it’s a little decadent but ya’ gotta live a little, right?

Project Recipe:
Stamps:  Judikins Bolio Stamp
Paper:  None
Ink:  Versamark and Gold Embossing Powder
Accessories:  Trim – Hobby Lobby,  Fabric from my stash, purse handles from my stash, ribbon, red sticky tape, glue

Not one to reinvent the wheel – after I made my first I discovered that many have done similar projects.  Here’s one you can check out if you are inclined to try.

Until next time!! :-)


pinTHIS SHAREthis TWEETTHIS EMAILthis
  • Tracy McAlisterNovember 18, 2009 - 1:39 am

    OMG just beautiful Becca, such a wonderful gift. You definately are one talented lady.ReplyCancel

  • Erica FieldsNovember 18, 2009 - 1:50 am

    Hi Becca,

    Long time lurker…first-time responder and I’m tickled that I’m the 2nd one, ’cause you get sooo many comments that you can’t possibly read more than 20 or so. This is just gorgeous and I’m wondering if you will consider doing a video tute. I successfully made 14 triangle boxes using your fab tute. I haven’t posted them on my blog yet. But they are ready to fill with some candies for T-Day and every single one of them has won rave comments from my critics. I hope you will consider the tute.
    Thanks.ReplyCancel

  • ElaineNovember 18, 2009 - 1:51 am

    ONE STINKING FABULOUS project! Yes, I am shouting it!! LOL OMG- it is amazing, Becca!ReplyCancel

  • LORRAINENovember 18, 2009 - 2:47 am

    This is amazing but you always do amazing creations. Just gorgeous.ReplyCancel

  • RobbieNovember 18, 2009 - 4:13 am

    What an amazing project, Becca! This is gorgeous…but why would I think anything different coming from you!!ReplyCancel

  • lois skiathitisNovember 18, 2009 - 4:36 am

    This is gorgeous. What a great gift idea. You certainly have an eye for design. Lucky us we get to see it. TFS!!!ReplyCancel

  • HeatherNovember 18, 2009 - 4:59 am

    Fantastic Becca. I like decadent now and then!!! Do consider the tutorial please.tfs.
    Hugs
    HW(UK)
    xReplyCancel

  • Denise (peanutbee)November 18, 2009 - 6:09 am

    I remember this project….totally incredible!ReplyCancel

  • Jerri KayNovember 18, 2009 - 6:26 am

    I remember seeing this in the Fan Club and fell in love with it! I’ve been looking for a stamp like that forever, I’m off on a hunt to find it. Thanks so much for sharing Becca!ReplyCancel

  • AnnMarie PszybylskiNovember 18, 2009 - 6:58 am

    WOW!!! This is stunning. As a librarian trainee I REALLY like this project. Thanks for sharing your beautiful and creative work for all of us to enjoy.
    Stay well,
    AnnMarieReplyCancel

  • broniNovember 18, 2009 - 7:19 am

    Yes, decadent and truly gorgeous! Thanks for the how-to on this beautiful card holder!ReplyCancel

  • Brenda OttoNovember 18, 2009 - 7:20 am

    Becca, what a beautiful project. I wish I had just a tiny bit of your talent. Great Job!!ReplyCancel

  • christiNovember 18, 2009 - 7:30 am

    wow, looking through my stash, i have none of the needed supplies, yeah, i get to shop! this project is so polished looking. i will definately check out the links ’cause i can’t see them getting any better.ReplyCancel

  • ChristyNovember 18, 2009 - 7:53 am

    Wow Very Very Cool :) I can’t wait to try this one !!
    Thank You so much for the links You Rock:)ReplyCancel

  • TriciaNovember 18, 2009 - 8:01 am

    This is sooo pretty. What a great gift this would make.
    Thank you for sharing.
    TriciaReplyCancel

  • niseNovember 18, 2009 - 8:23 am

    “Decadent” is perfect for this jewel! How fun is this! Maybe others have done it, but I bet if I looked at them all, I’d still like yours best. Thanks for sharing.ReplyCancel

  • Sabrina aka okimom2girlzNovember 18, 2009 - 8:36 am

    Becca, I admired this in your SCS gallery and was blown away by it’s beauty!!! Truly an amazing idea to recycle in such a GORGEOUS way!!! You never cease to amaze!! Hugs and blessings, SabrinaReplyCancel

  • KatieNovember 18, 2009 - 9:10 am

    is there any thing you can’t do? this is fabulous!ReplyCancel

  • JanineNovember 18, 2009 - 9:20 am

    Beautiful Becca!!ReplyCancel

  • ConniecrafterNovember 18, 2009 - 10:25 am

    Oh my goodness it is just absolutely Gorgeous, awesome work!ReplyCancel

  • patounineNovember 18, 2009 - 10:29 am

    trop beauReplyCancel

  • PatiNovember 18, 2009 - 10:31 am

    Cool, very cool – Decadent is a good word for this. You make it sound so easy to make in your short summary! Thanks for sharing.ReplyCancel

  • debNovember 18, 2009 - 12:34 pm

    this is such a creative project. I wonder if it could be used as a real purse???? my sister would love it.ReplyCancel

  • debNovember 18, 2009 - 12:34 pm

    this is such a creative project. I wonder if it could be used as a real purse???? my sister would love it.ReplyCancel

  • CarolenNovember 18, 2009 - 12:55 pm

    You are SO talented! Amazing!ReplyCancel

  • Grace NyweningNovember 18, 2009 - 4:17 pm

    Wow! You never cease to amaze me Becca! This is gorgeous and I could only wish to receive a gift this lovely!!! Wow is all I can say!!!ReplyCancel

  • DianeNovember 18, 2009 - 4:21 pm

    Becca,
    I remember this project in the Fan Club gallery.
    So neat! I don’t know where you come up with these ideas.
    You really are amazing my friend.

    ~~Diane~~ReplyCancel

  • MarionNovember 18, 2009 - 4:52 pm

    Ah Becca, what a great project, where do you get your ideas from?
    Marion UKReplyCancel

  • MrsHNovember 18, 2009 - 5:35 pm

    Good evening, Becca -Just beautiful!! Such a stunning project and a beautiful gift idea.ReplyCancel

  • Judy DunavenNovember 18, 2009 - 8:08 pm

    Awwwww… Becca,
    Thank you for the link. I do remember your other purse project and cards. I also remember asking for help with some directions. It is true patience is a virtue and it does pay off. A great big HUG Girlfriend.Just in time for gift making.

    God Bless,
    JUDYReplyCancel

  • LindyNovember 18, 2009 - 9:50 pm

    What else can I say but absolutely GORGEOUS!!!ReplyCancel

  • Leslie MillerNovember 18, 2009 - 10:15 pm

    That’s an excellent use of your tassled trim! What a wonderful project! Goodness, I’d be inclined to use this as an actual purse. So fabulous!ReplyCancel

  • Viki BanaszakNovember 22, 2009 - 9:16 pm

    Wow! This is stunning! I will have to find some old books to try this with.ReplyCancel

  • […] the task of making a set of cards to go in the purse I showed you about a week ago – you can see it HERE.  Because (often to my chagrin) I labor over things far longer than I should – I gave myself a […]ReplyCancel

  • Sylvia/GeorgiaNovember 28, 2009 - 10:04 pm

    This is a great idea! I volunteer with our local Friends of the Library, and we have many hardback books for 50 cents at our annual book sale that would be perfect for this project.ReplyCancel

  • FloliescrapJune 25, 2010 - 2:34 pm

    i can’t wait to tell you taht i’m amazed by your talent. You are incredible !!! and so thank you for all your tutorials. i learn so things.
    thank you thank you !!!!! god bless you !
    and… sorry sorry for my “little” english !
    Flo from FranceReplyCancel

I N F O