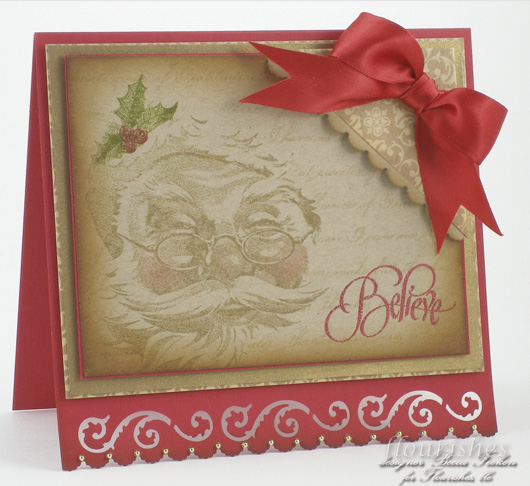
Ha!! I think I’m giving up my age :-)  I used to love those commercials!  When we were teens we used to say that all the time…is it real or is it Memorex?  Well when I was working on this card, I was so taken with how real that Santa face looks.  The artist’s shading is perfect . . .Becky Fleck – you are so taking the fun out of stamping!!  I don’t have to sit and look at an image for hours trying to figure out where the shading is going to go.  And hey, I picked out four colors for shading and you killjoy – I could only use one.  Okay, all kidding aside, I really like doing all of those things especially when I’m in the mood to color, but honestly I found this to be a stamp and go stamp.  By the way, this is one of Flourishes newly released Christmas sets called Santa – I Believe, by their new artist – Becky (yes you know her from PageMaps) Fleck!!  Based on this set I cannot wait to see what she has coming next!!

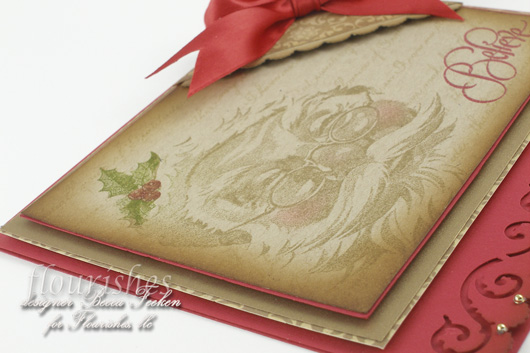
Alright, so here’s where I went to get Santa colored.  Leaving the bulk of the stamp blank, I colored the holly leaves with the edge of my green dye based ink pad, hit the holly berries with a red tombow marker and stamped down one time.  After cleaning up my stamp I then inked it back up with CTMH Desert Sand, carefully lined things up through the clearness and stamped again.  I tapped a clean q-tip into some CTMH Cherub Pink chalk and very lightly burnished it into his cheek.   That’s it – it doesn’t get any simpler :-)

Just to give the card a different look I masked the santa face and overstamped with a text stamp.  I used this stamp for the text while I really wanted to use this stamp.  I smudged my panel with both Brushed Corduroy and Vintage Photo Distress Inks.

Card Recipe:
Stamps:  Flourishes – Santa – I Believe, Thank You
Paper:  The Paper Company, Die Cuts with a View – Holiday Collection
Ink:  Colorbox Pigment – Cranberry, Distressed Ink – Brushed Corduroy and Vintage Photo, Green dye based ink
Accessories:  Ribbon, Pearls, EK Sucess Scroll Punch, EK Success Scalloped Scallop Punch, Tombow Marker

Is October really almost over?  Where does the time go?  So glad you stop by to spend some of your time here :-)


pinTHIS SHAREthis TWEETTHIS EMAILthis
  • annekeOctober 29, 2009 - 7:13 am

    hoi Becca!!!

    what a beauty, so sat that i can not understand how you did that, my englisch is not so good.
    this card is realy so cute!!!

    have a nice day

    greeting annekeReplyCancel

  • christiOctober 29, 2009 - 7:17 am

    wow! love the face and the sublety of it. have you tried any other colors for the face?
    cReplyCancel

  • Jerri KayOctober 29, 2009 - 7:28 am

    A vrey beautiful Christmas card Becca!ReplyCancel

  • Kerry HOctober 29, 2009 - 7:29 am

    Beautiful as usual Becca. Love the Santa done this way, and the double punched edging.ReplyCancel

  • CarlaOctober 29, 2009 - 7:46 am

    My gosh Becca – you continually out-do yourself!! This is really & truly stunning.ReplyCancel

  • MelanieOctober 29, 2009 - 7:50 am

    Becca, you do such breath-takingly beautiful work!ReplyCancel

  • Amy A. MontrealOctober 29, 2009 - 8:27 am

    Absolutely beautiful! LOVE this card.ReplyCancel

  • BarbaraOctober 29, 2009 - 8:30 am

    Absolutely beautiful!!ReplyCancel

  • Bev J.October 29, 2009 - 8:32 am

    Great vintage looking card; love the hint of coloring. tfsReplyCancel

  • Bernice BarnesOctober 29, 2009 - 9:12 am

    The vintage look and colours are beautiful – love the Santa face. The corner accent and background words are a nice touch too.
    BerniceReplyCancel

  • BarbaraOctober 29, 2009 - 9:18 am

    I just spent about an hour reading all the quotes you post on the top upper left side of your blog. Thank you!! They are very thought provoking and insightfulReplyCancel

  • Miss GOctober 29, 2009 - 9:33 am

    Becca Becca Becca

    Beautiful I love the Santa and the Scroll punch is just WOW!

    Please tell me is that punch still available…ReplyCancel

  • Judy McMullenOctober 29, 2009 - 10:48 am

    Wow! What a delightful image and you do it so beautifully!! TFS!!!ReplyCancel

  • DianeOctober 29, 2009 - 11:04 am

    Becca,
    BRAVO!!! BRAVO!!! (I yelled clapping my hands)

    ~~Diane~~ReplyCancel

  • Lisa D. Atha (inspired by purple)October 29, 2009 - 11:25 am

    Becca,

    Gorgeous, elegant, very pretty.

    Hugs,

    Lisa AthaReplyCancel

  • Cindy H.October 29, 2009 - 12:06 pm

    What a gorgeous card and I love the Santa!!ReplyCancel

  • Brenda OttoOctober 29, 2009 - 12:39 pm

    LOL! Becca, I had to laugh because I STILL use that saying :) Your card is absolutely stunning.ReplyCancel

  • ToshOctober 29, 2009 - 1:38 pm

    Your Santa is gorgeous Becca!! WOW!ReplyCancel

  • MrsHOctober 29, 2009 - 3:54 pm

    Good evening, Becca. This is such a beautiful card. Just love how you’ve stamped and coloured the main focus and those punched edgings are delightful.ReplyCancel

  • Ms TOctober 29, 2009 - 5:14 pm

    Wow simply gorgeous! I had to click on the link to make sure it was a stamp. Gorgeous!ReplyCancel

  • LisaOctober 29, 2009 - 10:02 pm

    It may be simple but….it does not look that way. It is just gorgeous Becca. It is so soft and elegant. I really LOVE this card.ReplyCancel

  • HelenOctober 29, 2009 - 10:21 pm

    Stunning card! Although the coloring is subtle the overall effect is very striking. Love all your finishing touches, as usual!ReplyCancel

  • Kerry D-COctober 29, 2009 - 11:18 pm

    WOW! THis is absolutely STUNNING, Becca!! STUNNING!ReplyCancel

  • lois skiathitisOctober 30, 2009 - 2:25 am

    Beautiful vintage card Becca. That image is such fun with fond memories of years ago. TFS!!!ReplyCancel

  • Mary L.October 30, 2009 - 5:53 am

    Where did you get the punches!?! I haven’t seen those! What a beautiful card. Thanks for sharing.ReplyCancel

  • JanineOctober 30, 2009 - 8:32 am

    Just gorgeous Becca!! Have a wonderful weekend.ReplyCancel

  • LatishaOctober 30, 2009 - 8:41 pm

    I love what you did with the santa Becca!! My favorite part of this set are those sentiments…so beautiful.ReplyCancel

  • Brenda MartinOctober 31, 2009 - 5:43 am

    Oh my……….this is stunning. Love the old time look and this stamp is perfect. You did an amazing creation here with the perfect layout. Love it!!!!

    BrendaReplyCancel

  • Judy DunavenOctober 31, 2009 - 10:34 am

    Ho Ho HO !!! So realistic what an awsome card. Thank you for sharing.
    Hugs, JudyReplyCancel

  • Suzanne J DeanOctober 31, 2009 - 11:35 am

    Just Beautiful Becca! Think I might NEED to add this Santa to my collection–I’m a Santa stalker, LOL! Lovely!

    hugz,
    SuzanneReplyCancel

  • MaryLou SturlaugsonJanuary 23, 2010 - 10:32 am

    I love this card, very very cute. I have looked high and low for the swirl punch at the bottom of this card and I can’t find it anywhere. Who makes it and do you know where I can find it? Please help.
    MaryLouReplyCancel

  • Martha NicholsonJune 25, 2010 - 11:04 pm

    Becca I hope to soon see a Becca video on how do this masking. I’ve never seen it done. But would love to be able to acheive this look. Santa is beautiful.ReplyCancel

Let’s see . . . go get coffee . . . plop down in studio . . . cup chin in hands . . . daydream a little . . . look up after an hour of wondering what to make next.   Lightbulb! . . . where is that bag of stuff from the $1.00 bin at Michaels?  Ah, there it is . . . bliss.

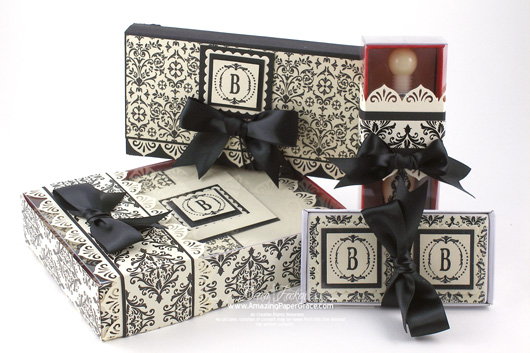
This is what I did yesterday.  I had a project all planned out but I just wasn’t feeling it enough to launch into making it.  I took a detour instead with some items I bought several weeks ago with a JustRite Monogrammed Writing Ensemble in mind.  This was a delightful project because it was extremely inexpensive, all the embellishment was fun and the addition of THIS JustRite set for monograms gives it that perfect polished touch I was looking for.

The purchased items here are the boxed pen, the boxed tiles, and small accordian file which originally had a bright fruit cover, and one package of four file folders that match the boxed pen.  File folders?  Don’t you see them?  That’s what I used to make the box holding the cards and the two belly bands on the boxes.  Okay that’s four items and you know where I purchased them, so besides adding the ribbon and design paper you can see what I have tied up in this project.  

The main item is the monogrammed note cards – I made a set of six.  For some reason I always prefer top folded cards and this week I’ve been pleasantly surprised at how much I’m liking side fold cards.  This is a side fold card that leaves much of the inside layer exposed so I thought I’d pretty it up.  After designing the layout of the card I knew that adding a small, crisp, one letter monogram using JustRite Damask Centers and 60 Point Font, would be a fairly clean look.   It’s hard to tell in the photo but the monogram sits inside a small square frame that I have popped up – then the last tier (the "B") is popped up.  Below is a picture of the card set unboxed.

I get the question in email all the time in regards to what JustRite set to start with.  My advice is this set is a perfect first project – it gives you a great feel for the stamps, how they fit into the mounts and they sure stamp up pretty!!

The cards are all 7" x 5" and I just used standard cream colored greeting card envelopes to pair them up.  No mystery to the box – it is the dimension of the card plus 1 1/2" on each side.  The nice weight of the file folder made the box super sturdy and since the file folder was double sided, the inside of my box is a shiny red :-).  The top of the box is made with a sheet of acetate.  I cut just a tad smaller than the bottom then scored 1 1/2" in on all sides, folded and taped it up.  It made for a lid that would fit just inside the bottom of the box.  The box itself used one file folder and one 8 1/2" x 11" sheet of acetate.  The belly band is made using a small strip of a second file folder.  

The accordian file was an easy embellish item.  It was a bright color to start with so I measured, cut and covered it with black card stock.  Once the black was in place, I then embellished with left over pieces of design paper -a monogram, border and bow finish it off.

Below is the pen set.  I simply put a belly band on the box.  For the (magnetic) tile set I simply embellished with monograms.  The magnets are recessed so these can be used as magnets or as paper weights.

Ensemble Supplies:
Stamps:  JustRite
Wood Stamper 1-3/16” with 3 Bonus Damask Centers & 60 pt Font Round 1-3/16"
Paper:  K & Co., Strathmore Art Paper, 1 Clear Acetate Sheet (for lid of box), Michaels Decorated File Folders from $1.00 bin (for bottom of box and for all belly bands)
Ink:  Versafine Black Onyx
Accessories:  Spellbinders Classic Square, Spellbinders Scalloped Square, EK Success Moroccan Lace Border Punch, Purchased $1.00 Bin Items – Boxed Tiles, Boxed Pen, Ribbon

This was totally fun.  Now that I have my layout in mind, it will take no time to sit down and make additional sets.  Okay one Christmas present done, a kajillion to go!  Have a great day friends and thanks so much for stopping by!

pinTHIS SHAREthis TWEETTHIS EMAILthis
  • Karen WOctober 27, 2009 - 2:46 pm

    This is just gorgeous, what a precious gift!ReplyCancel

  • Beth NormanOctober 27, 2009 - 2:55 pm

    Oh so elegant. Very, very nice. How nice to see such fabulous work from dollar products.ReplyCancel

  • annekeOctober 27, 2009 - 2:58 pm

    soooooooooo beautyfull Becca. graet job, what a much work, wel done!!!!!!!!!!!!!

    greetings annekeReplyCancel

  • BarbaraOctober 27, 2009 - 3:02 pm

    Another fabulous idea!! Can I get on your Christmas list? LOLReplyCancel

  • DianeOctober 27, 2009 - 3:04 pm

    Becca,
    Here I go again….. Ooooohhhhing and Ahhhhhing.
    Just beautiful.

    ~~Diane~~ReplyCancel

  • NancyKOctober 27, 2009 - 3:11 pm

    Becca – thank you so much for this post. I’ve been wondering what to make for my sister this Christmas and you’ve come to the rescue. While I won’t go all out with everything you’ve done, the pretty notecards are perfect for her !!ReplyCancel

  • vicki dutcherOctober 27, 2009 - 3:13 pm

    Gosh ~~ I WISH I was on your Christmas list! I am just speechless over your creativity! Beautiful project!!ReplyCancel

  • MaggieOctober 27, 2009 - 3:18 pm

    You always manage to make your creations looks so simple, even though it’s obvious that you put much thought in them. Then they look so elegant. Excellent job. I’m going to have to go searching for that accordian file folder. It looks smaller than any I’ve seen. TFS *wink*ReplyCancel

  • MortyOctober 27, 2009 - 3:20 pm

    More beautiful work Becca. I pop into your site several times a week and you never cease to amaze me with your stunning creations. Thanks so much for sharing your work with the world.ReplyCancel

  • Judy DunavenOctober 27, 2009 - 3:22 pm

    Becca you have done it again. I love the Black and White theme. Beautiful projects at an affordable price. Thanks.

    Hugs, JudyReplyCancel

  • Jerri KayOctober 27, 2009 - 3:41 pm

    Your monogram set is gorgeous Becca. What a wonderful idea! Love the black, white, and red, so elegant!ReplyCancel

  • CandyOctober 27, 2009 - 3:50 pm

    Did u stamp the black and white paper or does it come printed. I see you have K & Co as one of the companies. What is the name of it. I would be PERFECT for a project I have going………..
    Thank you!!ReplyCancel

  • Colleen HornerOctober 27, 2009 - 4:10 pm

    Becca, Becca, Becca I cannot have it all and just today I went to Quietfire Designs having looked at your quilt. Now I need this things too. Good thing they will only cost $1. That is what I have left.

    Joking of course. I love your creations and humbly copy them as best I can.

    ColleenReplyCancel

  • Loni ReynoldsOctober 27, 2009 - 4:12 pm

    I, too, am amazed by your creativity. It just never ends. This set is utterly beautiful and elegant.

    Another thing I’ve been wondering is what your photo setup is. Your photos are always so beautiful and there is very little shadow or background visible. Do you use a light box? The photos are awesome?

    Thanks for the inspiration!ReplyCancel

  • americaOctober 27, 2009 - 4:39 pm

    You are sssssssuper creative and i just love your amazing works of art GF!!!ReplyCancel

  • GloriaOctober 27, 2009 - 4:46 pm

    Becca,

    Absolutely beautiful!!I wish you lived nearer so you could teach me!!

    Love all of your work. Exactly my style but I do not have the know how.ReplyCancel

  • MarthaOctober 27, 2009 - 5:06 pm

    just beautiful!ReplyCancel

  • Lisa D. Atha (inspired by purple)October 27, 2009 - 5:22 pm

    Becca,

    Wow, your ability to look at things in the store and alter them to look so beautiful alwasy amazes me. This is so pretty!

    Hugs,

    Lisa AthaReplyCancel

  • Sue KOctober 27, 2009 - 6:06 pm

    WOW! – Becca this is simply stunning – so very classy and elegant – a great idea and a wonderful present – the recipient is going to be very very lucky and very very happy!!!!!!!!!!!!!!!!!!!!!!!!!!ReplyCancel

  • MarisaOctober 27, 2009 - 6:16 pm

    Fabulous!!! Love the cream and black and the border punch you used. A great gift set for someone.ReplyCancel

  • SueBOctober 27, 2009 - 7:08 pm

    Such a classy look with little cost – you go, girl – TFS!ReplyCancel

  • Denise (peanutbee)October 27, 2009 - 7:10 pm

    LOL, the start of your post cracked me up….love the *cup chin in hand and daydream a little*….too familiar! :)

    Gorgeous Gorgeous GORGEOUS set!!ReplyCancel

  • RufusOctober 27, 2009 - 7:41 pm

    Elegant, elegant, elegant! What a classy looking set! I’m glad to hear that you aren’t always in the mood to do “what should be done”. Wish I could dream up such a smashing “fun” set. Also wish I could go shopping with you! They never have such good stuff in the dollar bin when I get there!
    R/ReplyCancel

  • Linda C.October 27, 2009 - 7:47 pm

    Loads of class!! Loads of creativity! Loads of mojo!!ReplyCancel

  • lisa808October 27, 2009 - 9:15 pm

    Wow!!! This is beautiful and so elegant.ReplyCancel

  • KylieOctober 27, 2009 - 9:43 pm

    I love the colour scheme of this project and elegance of your work. So so so beautiful!ReplyCancel

  • patounineOctober 28, 2009 - 12:22 am

    magnifiqueReplyCancel

  • lois skiathitisOctober 28, 2009 - 3:29 am

    Such an elegant gift set. Anyone would be proud to get a set like this. TFS!!!ReplyCancel

  • HeatherOctober 28, 2009 - 3:46 am

    Wow Becca – what can I say that hasn’t already been said!!! Would you like to add me to your gift list please????
    tfs
    Hugs
    HW(UK)
    xReplyCancel

  • Anne (UK)October 28, 2009 - 4:01 am

    Oh my goodness! Just when I think you have designed somthing that is perfection, you produce another show-stopping, mind-blowing, breath-taking project to blow us all away!

    My visits here are the highlight of my day!

    TFS Becca!

    AnneReplyCancel

  • AmandaOctober 28, 2009 - 4:02 am

    Absolutely stunning! A very special presentReplyCancel

  • Cindy HaffnerOctober 28, 2009 - 5:10 am

    Beautiful Becca!ReplyCancel

  • Jill HaddadOctober 28, 2009 - 6:13 am

    Fantastic! A beautiful, yet inexpensive gift set. Lovin’ it.ReplyCancel

  • Renee MOctober 28, 2009 - 7:13 am

    Becca,Soooooooooooooooooo lovely,God has truely blessed you in this matter!!!!ReplyCancel

  • Nancy EnsignOctober 28, 2009 - 7:19 am

    I purchased some JustRite product, but am unable to stamp with it. I cannot get the beautiful crisp images you do. I get ink lines where there shouldn’t be anything. Do you ink with a stamp pad or marker? I feel I wasted my money.

    Very FrustratedReplyCancel

  • Julia B.October 28, 2009 - 9:35 am

    WOW you did it again. This is so lovely, you have to know you are blessed.ReplyCancel

  • JanineOctober 28, 2009 - 10:00 am

    This is exquisite Becca!! You have an eye for detail that’s for sure. You know I think your work is amazing!!
    Have a fabulous day!!ReplyCancel

  • jan hunnicuttOctober 28, 2009 - 11:21 am

    These are so nice, I can’t keep up with you! I love the way you’ve used the Nesties dies!ReplyCancel

  • JamiOctober 28, 2009 - 12:17 pm

    What an absolutely GORGEOUS set and how clever to use file folders like that!ReplyCancel

  • Linda BandowOctober 28, 2009 - 12:55 pm

    Wow! what a nice gift and I need to go to the Dollar store more often, I guess. This is really neat Becca. TFSReplyCancel

  • Debra TalleyOctober 28, 2009 - 2:17 pm

    These are beautiful! I would love the name of the papers – besides just being K & Company. Thanks!ReplyCancel

  • Marion (Australia)October 28, 2009 - 3:07 pm

    Such a beautiful gift set.
    Very elegant in deed.
    Hugs marionReplyCancel

  • Linda KlebackOctober 28, 2009 - 3:16 pm

    Wow!!!!ReplyCancel

  • ToshOctober 28, 2009 - 3:24 pm

    FABULOUS!! Gorgeous, elegant and FABULOUS!!ReplyCancel

  • Denise TrahanOctober 28, 2009 - 3:38 pm

    Wow… awesome!!!ReplyCancel

  • niseOctober 29, 2009 - 5:43 am

    Elegant and so together! Love the belly bands ~ do you think MY belly would look better if I dolled it up like that? teehee…ReplyCancel

  • PaulaOctober 29, 2009 - 10:03 pm

    Love it! So pretty and elegant! Thanks for the inspiration.ReplyCancel

  • JarieNovember 6, 2009 - 1:58 pm

    Becca,

    This set is just amazing. I bought those items at M’s but hadn’t thought to spruce them up. I didn’t buy the magnets but I might have to go back and pick them up. TFS.

    JanetReplyCancel

  • SamanthaSeptember 13, 2010 - 1:52 pm

    How did you make the lid of the box with acetate? Is there a tutorial you could send me? Thanks!ReplyCancel

  • Jessie PorterNovember 19, 2010 - 2:58 pm

    You always do such beautiful job on your gifts. I really like the elegance of this one is very pretty.ReplyCancel

Greetings, I have two cards to share that feature stamps newly released this month from Quietfire Design.  The first card uses a sentiment that had me running for my brass embossing templates.  How charming is that sentiment?  It’s called Sleeping Under a Quilt.

I used a technique I call Reverse Stenciling and that others call Letterpress.  I inked up my quilt brass template with Prussian Blue Chalk Ink then sandwiched it with my paper and tan embossing mat to run through my die cut machine.  It transfers the ink to the paper while embossing all other areas.  Then I was in a quandary about how to show the sentiment without covering up the quilt.  So I made a card with a buckle band where the sentiment holds the card closed and when opened reveals the lovely quilt.  I have several quilting brass templates that I’ll give a whirl with this sentiment!!

The band is made using a Martha Stewart Border Punch that works well with the scallops on the quilt.  Then I stamped the sentiment on another panel that I had run through with the quilt and cut sentiment and stacking layers from Spellbinders Petite Ovals Large and Small as well as Petite Scalloped Ovals Large

Card Recipe:
Stamps:  Quietfire Design – Sleeping Under a Quilt
Paper:  Strathmore Art Pad, Bazzill
Ink:  Colorbox Prussian Blue Chalk Ink, Versafine Black Onyx
Accessories:  Spellbinders Petite Ovals Large, Spellbinders Petite Ovals Small, Spellbinders Petite Scalloped Ovals Large,  Clear Embossing Powder, May Arts Silk Ribbon, Dreamweaver Brass Embossing Stencil ETA:  I was not sure about the manufacturer, however several people have emailed to confirm that this was correctly described as a Dreamweaver Stencil – it is most likely discontinued.

I also worked in a quick 10 minute card using another of the new decorative sentiments by Quietfire Design called Silent Night.  This little cuttlebug embossing folder eluded me last year and I found myself wishing I hadn’t let it get by.  Earlier this year it was re-released so I snagged it.  The bottom of the snow covered hill seemed the perfect place to stamp Silent Night.   I used the smaller version and there is a larger version too and are available as a set!

Card Recipe:
Stamps:  Quietfire Design – Silent Night
Paper:  The Paper Company
Ink:  Colorbox Pigment Ink – Cranberry
Accessories:  Cuttlebug Embossing Folder, Ribbon, Clear Embossing Powder

Thanks for stopping by, I have lots to show this week provided real life doesn’t get in the way.  Posting times are sporadic with me because my blog software upgrade is not allowing me to schedule posts.   Yikes I’ve got to get that fixed!  Have a wonderful week!

pinTHIS SHAREthis TWEETTHIS EMAILthis
  • christiOctober 26, 2009 - 4:18 pm

    wow, the silent night is just stunning!ReplyCancel

  • DianeOctober 26, 2009 - 4:20 pm

    Becca,
    Both cards are just beautiful.
    I love the sentiment on your quilt card.
    I’m going to try that technique as well.
    As always thanks for sharing all your creativity with us.

    Blessings my friend.
    ~~Diane~~ReplyCancel

  • MarisaOctober 26, 2009 - 4:29 pm

    Two wonderful cards! Love the fold on the top one.ReplyCancel

  • JenniferOctober 26, 2009 - 4:30 pm

    Becca, you are going to have to loan me some money because every time I see one of your lovely creations, I go and buy another spellbinder die or stamp :) You have a beautiful gift, thanks for sharing with us.ReplyCancel

  • TinaHOctober 26, 2009 - 4:32 pm

    Oh my gosh Becca – thank you for the info on the quilt card, what a wonderful idea for brass stencils – I can’t wait to try it myself. Your work is remarkable, thank you again so very much for sharing it with us.ReplyCancel

  • Jacqueline FrisbieOctober 26, 2009 - 4:58 pm

    Dear Becca,

    I love both (and all) of the cards you have made. But, I was wondering how you tie those neat bows with such precision? I have a very hard time tying bows and having them lay straight.ReplyCancel

  • beth UllmanOctober 26, 2009 - 5:20 pm

    Becca these are both real beauties.ReplyCancel

  • AnnelieOctober 26, 2009 - 5:55 pm

    Love both cards, but especially the “silent night”. You have given me an idea for Christmas cards this year. Thanks for sharing all your beautiful creations, Becca.ReplyCancel

  • NY DebbieOctober 26, 2009 - 6:23 pm

    Both cards are gorgeous!!! but the top one is my favorite, love how you made the buckle so as not to hide the beautiful stencil…Brilliant!!!!ReplyCancel

  • MichelleHOctober 26, 2009 - 6:42 pm

    Silent Night is gorgeous.

    I love the quilt sentiment! It’s so perfect. My mom crocheted each of the kids an afghan when they were toddlers. I would cover them at nap and say they were getting a hug from Grandma while they slept.ReplyCancel

  • Barb PipittOctober 26, 2009 - 6:58 pm

    Becca,I’m trying to find that brass stencil with no luck,can you tell me who might have it. BarbReplyCancel

  • Loni ReynoldsOctober 26, 2009 - 7:27 pm

    Becca, both cards are gorgeous, as usual. I love the simplicity of the Silent Night card–a little change of pace for you! Bravo!ReplyCancel

  • ShawnaOctober 26, 2009 - 7:43 pm

    Beautiful Becca! Both cards are just stunning.ReplyCancel

  • Tracy McAlisterOctober 26, 2009 - 8:33 pm

    Truly beautiful.ReplyCancel

  • Marion (Australia)October 27, 2009 - 2:24 am

    Both cards are beautiful. Love the silent night card.
    The sleeping under a quilt is very unique in the way you have made it and I love the sentiment.
    hugs MarionReplyCancel

  • Cheryl RowleyOctober 27, 2009 - 3:29 am

    You never cease to amaze! I love the elegance of your cards! The way the quilt card opens is really special!ReplyCancel

  • lois skiathitisOctober 27, 2009 - 3:37 am

    They are both beautiful. The quilt one is a great composition. The embossed Silent Night is stunning simple yet elegant. TFS!!! It’s always a joy to visit here.ReplyCancel

  • MicheleOctober 27, 2009 - 5:24 am

    You constantly knock my socks off! These are over the top gorgeous!!!!ReplyCancel

  • RosellaOctober 27, 2009 - 6:56 am

    What beautiful cards!! Love the quilted card. Just PERFECT!! And the Silent Night sentiment works beautifully with the embossing folder. GORGEOUS!!
    Thank you for your inspiration!!ReplyCancel

  • annekeOctober 27, 2009 - 7:25 am

    hoi Becca
    they are so beautyfull again!!!
    plesjer to look at it

    greetings annekeReplyCancel

  • Michelle ROctober 27, 2009 - 7:48 am

    Simply stunning!ReplyCancel

  • Kyle E.October 27, 2009 - 8:26 am

    Gorgeous cards!ReplyCancel

  • Silke LedlowOctober 27, 2009 - 9:06 am

    Becca – both cards are absolutely gorgeous!!! Your first one is soooo cool how it opens…and your second is a perfect CAS card!!! Hugs ~S~ReplyCancel

  • Cindy H.October 27, 2009 - 9:14 am

    Both of your cards are sooo gorgeous!! tfsReplyCancel

  • HeatherOctober 27, 2009 - 9:55 am

    OOOH I like what you have done with a brass stencil…… I have loads lanquishing in a folder – must give them an airing!!! Both cards are beautiful and very inspiring. tfs
    Hugs
    HW(UK)
    xReplyCancel

  • VictoriaOctober 27, 2009 - 10:48 am

    Love the cards!!
    I really like the way the quilt one opens. Very pretty!!ReplyCancel

  • Chris KOctober 27, 2009 - 1:19 pm

    Love these cards especially the beautiful quilt!. Can’t wait to try it myself.ReplyCancel

  • Judy DunavenOctober 27, 2009 - 3:09 pm

    ou… love the Quilt card I will have to invest in a Quilt brass plate. These two cards are just so pretty . Thanks Becca.ReplyCancel

  • ConniecrafterOctober 27, 2009 - 4:11 pm

    so pretty, very cool closure, Love it!ReplyCancel

  • Lisa D. Atha (inspired by purple)October 27, 2009 - 5:15 pm

    Becca,

    Wow, where do I start? The silent night card is so pretty, that small amount of Red really pops out and makes the whole thing gorgeous.

    That quilt card, mmmmmmmm love that shade of blue with the cream card stock, and the way you wrapped the band around the card, I never would have thought to do that. How clever. Love it.

    Hugs,

    Lisa AthaReplyCancel

  • ToshOctober 29, 2009 - 1:36 pm

    Both cards are simply fabulous Becca!! LOVE the embossed quilt with the buckle band, and the embossed white with the red….gorgeous!!ReplyCancel

I N F O