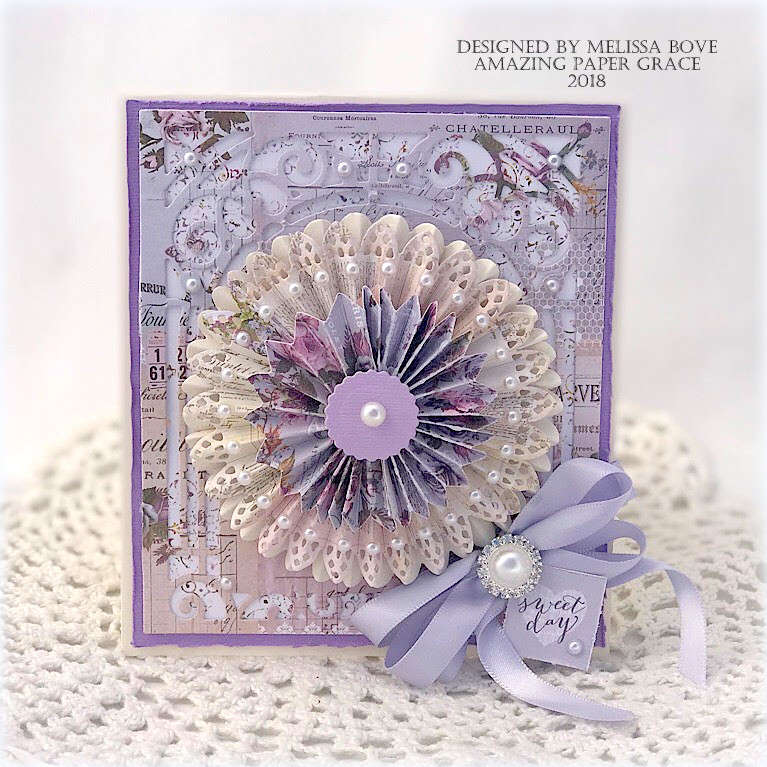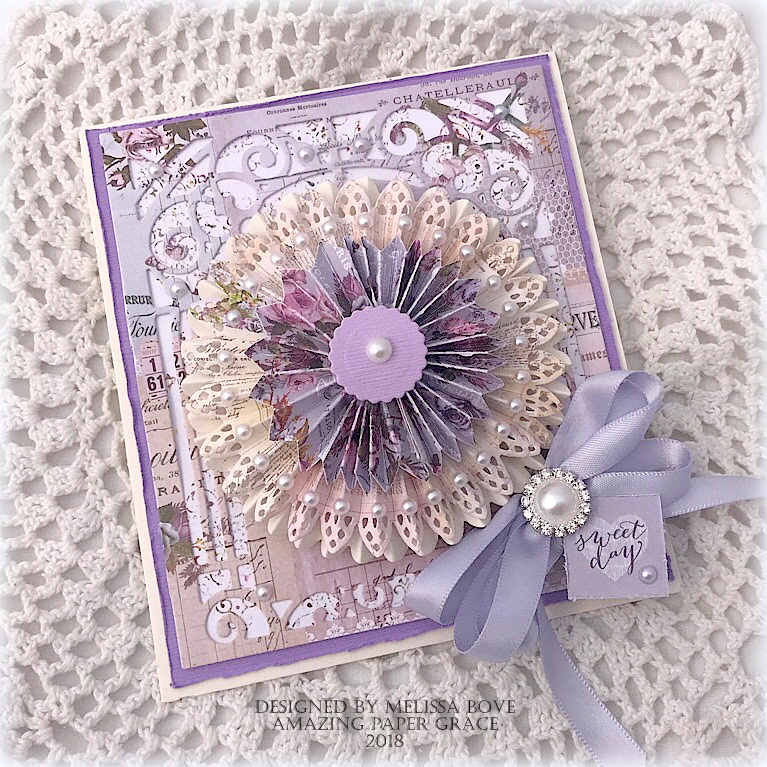
Card Making Ideas by Melissa Bove using Amazing Paper Grace 3D Vignettes and Grand Arch - see more info at www.amazingpapergrace.com/?p=33809
Good morning sweet friends!   Since the release of  Amazing Paper Grace 3D Vignette by Spellbinders it has been our pleasure to slip you a steady stream of ideas.  I’m tickled about the the virtual fountain of ideas that have sprung up – pure serendipity!  Today we are highlighting S4-869 Tiered Rosettes.  It’s a special rosette because the way the die is designed – you determine the depth of the rosette, not the die – they are adjustable.   Need a rosette that is a mere 1/2″ – you can cut it that way.  Need a rosette that is 1″ – you can cut it that way.

The beauty of adjustable rosettes is that you can stack them, just like a petticoat.  Oh, and did I mention that there are three decorative edges?  This week the Creative Team shows some beautiful samples.  The card above was done by Creative Team Member Melissa Bove and more pictures follow below:

How It Works

It’s a two step process:

  1. Cut with the largest scored piece
    Please note, it will cut on three sides and not release from the paper but will leave marks/indents that you will need for Step Two.
  2. Pick your edge finish and line up on two indent marks adjusting to the depth you desire and cut with just the edge piece – this will release your scored, edged paper.
  3. Fold along every other score line then flip and fold along every in between score line in a zigzag fashion.
  4. We find that two scored, edged pieces makes a full rosette, so cut another and glue end to end, then close the end
  5. Push down in the center and apply hot glue to hold or thread a thin wire or string through the holes to cinch the rosette in the middle.

post-header-bottom

3D Vignette Rosette Cards

Melissa Bove

Card Making Ideas by Melissa Bove using Amazing Paper Grace 3D Vignettes Tiered Rosettes and Grand Arch - see more info at www.amazingpapergrace.com/?p=33809
Melissa used:
Tiered Rosettes
Grand Arch Card

Card Making Ideas by Melissa Bove using Amazing Paper Grace 3D Vignettes Tiered Rosettes and Grand Arch - see more info at www.amazingpapergrace.com/?p=33809post-header-bottom

Joanna Krogulec

Card Making Ideas by Joanna Krogulec using Amazing Paper Grace 3D Vignettes Tiered Rosettes and Victoriana Crest - see more info at www.amazingpapergrace.com/?p=33809
Joanna used:
Tiered Rosettes
Victoriana Crest
Card Making Ideas by Joanna Krogulec using Amazing Paper Grace 3D Vignettes Tiered Rosettes and Victoriana Crest - see more info at www.amazingpapergrace.com/?p=33809
post-header-bottom

Teresa Horner

Card Making Ideas by Teresa Horner using Amazing Paper Grace 3D Vignettes Tiered Rosettes Emmeline Treillage Graceful Sweet Words Graceful Tiny Tags - see more info at www.amazingpapergrace.com/?p=33809
Teresa used:

Card Making Ideas by Teresa Horner using Amazing Paper Grace 3D Vignettes Tiered Rosettes Emmeline Treillage Graceful Sweet Words Graceful Tiny Tags - see more info at www.amazingpapergrace.com/?p=33809

post-header-bottom

Judy Hayes

Card Making Ideas by Judy Hayes using Amazing Paper Grace 3D Vignettes Tiered Rosettes Oh Happy Day Cascading Grace Hemstitch Ovals Ornamental Crest - see more info at www.amazingpapergrace.com/?p=33809

Judy  used:
Tiered Rosettes
Oh Happy Day
Cascading Grace
Hemstitch Ovals
Ornamental Crest

Card Making Ideas by Judy Hayes using Amazing Paper Grace 3D Vignettes Tiered Rosettes Oh Happy Day Cascading Grace Hemstitch Ovals Ornamental Crest - see more info at www.amazingpapergrace.com/?p=33809

Card Making Ideas by Judy Hayes using Amazing Paper Grace 3D Vignettes Tiered Rosettes Oh Happy Day Cascading Grace Hemstitch Ovals Ornamental Crest - see more info at www.amazingpapergrace.com/?p=33809


post-header-bottom


I hope you enjoyed a little inspiration today, thank you so much for stopping by!!

APG_signature

pinTHIS SHAREthis TWEETTHIS EMAILthis
  • Pam TasMarch 27, 2018 - 3:03 am

    Beautiful ways to use these dies all so
    different well done girls hugs Pam XXXReplyCancel

  • Lynda Mellor aka Loopy LyndaMarch 27, 2018 - 3:06 am

    Good morning Becca, truly amazing and so versatile!!! Love the fan very chic!!!
    Have a good one!!!
    Loopy LyndaxxxReplyCancel

  • Christine SpringmanMarch 27, 2018 - 6:44 am

    Love the rosette die the cards are stunning. Quinty girlReplyCancel

  • Karen KnegtenMarch 27, 2018 - 6:52 am

    Fantastic inspiration. Beautiful creations!ReplyCancel

  • ANN ROBBINSMarch 27, 2018 - 6:58 am

    Wow, Becca! These are totally awesome. Love them.Don’t have these yet but this makes me want them!!!!!
    Hugs
    Ann RobbinsReplyCancel

  • LisaMarch 27, 2018 - 7:02 am

    You and your team are absolutely the best! Thank you for sharing your awesome creativity.ReplyCancel

  • Denice with a "c"March 27, 2018 - 7:21 am

    These are just absolutely stunning. Looking forward to giving them a try. God bless…Denice with a “c”ReplyCancel

  • Crafty CruiserMarch 27, 2018 - 8:52 am

    These are all absolutely gorgeous! Funnily enough I was looking at the Rosette dies recently but they are out of stock. Will be definitely looking again.
    Doreen RReplyCancel

  • RosemaryMarch 27, 2018 - 9:41 am

    Simply amazing still waiting to hear from you on my questionReplyCancel

  • Becky GreenMarch 27, 2018 - 10:17 am

    WOW!!! STUNNING WORK, Ladies!!!! The ideas just keep coming, like Becca said! Keep it up ladies, we are LOVING IT!!! ;)ReplyCancel

  • ConniecrafterMarch 27, 2018 - 10:38 am

    these are all just amazing!ReplyCancel

  • Linda WaltonMarch 27, 2018 - 11:52 am

    It just keeps getting better and better! I get so much inspiration here. Thank you!!

    LindaReplyCancel

  • Cynthia SMarch 27, 2018 - 12:07 pm

    Becca, I never tire of viewing your blog! You and your team are great artists.Thank you, for the inspiration. CynthiaReplyCancel

  • Chelsea JohnsonMarch 27, 2018 - 1:47 pm

    Oh, mercy, these are all sooooo beautiful!! Thank you all for the inspiration!ReplyCancel

  • Sandy ArtmanMarch 28, 2018 - 8:18 pm

    Hi, Becca,
    Recently, I ran across a purchased rosette that I used on a belly band to keep a “box card” closed. It worked beautifully for that. I particularly love the easel card that Joanna made, such sweet elegance! So clever how she stacked the die cuts for the support stop.
    You and your team are the best!
    Love and blessings,
    SandyReplyCancel

  • Carol RossouwMarch 30, 2018 - 10:14 am

    Wow! Wow! Wow! Is all I can say. So very beautiful ?ReplyCancel

  • Lynn C.April 1, 2018 - 7:29 pm

    I need a video to figure this die cutting for the rosette. Is there one on someone’s website I could watch. I am sure if I saw it once, the written directions would make a lot more sense.ReplyCancel

  • Beverly JordanApril 5, 2018 - 7:51 am

    Such beautiful rosette vignettes! What a tongue twister! But so gorgeously done!ReplyCancel

  • Anne(UK)April 7, 2018 - 1:41 pm

    And so my wish list grows every longer!
    :o)
    Really stunning creations!
    Hugs
    Anne(UK)xReplyCancel

Papercraft Basket Ideas by Becca Feeken using Amazing Paper Grace 3D Vignettes - Grand Cabinet Base - see fully supply list at www.amazingpapergrace.com/?p=33791
Good morning sweet friends!   So sorry that I teased this was coming on Wednesday but a change in plans displaced it to the later part of the week.  On the bright side, I think we have you covered if you need ideas for a quick and easy Elegant Basket or Easter Basket.  I issued a challenge to the Creative Team to think out of the box and take a shot at converting any of the Amazing Paper Grace 3D Vignette by Spellbinders dies into a basket – the results are truly spectacular!   Please be sure to follow links to each creative team members post  so you can get more pictures and details on their basket.   For my basket today I’m using the Grand Cabinet Card.

Papercraft Basket Ideas by Becca Feeken using Amazing Paper Grace 3D Vignettes - Grand Cabinet Base - see fully supply list at www.amazingpapergrace.com/?p=33791
I cut four panels from the Grand Cabinet Base, glued the tabs together and taped along each seam and closed the basket.  As you might imagine, the bottom was open, so I created a box slightly less than 4.5″ on each side and inserted it to make for the bottom.  Then I cut a 3/4″ strip for the handle.

Papercraft Basket Ideas by Becca Feeken using Amazing Paper Grace 3D Vignettes - Grand Cabinet Base - see fully supply list at www.amazingpapergrace.com/?p=33791
I put ribbon around the perimeter of the basket then folded the edges down.

WR-Supplies
Stamps:  None
Paper:  Neenah Classic Crest – Natural White – 80lb Smooth Cover
Ink:  None
Accessories:  Amazing Paper Grace Dies by SpellbindersGrand Cabinet Card, Lace – Michaels, Satin Ribbon, Recollections Pearls

post-header-bottom

3D Vignette Grand Card Basket Ideas

Baskets are so easy!!  Pick out something attractive for a side, make four sides, figure out a way to glue them together and you are almost home free.  Take a stroll through our inspiration – you may even find something to make for a wee one for the upcoming holiday.

Joanna Krogulec

Papercraft Basket Ideas by Joanna Krogulec for Becca Feeken using Amazing Paper Grace 3D Vignettes - Grand Cabinet Base - see fully supply list at www.amazingpapergrace.com/?p=33791
Joanna used:

Grand Dome 3D Card
Petite Double Bow
Tiara Rondelle
Side panel from Grand Arch Card


Papercraft Basket Ideas by Joanna Krogulec for Becca Feeken using Amazing Paper Grace 3D Vignettes - Grand Cabinet Base - see fully supply list at www.amazingpapergrace.com/?p=33791Papercraft Basket Ideas by Joanna Krogulec for Becca Feeken using Amazing Paper Grace 3D Vignettes - Grand Cabinet Base - see fully supply list at www.amazingpapergrace.com/?p=33791
post-header-bottom

Judy Hayes

Papercraft Basket Ideas by Judy Hayes for Becca Feeken using Amazing Paper Grace 3D Vignettes - Grand Cabinet Base - see fully supply list at www.amazingpapergrace.com/?p=33791
Judy  used:
Grand Arch Card
Ornamental Arch
Graceful Tiny Tags

Papercraft Basket Ideas by Joanna Krogulec for Becca Feeken using Amazing Paper Grace 3D Vignettes - Grand Cabinet Base - see fully supply list at www.amazingpapergrace.com/?p=33791

post-header-bottom

Melissa Bove

Papercraft Basket Ideas by Melissa Bove for Becca Feeken using Amazing Paper Grace 3D Vignettes - Grand Cabinet Base - see fully supply list at www.amazingpapergrace.com/?p=33791

Melissa used:
Ornamental Arch
Petite Double Bow

post-header-bottom

Teresa Horner

Papercraft Basket Ideas by Teresa Horner for Becca Feeken using Amazing Paper Grace 3D Vignettes - Grand Cabinet Base - see fully supply list at www.amazingpapergrace.com/?p=33791

Teresa used:

Papercraft Basket Ideas by Teresa Horner for Becca Feeken using Amazing Paper Grace 3D Vignettes - Grand Cabinet Base - see fully supply list at www.amazingpapergrace.com/?p=33791

Grand Dome 3D Card
Petite Double Bow
Filigree Veil Etched Dies 
Cinch and Go Flowers III 
post-header-bottom

These work up quite quickly so I’ve made some mini Easter Baskets.  I hope we’ve inspired you today – happy creating!

APG_signature

pinTHIS SHAREthis TWEETTHIS EMAILthis
  • Sandy ArtmanMarch 23, 2018 - 2:57 pm

    Hi, Becca,
    Your team rose to the challenge beautifully! Your basket and theirs are so sweet. Such a delight of the promise of spring, particularly, during a week that has been filled with gray skies.
    My usual shopping sites have been sold out of the Grand Cabinet and 3D Vignette dies. I hope that means fantastic news for you! You and your team have done a wonderful job promoting these dies with your gorgeous and creative projects!
    Love & blessings,
    SandyReplyCancel

  • Lynda Mellor aka Loopy LyndaMarch 23, 2018 - 3:25 pm

    Good morning Becca, simply gorgeous!!!
    Loopy LyndaxxxReplyCancel

  • ANN ROBBINSMarch 23, 2018 - 3:42 pm

    Hi Becca,
    You dedicated “staff” have risen to the occasion! So very cute! I made my granddaughter an Easter card with the 3D die and made each of the cuts a different pastel color (pink, lt. blue, yellow, green, lavendar and white) and it just looked so Eastery and put a Happy Easter with bunnies on the back panel; then decorated with some lovely little yellow flowers. Very springy!! I am so glad that I ordered on Day 1 as I knew very well these would sell like “hot cakes!) Even for clutzy me, they are just so easy. I will have to try the basket thingy now!
    Hugs
    Ann R.ReplyCancel

  • Noelene ApapMarch 23, 2018 - 4:27 pm

    Hi Becca, these baskets are all so pretty! This would be a great project for the kids as well. Pre cut all the pieces & they can put them together! Would make a great Easter craft! Thank you to you & all the talented team for sharing! Have a lovely weekend xReplyCancel

  • Marilyn in E~TownMarch 23, 2018 - 4:51 pm

    Oh my, I’m over the moon in love with today’s projects, I love Spring time and these are just absolutely perfect!?ReplyCancel

  • Christine SpringmanMarch 23, 2018 - 5:37 pm

    Love all the baskets your team did an amazing job on all the baskets. Quinty girlReplyCancel

  • Pam TASMarch 23, 2018 - 6:35 pm

    Hi Becca one word Gorgeous!
    The team have smashed it lol
    thanks for sharing hugs Pam XReplyCancel

  • SuzzieQMarch 23, 2018 - 6:58 pm

    Wonderful expressions of lovely Easter baskets.ReplyCancel

  • Becky GreenMarch 23, 2018 - 7:56 pm

    WOW, Becca! I would have NEVER GUESSED you could do this too with these dies! LOL JUST BEAUTIFUL!!! I also LOVE the elegance of your basket! EVERYONE’S BASKETS were BEAUTIFUL, UNIQUE & FUN!!!! A SUPER CHALLENGE!!! ;)ReplyCancel

  • Sylvia JohnsonMarch 23, 2018 - 9:14 pm

    All of your team did a beautiful job. I have not been able to get the dies as everyone is out including Spellbinders. So I am patiently waitingReplyCancel

  • Beverly JordanMarch 23, 2018 - 11:41 pm

    This are such wonderful for Easter and look so expensive! You are so creative!!ReplyCancel

  • fusiafscrappingMarch 24, 2018 - 12:18 am

    Such beautiful baskets!ReplyCancel

  • Carol RossouwMarch 24, 2018 - 3:32 am

    What lovely project ideas!ReplyCancel

  • Crafty CruiserMarch 24, 2018 - 7:40 am

    These are all absolutely gorgeous! Well done everyone. I have lots of this collection on order and so looking forward to getting my hands on them!
    Doreen RReplyCancel

  • Dianne Schlegel aka the kardladyMarch 24, 2018 - 10:37 am

    Just love your little baskets – it is surprising the diversity of spellbinders dies – of course it takes the very creative minds of a dream team to come up with them! Thank your for sharing your talents and abilities with us. I’ve been trying a few of my own and I’m just loving doing it! Hugs DianneReplyCancel

  • Lorrayne IngramMarch 27, 2018 - 7:02 am

    The baskets are so cute. I hope to find some time to try these after my husband gets out of the hospital. Love the creative mental break for a short while when he rests.ReplyCancel

  • Anne(UK)April 7, 2018 - 1:45 pm

    Wow! Such gorgeous projects.I love them all!
    Hugs
    Anne(UK)xReplyCancel


Good morning sweet friends, I have a treat to share this morning!!  Over the years I’ve collected many craft supplies but one of my most coveted collections is my drawers of embossing powder.  I’ve always been mesmerized by it.  Recently my dear friend Seth Apter introduced new line of 7 luscious embossing powders that he designed for Emerald Creek.  They are called Baked Texture and my-oh-my, it wasn’t until I had them in hand that I realized these are no ordinary embossing powders – they are delightfully chunky and they are like nothing you’ve ever seen!

I can hardly even describe them other than to say they are a mixture of dreamy, creamy crystals and combined with sprinklings of colors that melt into a wonderful canvas of textured and variegated color.  Since these little jars have been in my possession I’ve tried them on quite a few surfaces and thought I would share three of those with you today…


My favorite powder is the Vintage Beeswax (I can’t even tell you how happy this one makes me :-)  (Use the link to take a peek and hover over picture for a close up).  I knew that I wanted to try the crackled glass technique that I honestly had not been able to do with plain embossing powder.   I stamped the vintage lady onto a piece of white pergamano (paper) that I had in my stash with Stazon Ink.  I ran my Versamark inkpad across the entire panel and then sprinkled on embossing powder and repeated the process 3 times.  Then I placed the panel in my freezer.  It immediately began to curl, twist and crackle right before my eyes – so exciting!

I went back to my studio to rub a Ranger Brushed Corduroy Inkpad across the surface.  Then I wiped it off with a baby wipe such that the ink settled down in the cracks.  It gave the vintage lady a worn and distressed look as if this card was unearthed from a long forgotten hope chest.  Finally before attaching to my card base, I ran a damp teabag across the front as well as the Graceful Damask Border to make the paper look aged.  This card was an absolute treat to make!!


My second favorite is an amazing powder called Chunky Rust (click on link to take a peek – hover over picture for close up).  Oh my, there are fibers in this one and they melt to make an amazing looking rust.  I took a wood element and inked it with my Versamark Pad. On my second pass I added touches of Patina Oxide to give the rust a little character.


Tied at second also is Patina Oxide (click on link to take a peek – hover over picture for close up :-)).  In my stash I have collected lots of chipboard elements.  They just don’t seem to come to life with plain paint.  Imagine my joy when I inked them with my Versamark Pad, sprinkled Patina Oxide and used the heat gun to emboss.  It was quick and fast!!  I simply added the chipboard piece as a frame and stamped one of my favorite Quietfire Design Sentiments – Give Thanks Set.  This was a quick and easy card and the chipboard element took the molten embossing powder very well.


It is safe to say that embossing powders are back!!  Keep a look out on Seth’s Blog all week to see who is using his powders and how – he describes the line up in this post —–> HERE!

WR-Supplies
StampsQuietfire Design – Give Thanks Set  
Paper:  Various
Ink:  Versamark
Accessories:  Baked Texture Embossing Powders by Seth Apter,  Amazing Paper Grace Dies by SpellbindersGraceful Damask Border, Lace – Michaels, Satin Ribbon, Recollections Pearls

post-header-bottom

Tomorrow, the Amazing Paper Grace Creative Team are sharing baskets (clever baskets) – you won’t want to miss them!! Thanks so much for stopping by!!

APG_signature

pinTHIS SHAREthis TWEETTHIS EMAILthis
  • Melissa BoveMarch 20, 2018 - 8:25 am

    Wow!! So pretty Becca! Those powders look fabulous! Love that Patina one especially!!ReplyCancel

  • LageneMarch 20, 2018 - 8:26 am

    Gorgeous creations, thanks for sharing this product!ReplyCancel

  • Christine SpringmanMarch 20, 2018 - 8:45 am

    These cards are stunning love what a little embossing powder can do to a card. Quinty girlReplyCancel

  • Kristine VencelMarch 20, 2018 - 9:02 am

    Hi Becca!
    I have been coveting these embossing powders ever since watching the CHA demos. Sigh. Haven’t been able to find them in this area though. The local store that I know would have carried them closed last year so I am in the lurch. I haven’t seen anyone advertise them in stock online, either. I only see bloggers using them. Soooooo, I am trying to be patient. Lol
    Thank you for sharing new ways to use them. ????ReplyCancel

  • Debi AdamsMarch 20, 2018 - 9:29 am

    Oh my gosh! You really took these to a new level Becca! And that Beeswax..ah!?? Love how well the embossing powders work with your classic, elegant style.ReplyCancel

  • Becky GreenMarch 20, 2018 - 9:40 am

    HOW GORGEOUS, BECCA! I think the embossing powders are making a come back too! LOL I saw on another blog, another type of embossing powder also….. They are doing things to the powders that are EXTRAORDINARILY BEAUTIFUL!!! ;) I LOOOVE the vintage touches you’ve given your cards with these powders! LOOOVE the vintage lady you’ve done! We NEED images like this out there…. Do tell where the stamp comes from???? If it is still available????ReplyCancel

  • DarleneMarch 20, 2018 - 10:09 am

    Seth & Emerald Creek are a match made in heaven. You have taken what they have done to a different place.ReplyCancel

  • Chelsesa JohnsonMarch 20, 2018 - 10:16 am

    You make everything beautiful, Becca. Even grungy stuff isn’t grungy when you use it. It’s beautiful!!
    (Did I read correctly that these are put in the freezer to activate the powder? “Then I placed the panel in my freezer.” That is so different. I saw further down you had heated with your heat tool, which is more traditional. So these powders work both ways?)ReplyCancel

  • Beverly JordanMarch 20, 2018 - 12:08 pm

    So elegant and beautifully done!! Have loved Seth’s stamps from previously so am not surprised that he has taken this a step further with the embossing powders!! They look remarkable and your use of them on the first Vintage lady card is amazing the crackle you got!! The Rust and Patina are so beautiful as well!! You always inspire us to try new things and this is wonderful with the embossing powders! So appreciate you sharing!ReplyCancel

  • Lisa HoelMarch 20, 2018 - 4:46 pm

    These powders are wonderful! I’m going to try the cracked glass technique – that’s a new one to me! =) thanks!!ReplyCancel

  • Gwen LMarch 20, 2018 - 4:55 pm

    Such gorgeous cards! I would never have thought to use the cracked glass technique with the Vintage Beeswax, but it turned out amazing! I’m totally trying that now!ReplyCancel

  • Nancy G.March 20, 2018 - 6:18 pm

    What beautiful work. Thanks for sharing your techniques with several of the powders.ReplyCancel

  • Terri WMarch 20, 2018 - 6:31 pm

    Those embossing powders look so intriguing! Thanks for sharing your projects with us Becca.ReplyCancel

  • Denise SpillaneMarch 20, 2018 - 11:27 pm

    Beautiful ideasReplyCancel

  • Pam TASMarch 21, 2018 - 4:24 am

    Love the chunky rust love embossing powders
    they are always a go to .
    Thank you Becca for sharing hugs Pam XXXReplyCancel

  • Crafty CruiserMarch 21, 2018 - 3:22 pm

    These projects are so beautiful. It’s been a long time since I used embossing powders but your great ideas have started me thinking!ReplyCancel

  • Donna CervantezMarch 21, 2018 - 4:06 pm

    Wow I love your cards and those embossing powders look awesomeReplyCancel

  • BenteMarch 22, 2018 - 3:43 am

    Beautiful cards, Becca :))
    And the powders look amazing!ReplyCancel

  • Sylvia/LittleTreasuresMarch 23, 2018 - 2:34 pm

    Loving all of you new designs. Can’t wait to try the new embossing powders..Awesome technique with the bees wax and I love the Vintage Lady stamp.ReplyCancel

  • SophiaMarch 31, 2018 - 8:57 pm

    Hi Becca – I love the vintage lady image. Which stamp is that?ReplyCancel

I N F O