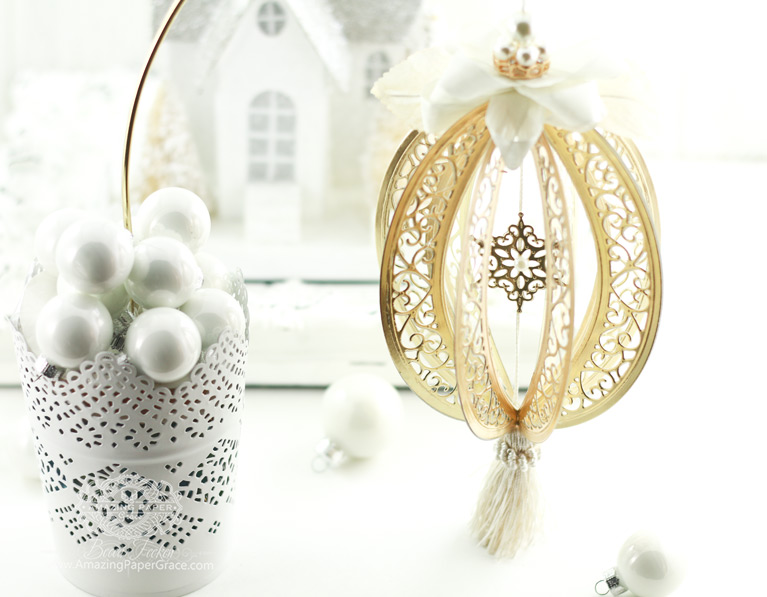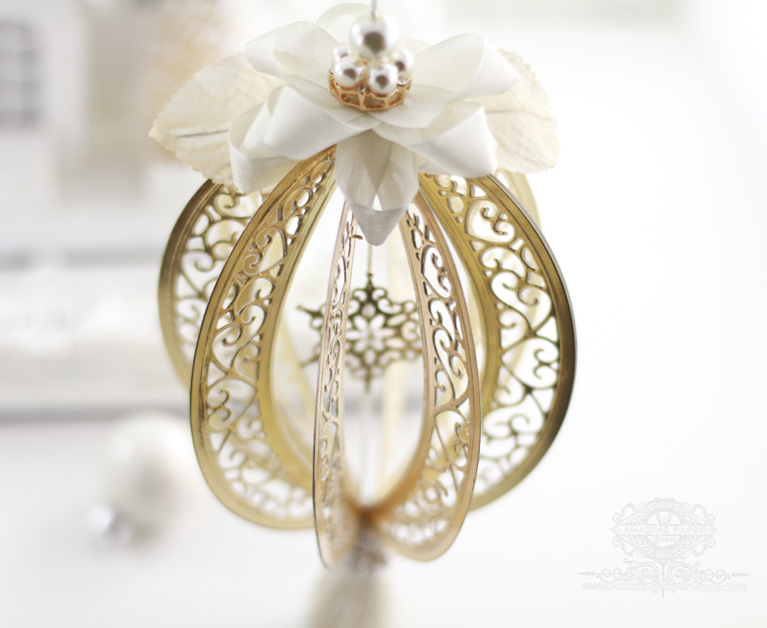
Die Cut Bella Rose Ornament by Becca Feeken using Spellbinders Bella Rose Lattice Layering Frame - see full supply list at www.amazingpapergrace.com/?p=33083
Good morning sweet friends!  Just in case you didn’t see this before, today I’m sharing the tutorial for the Bella Rose Die Cut Ornament on my blog – it was the first in the Die Cut Ornament series.  (I also have more Creative Team Inspiration with more cards made with the Chantilly Lace Collection.)  I posted this picture on Instagram and several of you have made similar ornaments – that simply makes my heart sing!   It’s an easy make with eight cuts of the Bella Rose Lattice Layering Frame – except this time I use the inner oval portion along with inserts from the Lunette Arched Borders set.  It certainly makes for a signature look ornament that people will notice.  One reader even said to hang it over the door with mistletoe for a kissing ball.  I love all the ideas that flooded in and I hope you’ll snag the info for a try next year or even this year as the icing on the cake.

Here are links to the other two Die Cut Ornaments I made this season:  Multiloop Tiered Bow Die Cut Ornament and Swirl Bliss Pocket Die, Die Cut Ornament.

Die Cut Bella Rose Ornament by Becca Feeken using Spellbinders Bella Rose Lattice Layering Frame - see full supply list at www.amazingpapergrace.com/?p=33083

How to Assemble Your Bella Rose Die Cut Ornament:
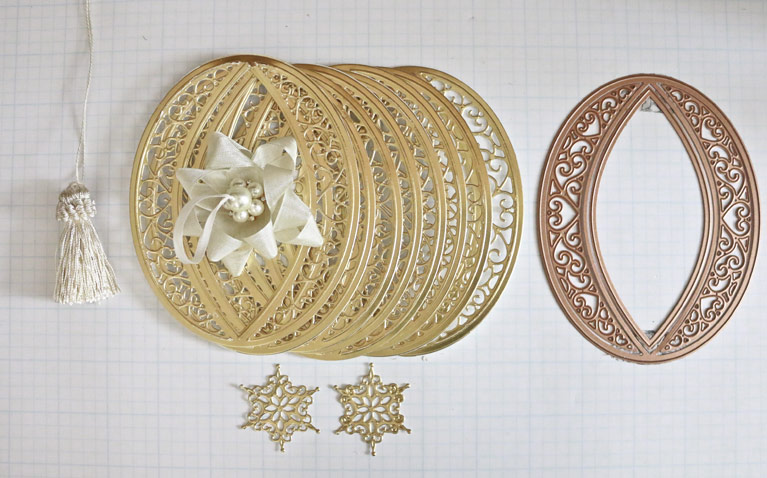
Die Cut Bella Rose Ornament by Becca Feeken using Spellbinders Bella Rose Lattice Layering Frame - see full supply list at www.amazingpapergrace.com/?p=33082
Gather a tassel, bow and embroidery thread.  Cut eight ovals with inserts from S6-129 Bella Rose Lattice Layering Frame.  I used the heart motifs from S5-330 Lunette Arched Borders for the insert on mine.   I also cut two small snowflakes from S3-302 Die D-Lite Snowflakes.

Die Cut Bella Rose Ornament by Becca Feeken using Spellbinders Bella Rose Lattice Layering Frame - see full supply list at www.amazingpapergrace.com/?p=33083
Using Glossy Accents, glue all eight folded elements together.  Do this by placing one folded element on table, glue exposed top and stack another element on top of glue.  Repeat until all eight pieces are finished.   Die Cut Bella Rose Ornament by Becca Feeken using Spellbinders Bella Rose Lattice Layering Frame - see full supply list at www.amazingpapergrace.com/?p=33083
Glue snowflakes back to back on thread with tassel and glue thread to edge of stack.

Die Cut Bella Rose Ornament by Becca Feeken using Spellbinders Bella Rose Lattice Layering Frame - see full supply list at www.amazingpapergrace.com/?p=33083
To finish, close the circle by putting glue on the last piece on top and gluing it to the first piece on the bottom of the stack.  Embellish by putting a button and bow on top.  Your ornament will lay flat for storage, as shown below.  If you want your ornament to retain a consistent shape, simply arrange the gores so that they are even and  add a dollop of hot glue at top of ornament.

WR-Supplies
Stamps:  None
Paper:  Gold Poster Board – Fine Touch – Hobby Lobby
Ink:  None
AccessoriesAmazing Paper Grace Dies S6-129 Bella Rose Lattice Layering FrameS5-330 Lunette Arched BordersS3-302 Die D-Lite SnowflakesMay Arts Silk Ribbon, Pearl Button,  PL-001 Platinum™  Die Cutting And Embossing Machine with 8.5″ PlatformT-001 Tool ‘N One™

Here is some sweet inspiration from the Creative Team to peruse as you sip your holiday hot chocolate or coffee :-)

Jo Ferriby

Jo Ferriby for www.amazingpapergrace.com

Joanna Krogulec

Joanna Krogulec for www.amazingpapergrace.comJoanna Krogulec for www.amazingpapergrace.comJoanna Krogulec for www.amazingpapergrace.com

Teresa Horner

Teresa Horner for www.amazingpapergrace.com
Melissa Bove
Melissa Bove for www.amazingpapergrace.comMelissa Bove for www.amazingpapergrace.com


pinTHIS SHAREthis TWEETTHIS EMAILthis
  • AletDecember 19, 2017 - 10:45 am

    Another beautiful ideaReplyCancel

  • Lynda Mellor aka Loopy Lynda U.KDecember 19, 2017 - 10:51 am

    Good morning Becca, absolutely stunning. I love it.
    Love the girls cards too!!!
    Have a good one!!!
    Loopy LyndaxxxReplyCancel

  • DevyDecember 19, 2017 - 11:04 am

    Such a beautiful ornament! And the inspiration from your team is absolutely stunning!ReplyCancel

  • Joanna DicksonDecember 19, 2017 - 11:19 am

    Another beautiful creation Becca. So very pretty.. wishing you a very merry Christmas. Sending love and best wishes to you all xxReplyCancel

  • Jennie BaileyDecember 19, 2017 - 11:27 am

    how lovely they all are.ReplyCancel

  • Karen KnegtenDecember 19, 2017 - 11:28 am

    Your creations are wonderful!ReplyCancel

  • Chelsea JohnsonDecember 19, 2017 - 11:44 am

    What a beautiful ornament, Becca. I sure have enjoyed your series of pretty ornaments for this season. And thank you to your Team who also have contributed some lovely work to your post today!ReplyCancel

  • Becky GreenDecember 19, 2017 - 4:23 pm

    GORGEOUS, BECCA!!!! I LOVE the little gold snowflake in the center too!!! This is SUCH A FABULOUS DIE SET that you’ve used!!! ;) Course, ALL of your dies are FABULOUS!!!!!!!!!!! LOL MERRY CHRISTMAS!!!!!!!!!!!!!!!!!! ;)ReplyCancel

  • KathymDecember 19, 2017 - 6:42 pm

    Beautiful, charming, and joyful!! I need to make these cards! Thank you!ReplyCancel

  • Marilyn in E~TownDecember 19, 2017 - 11:25 pm

    Beautiful cards. Such talent, I’m jealous, it’s so refreshing and relaxing to visit your blog Becca and see all the beauty, thanks for all the hard work ladies?ReplyCancel

  • Pam TASDecember 20, 2017 - 4:38 am

    Hello Becca I have not had time to make one of these
    ornaments but I am going to do some after Christmas I
    might then have them finished in time for next Christmas lol
    Merry Christmas to everyone Hugs PamXXXReplyCancel

  • Crafty CruiserDecember 20, 2017 - 1:24 pm

    Stunning ornament Becca and all the team projects are beautiful too.
    Happy Christmas everyone and a happy and healthy 2018
    Doreen RReplyCancel

  • Dorothy MutafopulosDecember 22, 2017 - 12:39 pm

    Love all the cards and the ornament is truly amazing!!! I guess I know what I am going to start in July since they say Christmas in July!!!
    Merry Christmas and a Happy New Year!! May God bless you!ReplyCancel

Swirl Bliss Die Cut Ornaments by Becca Feeken using Spellbinders Swirling Grace Pocket Die - see full supply list at www.amazingpapergrace.com/?p=33053Sweet friends, recently I did a series on Die Cut Ornaments and this is one of the three die cut ornaments made for the season.  It’s our family tradition to have a special ornament so I embellished this for one of my trees.  I used the Swirl Bliss Pocket Die to create the ornament.  These are all sentimental to me this year; I was creating them as I sat in the midst of memories.  December 4th would have been my 35th wedding anniversary and this is an activity that John and I relished.  It didn’t make me sad but I know he would be proud that I continue to create, especially on an occasion that would have previously really squeezed my heart.  Life is good like that!!

Swirl Bliss Die Cut Ornaments by Becca Feeken using Spellbinders Swirling Grace Pocket Die - see full supply list at www.amazingpapergrace.com/?p=33053These dies were not originally designated to make ornaments but I love designing something you can get a bonus use out of.  I have a tutorial of an unembellished version that I share below.  These can be decorated in so many ways – I chose to put a flameless candle inside and below I share an illuminated undecorated version so that you can clearly see the charm of the glow.

SSwirl Bliss Die Cut Ornaments by Becca Feeken using Spellbinders Swirling Grace Pocket Die - see full supply list at www.amazingpapergrace.com/?p=33053I could chat on forever but this is a Christmas Spirit thing – a joy for me to make.  I hope you’ll take a moment to scroll through the pictures.

Swirl Bliss Die Cut Ornaments by Becca Feeken using Spellbinders Swirling Grace Pocket Die - see full supply list at www.amazingpapergrace.com/?p=33053We are in the days where we take stock of the happenings of the past year.  I find myself pondering what actions I take to make the next year better.  I wanted to say that I so appreciate the readers that come here to Amazing Paper Grace.  I’m going into my 10th blogging year and would not have made it though my rough personal times without you.  Your collective voice has lifted me more than you know.  2017 was fraught with trials but I am walking with my head up and with a confidence that has been long in finding the right place in my life.  I hope the same is true for you :-)

Swirl Bliss Die Cut Ornaments by Becca Feeken using Spellbinders Swirling Grace Pocket Die - see full supply list at www.amazingpapergrace.com/?p=33053

How to Assemble your Die Cut Ornaments

Swirl Bliss Die Cut Ornaments by Becca Feeken using Spellbinders Swirling Grace Pocket Die - see full supply list at www.amazingpapergrace.com/?p=33053
Die cut the Swirl Bliss Pocket 8 times.  Flex all score lines on pockets.


Swirl Bliss Die Cut Ornaments by Becca Feeken using Spellbinders Swirling Grace Pocket Die - see full supply list at www.amazingpapergrace.com/?p=33053
Lay out pockets in pairs (4).
Swirl Bliss Die Cut Ornaments by Becca Feeken using Spellbinders Swirling Grace Pocket Die - see full supply list at www.amazingpapergrace.com/?p=33053
Cut 2 squares 2-1/4? x 2-1/4? and pierce each with a hole in the center.  Attach a loop from recycled ornament and an ornament hook to the center of each square.  (If you don’t have an old ornament, feel free to use thread or ribbon adhered to the square.)

Swirl Bliss Die Cut Ornaments by Becca Feeken using Spellbinders Swirling Grace Pocket Die - see full supply list at www.amazingpapergrace.com/?p=33053
For each pair of pockets, apply adhesive to the front side of one pocket along the bottom flap.  Then, adhere to other identical pocket in pair, keeping front sides together.

Swirl Bliss Die Cut Ornaments by Becca Feeken using Spellbinders Swirling Grace Pocket Die - see full supply list at www.amazingpapergrace.com/?p=33053
Trim seam on each joined pair to 1/4″.

Swirl Bliss Die Cut Ornaments by Becca Feeken using Spellbinders Swirling Grace Pocket Die - see full supply list at www.amazingpapergrace.com/?p=33053
Apply adhesive to side flaps of each pocket then adhere joined pairs to 2-1/4″ square by placing a seam on each corner.

Swirl Bliss Die Cut Ornaments by Becca Feeken using Spellbinders Swirling Grace Pocket Die - see full supply list at www.amazingpapergrace.com/?p=33053
Adhere 3 more pairs to the square bottom (inside) to construct the four sides.  I chose to add a large flameless candle to  the lantern  that was too large to go through the side (a small flameless votive would fit).  I left one end open so that I could get candle in place and glued closed.

WR-Supplies
Stamps:  None
Paper:  Neenah Class Crest – Natural White – 80lb smooth card stock
Ink:  None
Accessories:  Swirl Bliss Pocket, May Arts Silk Ribbon, Mulberry flowers,   Platinum™  Die Cutting And Embossing Machine with 8.5″ Platform, Tool ‘N One™

post-header-bottom

APG_signature

Thanks for peeking in today!  Sending Hugs!!

pinTHIS SHAREthis TWEETTHIS EMAILthis
  • Suzie WestDecember 16, 2017 - 5:15 pm

    Absolutely beautiful. Becca, you are sooooo creative!

    SuzieReplyCancel

  • Carole StrawnDecember 16, 2017 - 5:24 pm

    Your creativity always amazes me. I love the ornaments and how you repurposed dies to create them. I remember those first holidays after my husband passed away. He loved Christmas and I knew that he wouldn’t have wanted his death to ruin the holiday for me so I forced myself to decorate and celebrate. After that each year became easier. Even though I remarried ten years after his death, I still have ornaments on my tree that we bought together at Christmas shops while on vacation. Now they bring more smiles than tears. I am sending you wishes for a special and meaningful holiday season and a Merry Christmas.ReplyCancel

  • Claire HorvathDecember 16, 2017 - 5:24 pm

    Ooooh thanks so much! I have the Swirl Bliss Pocket and can’t wait to make this. Beautiful!ReplyCancel

  • Trish AveryDecember 16, 2017 - 5:26 pm

    Becca you are amazing. I have been scrolling through your site as I need a box for a wedding favour for my son. (who I never thought would get married) and this is just ideal. Thank you so much and while you had a bad year last year, mine has been this year. That is why we do so well in crafting we always have someone to lift us. thank you so very much Merry Christmas and your hubby would be so proud of you.xxReplyCancel

  • TheresaDecember 16, 2017 - 5:32 pm

    This is the cutest thing!!! I’d like to try making it with metallic or glitter paper for the holidays. It would make such a cute gift. What a great idea.ReplyCancel

  • SuzzieQDecember 16, 2017 - 5:50 pm

    I would have not thought to make a hanging ornament from a pocket die. I am so glad you are teaching me to “see”. What would I do without you inspiring me. Your ornament is lovely. It was sweet of you to share your precious memories with those of us that come to visit. Life moves on, but we often wonder: “What if?” I am proud of you making it through this year of “trials”. You should be pround of yourself. I knew you could do it!ReplyCancel

  • Jennie BaileyDecember 16, 2017 - 5:54 pm

    How beautiful and a great twist on one of your diesReplyCancel

  • RobiDecember 16, 2017 - 6:19 pm

    These are stunning! And so clever to use the pocket dies!!!ReplyCancel

  • BunnyDecember 16, 2017 - 6:46 pm

    Absolutely beautiful.ReplyCancel

  • christiDecember 16, 2017 - 7:04 pm

    I so enjoy your blog. you are a blessing to us as you share your talents. I hope you’re here for many more years. Merry Christmas.ReplyCancel

  • Dorothy MutafopulosDecember 16, 2017 - 7:11 pm

    Another beautiful ornament I could see this for wedding settings or even for a sweet sixteen! You are truly my inspiration!!
    Love you Becca !!ReplyCancel

  • jean marmoDecember 16, 2017 - 7:53 pm

    Wow!!!ReplyCancel

  • Christine BrownlowDecember 16, 2017 - 7:59 pm

    I remember the year you lost your beloved John. That was when I used to visit your blog first thing every morning.
    I remember when you made another beautiful box from a pocket die that I purchased as it was so beautiful .
    My blog used to be Themessycraftroom . In 2011 I got breast cancer and not long after I gave up blogging. I am still fighting that demon as it went into my spine. Crafting as kept me going all this time. I was so thrilled that I can now follow you on Facebook. Take care my beautiful friend.
    John would be so proud of all that you have achieved.
    Wishing you a very Merry Christmas. Love and crafty hugs
    Your work is always so stunning and inspiring . God Bless you. XxxReplyCancel

  • Christine SpringmanDecember 16, 2017 - 8:12 pm

    This is absolutely gorgeous, your work is beautiful I am great full that I found your web site your talent is truly amazing wishing you all the best in everything that you do. Quinty girlReplyCancel

  • Becky GreenDecember 16, 2017 - 8:54 pm

    HOW LOVELY, Becca! You make me look at my dies in such a different way!!! LOL IT’S GREAT! Now, I need to check out a die or two from my stash to see what I can make! ;) I also see your pink tree….. It’s LOVELY!!! And I am SHOCKED that it has been only 10 years, as I thought you’ve been blogging so much longer! You have come a LONG WAY in such a short amount of time, really! It’s your TALENT! ;) God is SO GOOD to heal with time, & gift us with talents that help to heal! I totally understand that!!! ;) BLESSINGS dear lady!!! I am SO GLAD I found you early on in your blogging! ;)ReplyCancel

  • Janice BrummettDecember 16, 2017 - 8:59 pm

    Beautiful ornament! I would never had thought to put the swirl pocket die into an ornament. You never cease to amaze me! Great design!ReplyCancel

  • Chelsea JohnsonDecember 16, 2017 - 9:54 pm

    Oh, my. That is just so clever!! I love these ornaments you are creating. It is wonderful to have other things to create with these dies, and ornaments are just the ticket. Thank you for sharing your great ideas!ReplyCancel

  • Carol H.December 16, 2017 - 10:19 pm

    What a beautiful ornament! Such beautiful memories too and isn’t it good to be in that place to be able to feel the sweetness. Many blessings to you this Christmas season! Hugs!ReplyCancel

  • Juanita BraunDecember 16, 2017 - 10:37 pm

    Wow! Beautiful ornament. I love the way you show us different ways to use our dies. I am wondering if this can be done with the Arched Elegance Pocket. Can you let me know.? Warmest wishes for a wonderful holiday and a very happy and healthy New Year.ReplyCancel

  • Beverly FuchsDecember 16, 2017 - 11:44 pm

    Hello Becca,

    What a beautiful ornament and another clever way to use your dies. I would have never thought to do that. Your work is always stunning and you are such an inspiration. Wishing you much happiness at Christmas and in the New Year.

    BeverlyReplyCancel

  • CarolDecember 17, 2017 - 2:11 am

    Becca, I am in total awe at your amazing creativity. This ornament/lantern is absolutely stunning. Thanx for including the directions for recreating this beautiful piece. Love your work.ReplyCancel

  • margaret driscoll UKDecember 17, 2017 - 2:27 am

    Hello Becca
    I have this Die but never thought to use it like you have today!
    So much inspiration thank you!
    Have a very Happy Christmas and a wonderful New Year.
    Love MargReplyCancel

  • MaryDecember 17, 2017 - 3:08 am

    And this is why you are Amazing Paper Grace :) Absolutely beautiful! xReplyCancel

  • Lynda Mellor aka Loopy Lynda UKDecember 17, 2017 - 3:20 am

    Good morning Becca, you never cease to amaze me!!!You always think outside the box, you always see something else!!! What a blessing.
    Have a good one!!!
    Have a very Merry Christmas and a Happy New Year!!!
    Loopy LyndaxxxReplyCancel

  • Pam TASDecember 17, 2017 - 3:47 am

    Becca so good to hear you are now in a good head space ready
    for the coming New Year hope it’s a good one for you and yours.
    You inspire so many of us not only with your makes but also your
    attitude on life and dealing with the downside of daily life .
    Your makes this year have so inspired me to use my dies in different
    ways to get the most out of them !
    I thank you for all you do and the work you put into it for everyone of us
    to learn and enjoy.
    John would be so proud but not surprised!!! Hugs much love Pam XXXReplyCancel

  • Crafty CruiserDecember 17, 2017 - 4:32 am

    Absolutely stunning! What more can I say?!
    Doreen RReplyCancel

  • Mary HaglerDecember 17, 2017 - 7:16 am

    Thank you for a beautiful idea…I have loved that die and now must try my hand at making this project… you are inspiring … hugs! ????????????ReplyCancel

  • LageneDecember 17, 2017 - 7:53 am

    GORGEOUS luminary ornaments!ReplyCancel

  • Sara AlfordDecember 17, 2017 - 8:57 am

    Becca, thank you for sharing this versatile die. But most of all, thank you for sharing your innermost thoughts from every chamber of your heart. You must know, that a lot of us out here in creative land are going through stressful times and your quiet messages of love can permeate the worst day. God bless you during this Christmas season and may you be surrounded by cherished friends and family. SaraReplyCancel

  • Dianne Schlegel aka the kardladyDecember 17, 2017 - 10:57 am

    How very creative Becca – your ornament is beautiful and I love the white on white effects! I’ve just order 4 new Becca dies from Spellbinder – a treat from me to me! A blessed Christmas is wished you and your dream team – you deserve every blessing you get! Hugs Dianne aka the kardladyReplyCancel

  • Janet IngrahamDecember 18, 2017 - 1:55 am

    Gorgeous lantern. Another possibility with that lovely dieReplyCancel

  • Marisela DelgadoDecember 18, 2017 - 4:52 pm

    So beautifulReplyCancel

  • […] Here are links to the other two Die Cut Ornaments I made this season:  Multiloop Tiered Bow Die Cut Ornament and Swirl Bliss Pocket Die, Die Cut Ornament. […]ReplyCancel

  • Joanna DicksonDecember 19, 2017 - 11:21 am

    Amazing. XxReplyCancel

Becca Feeken makes Die Cut Ornaments using Spellbinders Tiered Multiloop Bow Die - see step by step at www.amazingpapergrace.com/?p=33013
Good morning sweet friends!  Today I thought I would share some easy to make die cut ornaments using my Tiered Multiloop Bows Die, that I had not shared here yet.  I’ll actually be making a few of these this weekend – here’s why.  I have one tree decorated but in a quick stop yesterday, found real glass ornaments in the vintage colors that I am always looking for.   At the top of my favorite colors is a vintage pink that is a dusty rose – I look for it in paper, I look for it in ribbon, I look for it, but it is hard to find.  It was my luck to find (on clearance) the dusty rose and vintage tan – which is a creamy off white and a darker rose.  Here is a peek :-)
Becca Feeken - Tree #2 - www.amazingpapergrace.com/?p=33013
I know it’s crazy – less than two weeks until Christmas, but I’m going to rework my second tree.  The ornaments that I made with the Bow die – in these colors will actually fit.  At any rate, let me show you how easy these die cut ornaments are :-) Also stay tuned for Creative Team Inspiration!


Becca Feeken makes Die Cut Ornaments using Spellbinders Tiered Multiloop Bow Die - see step by step at www.amazingpapergrace.com/?p=33013
These die cut ornaments actually go together very quickly, if you are like me, it will take you longer to pick your embellishments.  Keep it simple and you’ll be able move though multiples quickly!

How to Assemble Your Simple Die Cut Ornaments:

Becca Feeken demonstrates constructing die cut ornaments using the Tiered Multiloop Bow Die - www.amazingpapergrace.com
Gather two brads.  Cut the largest Tiered Multiloop Piece with lattice inlay 4 times.  Use a large brad to secure four end loops.

Becca Feeken demonstrates constructing die cut ornaments using the Tiered Multiloop Bow Die - www.amazingpapergrace.com
Gather the loops on the other end by putting opposing ends over the tails of the brad – facing inward.  Spread the tails of the brad.


Becca Feeken demonstrates constructing die cut ornaments using the Tiered Multiloop Bow Die - www.amazingpapergrace.com
Here’s what your ornament will look like.


Becca Feeken demonstrates constructing die cut ornaments using the Tiered Multiloop Bow Die - www.amazingpapergrace.com
Embellish by adding two double loop bows, two flowers, a button with  ribbon looped through it along with a tassel.  Hot glue one bow to the top front about 1/4″ from the top.  Hide the knot of the bow by hot gluing a flower in front of it.   Mirror those embellishments on the back side.  Glue decorative button on top.  Glue tassel to the bottom.   It’s that easy.

Becca Feeken demonstrates constructing an ornament using the Tiered Multiloop Bow Die - www.amazingpapergrace.com

Although we are only using four pieces for our ornaments today, I wanted to show you that with the smaller piece, you can get a full globe using six pieces.  This will produce a smaller ornament! As a side note, it’s a great idea to hang a tassel or some beads on the bottom as they give the ornament stability and will make it hang straight on your tree.

Becca Feeken makes Die Cut Ornaments using Spellbinders Tiered Multiloop Bow Die - see step by step at www.amazingpapergrace.com/?p=33013
Here is some sweet inspiration from the Creative Team to tide you over!!

Have a peek at what Jo Ferriby did with Spellbinders Breanna’s Corset Die in her remarkable card – many more pictures on her blog so that you can examine closely.  Followed up by a pristine, sparkly card by Melissa Bove – it so reminds me of newly fallen snow!  She used  Annabelle’s Trousseau Layering Frame Medium Etched Dies.  And then I love the whimsy of a sweet box by Teresa Horner using Spellbinders Mini Card Booklet Gift Box Dies, Spellbinders Gossamer Knot Ensemble Dies, and Spellbinders Francesca Label Dies.

Jo Ferriby
Jo Ferriby for www.amazingpapergrace.com

Melissa Bove

Melissa Bove for www.amazingpapergrace.com

Teresa Horner

Teresa Horner for www.amazingpapergrace.com

Teresa Horner for www.amazingpapergrace.com

pinTHIS SHAREthis TWEETTHIS EMAILthis
  • ConniecrafterDecember 12, 2017 - 12:45 pm

    Gorgeous ornament!! I can’t wait to try it!ReplyCancel

  • Chelsea JohnsonDecember 12, 2017 - 1:06 pm

    Are you kidding me??? Becca. That ornament is wonderful!!!!!!!!!!! Why didn’t I think of that?!!! You are such a genius. Thank you so much for sharing this. I actually have that die and can’t wait to try making these ornaments. Thank you, dear one. You continue to bless and amaze me.
    Well done to the team, too. Thank you one and all for the inspiration.ReplyCancel

  • jean marmoDecember 12, 2017 - 1:09 pm

    Simply stunning!ReplyCancel

  • Crafty CruiserDecember 12, 2017 - 1:27 pm

    Truly stunning ornament. Great projects too from the design team.
    Doreen RReplyCancel

  • Christine HarropDecember 12, 2017 - 1:32 pm

    Oh wow Becca these tree baubles are absolutely delightful!! Such inspiration! Sorry I have been awol for so long but I have had some sad family times over the last months. Hopefully I can get back to some form of normality soon. Hugs Christine xxReplyCancel

  • Wanda BassDecember 12, 2017 - 1:41 pm

    Thank you Becca for showing us another way to use the bow die. How creative.
    So appreciate your inspiring ideas… and your team’s ideas!ReplyCancel

  • Claire HorvathDecember 12, 2017 - 2:17 pm

    Love that ornament! I would have never thought of that either and I love ornaments in general.ReplyCancel

  • KathymDecember 12, 2017 - 2:27 pm

    Super festive! All of the designs are little felt. I need to make each design. Thank you all!ReplyCancel

  • Becky GreenDecember 12, 2017 - 2:28 pm

    THANK YOU BECCA! I LOVE IT when you do tutorials! There is ALWAYS SOMETHING to learn! ;) Your ornaments looks WONDERFUL & I’m SURE your redoing your tree will pay off! ;) I LOVE the colors you’re always looking for too!! ;)(They USED TO BE quite popular colors!)ReplyCancel

  • Christine SpringmanDecember 12, 2017 - 2:38 pm

    The ornament is so elegant. The design team did a great job on their creations. Quinty girl.ReplyCancel

  • Pam TasDecember 12, 2017 - 3:22 pm

    Hi there thanks for sharing your ornaments and the
    teams makes ! its getting busy now not long to go …..
    Hugs Pam XReplyCancel

  • Noelene ApapDecember 12, 2017 - 3:44 pm

    Hi Becca,
    Oh you never cease to amaze me! Thanks so much for sharing this! I love the ornaments & always wondered what else we can do with this die!!!
    The work from the team is also beautiful!
    Have a lovely week!! Noelene xReplyCancel

  • Irene ClarkDecember 12, 2017 - 3:50 pm

    These are so stunning truly love them.
    The ornaments are gorgeous xxReplyCancel

  • JoannaDecember 12, 2017 - 4:00 pm

    Beautiful ornaments Becca! So clever.
    Loving Jo, Melissa and Teresa’s creations too:)
    JoannaReplyCancel

  • DianeDecember 12, 2017 - 4:25 pm

    FABULOUS – FABULOUS…..WHAT WOULD WE ALL DO WITHOUT YOU AND GIRLS ! THANKS SO MUCH FOR ALWAYS SHARING !
    MERRY CHRISTMAS AND A VERY PROSPEROUS 2018 YEAR ! !ReplyCancel

  • RobertaDecember 12, 2017 - 4:59 pm

    Beautiful ornaments Becca!ReplyCancel

  • Ava GavloskiDecember 12, 2017 - 6:57 pm

    BeautifulReplyCancel

  • Sandy ArtmanDecember 12, 2017 - 8:26 pm

    Hi, Becca,
    I just love handmade ornaments and you have created many beauties through the years and these are no exception. They are gorgeous! Thank you for always inviting us to see new possibilities.
    Love and blessings,
    SandyReplyCancel

  • Dorothy MutafopulosDecember 12, 2017 - 9:39 pm

    Wow!!! The ornaments are so beautiful!!! You always come out with such great ideas, love it !!!ReplyCancel

  • Sandra SmithDecember 13, 2017 - 1:17 am

    Love the lovely ornaments and all the gorgeous inspiration!ReplyCancel

  • Lynda Mellor aka Loopy Lynda UKDecember 13, 2017 - 2:04 am

    Good morning Becca, you never cease to amaze me!!!
    Have a good one!!
    Loopy LyndaxxxReplyCancel

  • SuzzieQDecember 13, 2017 - 8:03 am

    Becca, you are so clever to make these gorgeous Christmas ornaments. So happy for you to find these Christmas baubles in your most favorite colors. I am with you on these colors. Love, love, love them. Happy colors!ReplyCancel

  • Monika.BuzsyDecember 13, 2017 - 9:07 am

    Beautiful ornaments Becca. Such elegant look, especially with the gold. Lovely samples ladies!ReplyCancel

  • CaroleDecember 13, 2017 - 10:23 am

    I am in awe of your creativity. These ornaments are beautiful and amazingly simple to make.ReplyCancel

  • Denice with a "c"December 13, 2017 - 11:29 am

    These are just absolutely gorgeous , I can’t wait to try this out with my dies. thank you for another wonderful idea and great inspiration. God bless…Denice with a “c”ReplyCancel

  • Anita BraddockDecember 16, 2017 - 8:54 pm

    Awesome Ornament they are Absolutely Stunning I want this die and all your dies. Thanks for sharingReplyCancel

  • […] are links to the other two Die Cut Ornaments I made this season:  Multiloop Tiered Bow Die Cut Ornament and Swirl Bliss Pocket Die, Die Cut […]ReplyCancel

I N F O