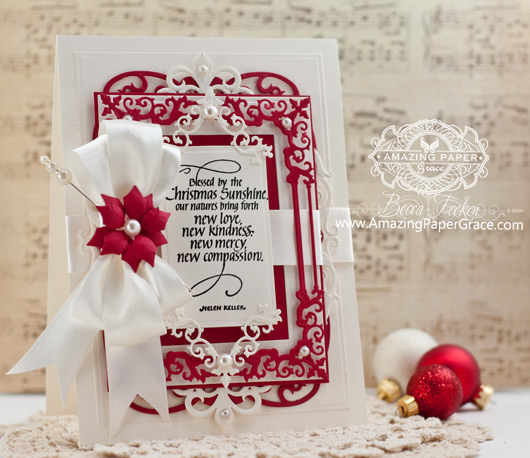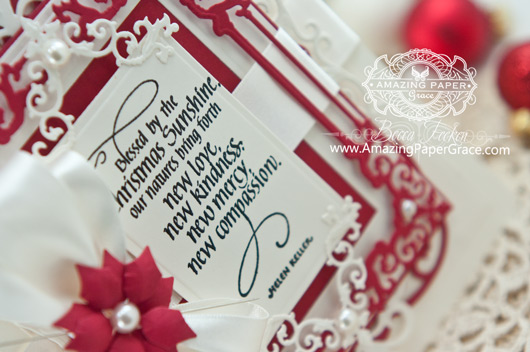
Hi there friends! Guess who is scrambling to finish up one or two more Christmas cards? That’s right, me! Talk about therapy – Christmas music and making cards! This week I received a new sentiment from Quietfire Design called Blessed by the Christmas Sunshine. Does anything sound more optimistic? It simply touched my heart. I paired it with the elegance of new Victorian Dies for a regal look.

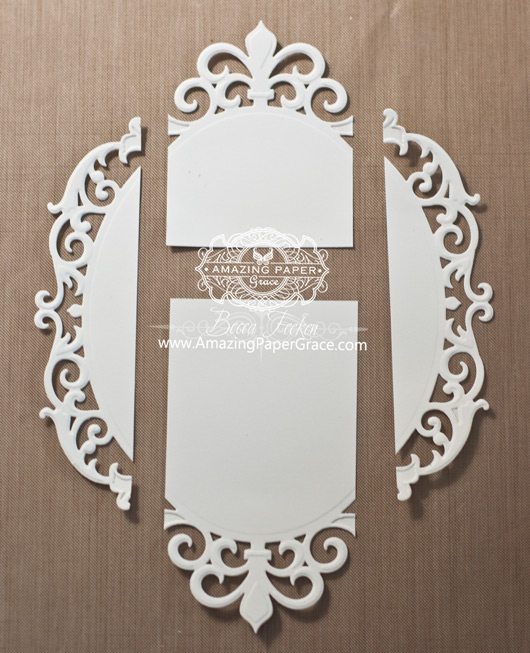
I stacked up several dies for the card including Spellbinders 5 x 7 Matting Basics A and Spellbinders A2 Matting Basics A with Spellbinders Labels 39 Decorative Accents, Spellbinders Fleur de Elegance, and Spellbinders Regal Frame. I got extra mileage by using Spellbinders Fleur de Elegance as a border, I simply snipped it into four pieces (see bel0w).
Here’s how I made it – step by step:
- Create a cream card base with cream cardstock that measures 5-1/2″ x 7-1/2″. (Card bases are made with two pieces of 5-1/2″ x 8-1/2″ paper scored and glued as in this Hinge Video.
- Cut/Emboss Spellbinders 5 x 7 Matting Basics A #7 from cream cardstock, adhere directly to card base. Band ribbon around these layers taping in front.
- Cut/Emboss Spellbinders Labels 39 Decorative Accents from red cardstock, adhere with one layer of foam tape
- Cut/Emboss Spellbinders Fleur de Elegance from cream cardstock. Slice off both sides then cut remaining piece in half (see below). Adhere to previous layer.
- Cut/Emboss Spellbinders A2 Matting Basics A #4 and #7 at the same time, from cream cardstock, creating a frame.
- Mat and adhere to red paper cut just a scan 1/8″ larger. Place a band of ribbon around these layers taping in back. Adhere to card base with one layer of foam tape.
- Cut/Emboss Spellbinders Regal Frame. Adhere to card base using two layers of foam tape in areas that will be hidden.
- Cut/Emboss A2 Matting Bascis A #3 from cream cardstock. Stamp sentiment. Adhere to card base with two layers of foam tape.
- Glue corner pieces from Regal Frame to the top and bottom of sentiment panel.
- Tie a bow and glue to left side of card.
- Cut/Emboss Spellbinders Layered Poinsettia smallest flower, twice. Burnish to plump and glue with leaves staggered. Adhere to bow and add pearl.
- Embellish with pearls.
| CRAFT SUPPLIES I USED |
| Stamps: Quietfire Design – Blessed by the Christmas Sunshine Craft Paper: Neenah Classic Crest – Natural White – Smooth, PTI – Pure Poppy Ink: Versafine Onyx Black and clear embossing powder Accessories: Spellbinders 5 x 7 Matting Basics A, Spellbinders A2 Matting Basics A, Spellbinders Labels 39 Decorative Accents, Spellbinders Fleur de Elegance, Spellbinders Regal Frame embossing folder, Paper Source Satin Ribbon, Recollection Pealrs, Corage Pin, Embossing Powder. |
Wishing you the best during this wonderful holiday season!
Question Parking Lot:


Hi Becca,
How gorgeous is this? Thank you for the detailed instructions, it will make it much easier to imitate this card. If you don’t post again before Christmas I wish you all the blessings of the festive season. Lpve and God Bless xx
Beautiful, lovely layering of the dies, love how the flower just pops from the bow and wonderful framing of the sentiment!
Becca!! What an incredibly lovely card.
I thank the Lord for you and your sweet skills!!
Judie
Your cards are simply gorgeous.
Hello Becca
Beautiful work and wonderful colours!
Have a lovely Christmas and a Happy New Year!
Love Marg
The red & white is stunning and the layering of the spellbinders is awesome.
Have a Merry Christmas. :)
Sublime – love it – I have just finished my last Christmas card so I’ll be having a little sort out and tidyup of the craft stuff and a put away before starting the next project – which is going to be one of your bracelets – really looking forward to having a go at those – Wishing you a very merry Christmas and thank you for all your wonderful blog posts in 2014 – it always make my day when a message lands in my In Box to say you have posted – you are really appreciated.
The way you slice up die cuts is so creative, Becca. And your cards are always gorgeous.
Absolutely GORGEOUS! I love all your layered framing!
What a fantastic card, Becca. I love the layers of elegance!! Everything you post is gorgeous and inspirational. Thank you so much for sharing your art with us!!
Oh my! The red & white … those gorgeous pearls … that lovely poinsettia … all the fabulous layers of die panels and that beautiful sentiment make for one STUNNING Christmas card, Becca! Wishing you & yours a love & laughter filled Christmas. XO
Gorgeous card!
Thanks for sharing. Wishing you and yours a wonderful Christmas
. God bless.
Absolutely stunning! I only wish I had a smidgen of the talent you display in making your wonderful cards…you are truly blessed. What is so wonderful is your total humility about your talent and your generosity in sharing it. May God truly bless you and yours this wonderful Christmas holiday as we share the celebration of our Lord’s birth.
Outstanding Becca! I love the way you put it all together! Many, many blessings to you and yours in this Christmas season!
Beautiful.
Beautiful Becca , just beautiful.
God Bless .
Elaine H X
Lovely card Becca with a beautiful sentiment,
XxxRuth
lovely card. Thanks for using the new stamps from Quietfire Design!
Yes! This is fantastic! Amazingly gorgeous card. Thanks so much for the cutting idea, too.
Suzanne does make gorgeous stamps!
Hi Becca, A truly elegant and beautiful card, the sentiment is gorgeous. I would give anything for some ‘Christmas Sunshine’ haha.
Lots of love from Patricia xx
Another stunning card. Now, why can’t we think to cut up some of the beautiful dies and make something elegant? You are so talented.
Love the way you cut one piece to make individual embellishments. Great detailed instructions.
What a beautiful card! Thanks for showing how to cut apart one die cut to make 4 pieces. that makes me looks at others in a different way.
Another SPECTACULAR card from you Becca!!
Elegant and totally Beautiful!!
Thank you for sharing!
Have a WONDERFUL Christmas with your family and friends, and a New Year full of inspiration!
I love this card!
Oh my Becca this is sooo beautiful as ever and absolut awesome work as always too. And just the right colors too for a true christmascard. Your work is just as always simply stunning and sooo well made sweeet lady.
I hope, you´ll have a wonderful christmas with your great family around.
This is so beautiful Becca, love the colour combo too, so rich. Just beautiful.
May I wish you and your family a Very Merry Christmas and a Happy New Year.
Love & Hugs
Jacquie J xxx
Beautiful card as usual and the instructions on are very helpful too! Just wondering in step 2 you taped the ribbon in the front and in step six you taped the ribbon in the back. Is there a reason for this? You seem to share so many tricks of the trade that most of us don’t think about and they all work. Thanks for the inspiration and have a Wonderful Christmas!
So beautiful! You are such a master artist and your cards teach some of us less creative want-to-be artists wonderful techniques and how to make some beautiful cards also.
Such a beautiful card
Hi Becca. A beautiful card with a lovely sentiment : ) Wishing you a very Merry Christmas and a Happy New Year. Thank you for all of the wonderful cards that you hae shared with us this year : ) Take care.
Hi Becca
Yet another stunning creation the red & white theme looks very festive, thank you for your clear instructions – have a great Christmas x x x
Dear Becca,
I have loved reading your blog over the past year, and look forward to each new addition.
Wishing you all the best for Christmas and the New Year
Fond regards
Jeanne
So bold – and so incredibly beautiful! You wow us all the time!
Hugs
Anne (UK) x
Such a beautiful card today and the sentiment says it all, thank you so much for always being so kind to us with everything you do.
Stay safe, healthy and happy everyone, hugs June Smith xxx
Beautiful! Thank you for all your time sharing with us all. I love your blog and wish you and your loved ones a wonderful holy season and a safe New Year! Love, Shirley