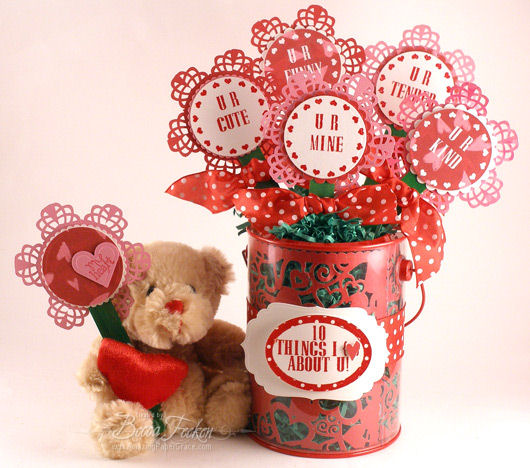
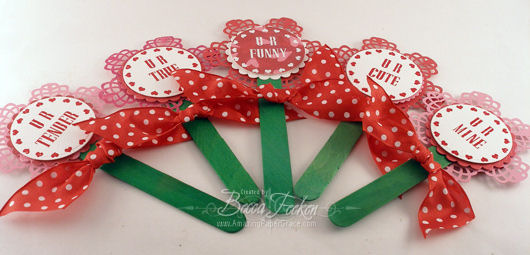
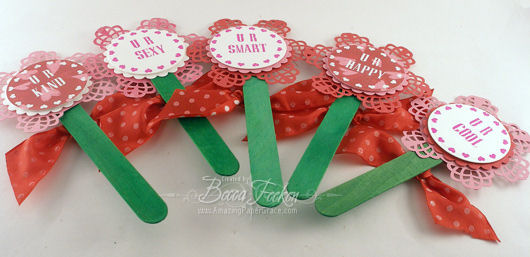
Are you ready for Valentines Day? It seems like it was just New Years and lo and behold a shocking look at the calender made me spring into action so that my sweetie will have a little surprise waiting for him on Valentines Day. This is a flower bouquet very similar to a cookie bouquet he sent me one year. The bouquet is made of 5 flowers and on each side of the flower I’ve stamped the reasons I love him so much. Below you can see both sides of the flowers. First the front side:
Then the flip side:
I’ll take you through the process of how I created them. You will see that the flowers were made with a corner punch (are you surpised?) and the technique that I’ve used here is the same that I used on this Valentines Day Card HERE, it just looks different because of the way the punch was used. I call this technique "Corner Punching an Interior Frame."
| JustRite Brayton Font | Ribbon | Scissors |
| Harmony Classic Circle Stamper II Ensemble | Design Paper | Glue Dots |
| Harmony Classic Oval Stamper II Ensemble | Assorted Cardstock | Popsicle Sticks |
| Spellbinders Classic Ovals Large | Versamark | Filler Grass |
| Spellbinders Classic Scalloped Circles Large | Embossing Powders | Clear Paint Can |
| Spellbinders Standard Circles Large |
EK Success Punch | Pop Dots |
| Spellbinders Labels Four | Small Heart Punch |
Okay, here we go. . .
For each frilly flower I stamped two sentiments using my JustRite Harmony Classic Round Stamper III with the heart border and the Brayton Font to make up the words of my choice. Once stamped, I embossed each with embossing powder then cut/emboss each sentiment with my Spellbinders Standard Circle – the circle I used here is 2 3/8" in diameter. I made a total of 10 sentiments for 5 flowers.
Next I cut a piece of cardstock 5 ½" x 5½" and cut a circle in the center with my Spellbinders Standard Circle measuring 1 7/8". I needed 5 of these for my frilly flowers used an EK Success Corner Punch to cut the frills border from the interior circle.

First I inserted the punch flip side so I could see the bottom and punched once. (See below)
For the next punch, to get my orientation, I inserted it with the punch right side up and next to the hole that I just punched. (See below) 
Then I flipped the punch and cardstock over so that I could again see the bottom side of the punch, aligned according to the first punch adusting spacing as necessary. (See below)

Then I completed the second punch. (See below). Continue this around the circle until there is no more room to insert another set of two punches. (A word to the wise – practice first on plain paper to get the feel of how much spacing you will need. I after a trial, I am able to judge it by sight – you will be able to also!)

Once you’ve completed punching around the circle, there are several clips that need to be made to free your frilly flower. Start by clipping at the tip of each petal. (See below)

Next, clip at the base of each petal. (See below)

Your frilly flower or your border is now free. (See below) I was able to do this process with each of my corner punches and the each make a fabulous and unique looking frame.

Now it is time to assemble each flower. I cut/embossed scalloped circles for layering from my Spellbinders Scalloped Circles Large. The scallped circle I used was 2 5/8"

Add pop dots and glue dots as shown below. Keep the center of your scalloped circle clear as the popsicle stick needs to fit.

Stack the elements in a sandwich beginning with your first sentiment. Add Scalloped Circle. Add popsicle stick. Add Frilly Flower. Add Scalloped Circle. Add second sentiment. Finish by adding a piece of ribbon tied in a knot and secured onto stick with a glue dot. (See below)

Here is the finished flower. (See below)

To pull the bouquet together I used a clear paint can, some filler grass and floral foam. (See below) I filled the can with the filler grass almost to the top, then arranged the flowers in the floral foam then put the arrangement in the can and disguised it with the grass.

The final touch for my arrangement was a label for my can stamped with "10 Thing I {Heart} About U" using the Brayton Font and my Harmony Classic Oval Stamper II. I picked the dotted frame which matched the ribbon I was using. I stamped and embossed this in red to match the embossing from the flowers. The sentiment was then cut out with my Spellbinders Classic Oval Large, using the second largest oval, then mounted on a Spellbinders Labels Four die cut.

Check the the picture at the beginning of my post for final presentation. It was truly a fun project and I hope you liked seeing how to make a new type of frame.


What a great project, Becca! TFS the picture tutorial!
Becca,
Ok, that was the most awesome idea! You never cease to amaze me! You have so much natural talent to come up with these original ideas. I shall declare that you must be the queen of paper crafting! Don’t ever quit, you make my day to be able to see your creations on your blog!
Hugs,
Lisa Atha
You AMAZE me – you are so very creative and your creations are always so awe-inspiring! I didn’t want to say “awesome” even though they are, I want you to know when I see your work, I am truely in awe of what you are able to create. Thank you so very much for sharing your ideas, creations and tutorials with us – you are one of a kind – thanks!
Those are wonderful, Becca. I think I need to put corner punches on my wish list!
Love this Becca! I’ve always been a big collector of punches, but only had 2 corner punches. So I MUST go shopping for more – LOL. You have me hooked.
Thanks
Elaine Allen
Amazing, Becca!
Adorable creation!! Thank you so much for sharing
OMG, Becca, this is soooo amazing! You are just soooo talented! I love this idea and you bet I will make something like this. Thank you so much for sharing all your beautiful creativity with us!
hey Becca!
where do you get these ideas?
do you wake up in the middle of the night thinking about a project?
hahaaaaaaaahaaaaaaaa
wow!
You are my favorite blogger…
cute,cute,cute!!!
**Milu**
U GO GIRL!
Becca your blog always leaves me smiling and awed at your talent and imagination. I look forward to your daily posts.
You have the most awesome, creative ideas!! What a cute project. Thanks for yet another way to use corner punches, and thanks for taking the time to share your ideas with all of us.
Wow! I would never have thought you made those with punches! I thought you had used a die cut machine. Simply gorgeous! Thank you so much for showing us how you do this.
((hugs)) Mechelle
These are great. Stampin up doesn’t have corner punches, so will have to wait to go out of town to get some. I have one rather plain one that I will practice on. I did do a square frame for my husband’s valentine/anniversary card. I framed Corinthians verses from our wedding. I must say, thanks to your inspiration and direction, it looks wonderful. I cannot wait to give it to him. Won’t you be my neighbor?
Way too cute! A fabulous bouquet!
I just found your web-site. I feel that all your creations are so beautiful because they are reflecting your love for God and others. How generous must be your heart and love for your husband, what an incredible effort, he is truly blessed.
Becca, I ditto everything that was said before!!!!! You never cease to amaze me. Thank you so very much for sharing your talent.
Sabrina
What a brilliant idea!! Have a fabulous weekend.
This is why you have a kajillion hits…..you never cease to amaze us with your creativity.
Awesome!
Becca, you make it look so easy…very cute
Becca,
What a GREAT idea!
Can’t thank you enough for
sharing your creativity with all of us.
Have a wonderful weekend my friend.
~~Diane~~
Wow! You think outside the box and inside the circle and so many ways that my mind just does not go! Amazing! Thank you for teaching this old dog new tricks!
Wow…this is so creative and amazing! Thanks for sharing!
What a creative idea! Thank you for the tutorial.
Genius.
Fabulous! Now you need to make one that says U R AMAZING and that’s just for you.
FANTASTIC!!!!!
What an amazingly creative mind you have, so many wonderful and unusual ideas in there.
Becca these are so fun, you go girl.
I have that corner punch, but NEVER would I have thought to use it that way. You are just the best. I am delighted to have had a friend tell me about your blog. Now it’s my fave!
OH!! Becca I had to write, I was so impressed. Then I went to your Gallery of cards, and thought I had died and gone to Heaven. I am 86, and I have Ovarian Cancer, in remission for 4 months now. And the joy of card making fills my heart, so I forget the cancer. If there was a Dying Wish Elderly program, my dying wish would be to spend a day with Becca. God Bless You, Muriel
Dear Becca,
I am not the first, nor will I be the last to compliment you on making wonderful use of your God given talents and sharing them with all of us. Thank you so much!
Annie
Fantastic!! What a creative bouquet!! Love it!!
Oh how fun!! That is awesome.
What could I possibly add to all the previous comments? Your God given talents are truly amazing. How many times do you remake a project before you get it the way that your truly are happy with it? Also, did I miss something? How did you get the paper liner for the can? Was that a purchased piece or did you create that yourself?Thank you for continuing to share such unique creations.
Becca, You are amazing…you have the most creative mind! I can’t wait to see what new and incredibly awesome project you’ve come up with each day! Thank you for sharing your gift! Becky
Becca, Becca, Becca– you never cease to amaze me with all the fabulous things you can do with punches! OH MY GOSH! This is too cute for words! I am in awe!
You have the best ideas ever!!! Amazing project!!! LOVE IT, LOVE IT, LOVE IT!!! Thanks for sharing!
You are amazing! Your work is exquisite!! You are really one of a kind, a paper genius!!! What more can I say!?!
Love your work!
Pat
This is wonderful Becca! The tutorial was awesome. I am going to have to try this.
Wow….the punch queen strikes again!!! The corner punch people should be paying you to come up with this stuff because every time you show us one of these AMAZING techniques, I just want to run out and buy as many corner punches as possible!! Your flower should say U R AMAZING!
Hugs!
Becca,
This is the first time I’ve spent time on your blog, and all I can say is–Beautiful! Everything is beautiful! You are truly blessed with a creative gift. I will be returning many times I’m sure!
Wow! I’m always learning so many new things when I visit your blog! Thank you so much for your creativity and willingness to share! You are truly amazing!
Hugs :D
I love the corner punch circle designs….what a great tutorial you put together for us!
Thanks so much!
You are just too clever. How did you think this one up? Amazing. Love it.
Becca strikes again! I have to ditto all the love you have received previous to my post. Amazing…just amazing! Thank you once again for sharing!
F A N T A S T I C
Love the tutorial. Thankyou so much for sharing.
I’m going to have to use a jaw-lifting device every time I read your blog! Mine keeps hitting the floor every time you post a new project! LOL I’m always amazed with the ideas you come up with! Your creativity level is somewhere in outter space and your talent never ceases to amaze me. This project is an outstanding display of creativity!! Awesome Becca!!!
I just can’t get over your creativity, these are just too cute!
Becca that is amazing! I am so in awe of all of your creations! Thank you so much for the tutorial! I love that you are so giving and share all of your projects with us to create!
Hugs~ Kim
Wow, another incredible creation! You are soooo creative!! TFS
Oh, WOW! The pic at the top caught my eye, but your tutorial was amazing! I never would have thought to use a punch that way. Thanks for sharing!
Good evening, Becca- a great project and a great tutorial. I’m just home from holiday and I’ve had a wonderful time browsing and checking out the fabulous projects and tutorials you’ve produced while I’ve been away. I have not commented on each individual project but I would like to say that they are all superb, as usual, of course.
Omigosh! AWESOME! Boy, if you lived closer I’d ask if you’d take a commission to make me one, LOL – TFS!
You continuously amaze me!
I love it, Becca. Just way too cute and cleaver :)
WOW! You continuously amaze with what you can do with paper…and corner punches! You area the corner punch queen. I’m still looking at mine, shaking my head and smiling that you came up with that gorgeous circle! :)
You blow my mind! Seriously, Becca!!!! Your mind is truly gifted!!! AMAZING project!! Seriously gorgeous!!!!!!
WOW! You realy do come up with the most brilliant ideas! I am going to have to give this one a try.
You are brilliant with your creative corner punches woman!!!! Love your ideas here. Thanks for your endless inspiration! A huge fan, America
Oh Becca – these are just way too cute!!! You are one clever girl!!!
Girl, what you do with a paper punch is so-o-o creative! I’ll bet the people who make them love you. The demand for one you’ve used has to go through the roof. I know I want one of everything you’ve used. Thank you for sharing your marvelous creativity and talent with us! your flowers are the cutest! You truly are a blessing to us all!
You and Paper Punches are an awesome team. I love paper punches too and really admire all your ideas and creations. Thanks for sharing and making all the steps so simple to understand.
Keep up the great work! I can not wait to see what you come up with next.
Totally cool, Becca!!!
Your creativity is amazing!!
Wowsers, Becca!!! That is SO very creative. I wish my mind worked like that!
HI Becca,
I just stumbled across your site. Your flowers are fantastic. I thnk I have to put your site on my favorite toolbar. Thank you for sharing your wonderful work .
Bless you,
debby
Thanks Becca,
I don’t know if my request was the one that triggered your response but I want to thank you for sharing your tutorial with this corner punch. Your artwork is wonderful.
Judy
wouldn’t anyone’s sweetie love to get a bouquet like that? so cute!! great to see the tutorial….i have wondered how to get that look with a punch. now i’ll have to try it out for myself!
thanks for showing us….sandyh
sandyha@comcast.net