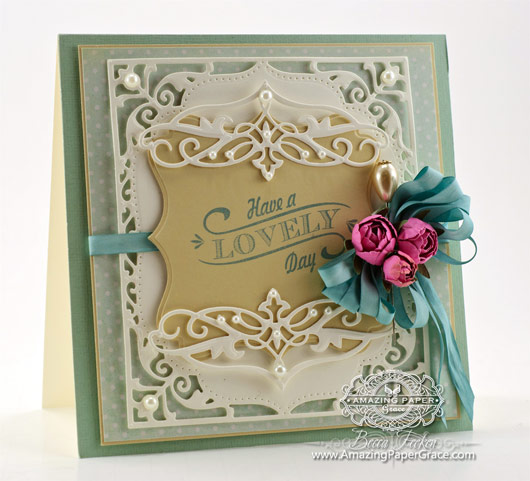
Hi there blog friends! Today I’m joining in on the JustRite Papercraft December new release Blog Hop. I’m kind of excited because today they are showing one of my new dies and one of my new stamps sets. My first card uses a nice flourish die called Heirloom Flourish Die One that I designed and JustRite Papercraft is now carrying. This is a small single die and it’s nice on your wallet too . . . I used it to embellish other dies in my stash for a ‘new look’ – you know what I mean :-) It adds such an elegant touch to the clean classic Spellbinders Elegant Labels Four Spellbinders Labels Sixteen and Spellbinders Rose Creations I used in my card.
Here’s your Step By Step Recap of die cuts and layers, from the bottom up: Start out with a Green Card Base 6″ tall by 6″ wide, foam tape, kraft matting layer cut to design paper matting layer cut to 5-3/4″ x 5-3/4″, design paper layer cut to 5-5/8″ x 5-5/8″, foam tape, die cut layers using Elegant Labels Four (cut a sliver out of middle to make panel 5-1/4″ tall). foam tape, die cut layer using Labels Sixteen, die cut layer using labels Heirloom Flourish Die One. The three buds are made using Rose Creations. As always, cut everything first then stack. Position ribbon, pearls and bow on correct layer, admire, then glue!
| CRAFT SUPPLIES I USED |
| Rubber Stamps: JustRite Papercraft – Birthday Vintage Labels Four Craft Paper: Neenah Classic Crest Natural White 80lb Cardstock, Bazzill, My Minds Eye Ink: Amuse – Eucalyptus Accessories: Heirloom Flourish Die One, Spellbinders Elegant Labels Four, Spellbinders Labels Sixteen, Spellbinders Rose Creations, Recollection Pearls, May Arts Silk Ribbon, Grand Calibur Die Cut Machine |

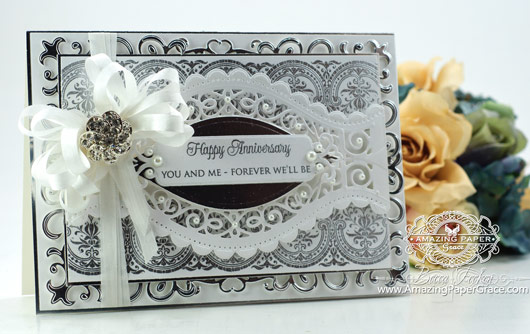
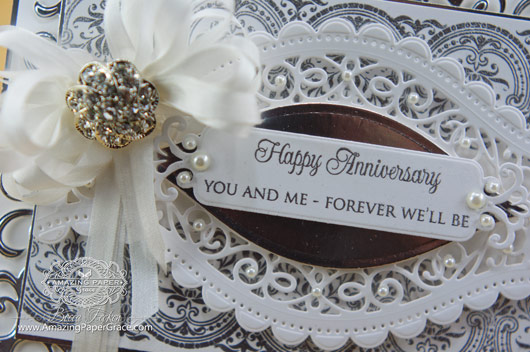
For my second card I’m using Elegant Celebrations, it has a lovely border and wide one and two liner sentiments that fit in several dies as well as across the bottom of your card. So many people ask me to point out samples they can use for Anniversary Cards – it’s the most requested card by my readers, so I created this set. My 31st wedding anniversary would have been the day before yesterday so while I was making the sample I sure thought of what sweet things I could say. I hope you’ll enjoy – you’d be pressed to find these sweet sentiments elsewhere – you can preview the new sets HERE. For this card I reached for Spellbinders Curved Borders Two, Spellbinders Corner Flourish and Spellbinders Fancy Framed Tags One.

Here’s your Step By Step Recap of die cuts and layers, from the bottom up: Start out with a Card Base 7″ wide by 5″ tall, foam tape, white layer cut to 4-7/8″ tall by 6-7/8″ wide, foam tape, adhere four Corner Flourishes on the back of the next layer and piece heart from flourish in the gap in the center, silver layer cut to 4-1/8″ tall by 6-1/8″ wide, stamped layer cut to 4″ tall by 6″ wide, foam tape, die cut layer made by cutting decorative edge of Curved Borders twice, foam tape, die cut layer made by cutting clean edge of Curved Borders twice, foam tape, die cut layer using Fancy Framed Tags One. As always, cut everything first, then stack. Position ribbon, pearls, button and bow on correct layer, admire, then glue!
| CRAFT SUPPLIES I USED |
| Rubber Stamps: JustRite Papercraft – Elegant Celebrations Craft Paper: Neenah Classic Crest Solar White 80lb Cardstock, DCWV Silver Foil Ink: Versamark and Silver Embossing Powder Accessories: Spellbinders Curved Borders Two, Spellbinders Corner Flourish, Spellbinders Fancy Framed Tags One, Recollection Pearls, May Arts Silk Ribbon, Button, Grand Calibur Die Cut Machine |
For more inspiration using these new sets, the designers have worked up stunning samples; be sure to pop in and see what they made :-)
JustRite Inspiration • Becca Feeken • Debbie Olson • Marisa Job • Eva Dobilas • Kristi Schurr • Heidi Blankenship • Darsie Bruno • Sheri Holt • Michele Kovack • Kazan Clark • Angela Barkhouse

Save 30-50% off the Entire Christmas Stamp Collection while supplies last.
Hugs to you all, I have the most wonderful readers and love reading your comments with hints of what’s going on in your life. No worries if you are quiet here, I adore you no matter what and appreciate that you stop by in the midst of your busy day. Always grateful…


Always sooo enjoy seeing your creations, Becca. Love all the layering & die use, but mostly how you choose to use your dies in more unconventional ways than they were intended. Thank you so much! These are
beautiful!
Hi Becca. Wow. These two are scrumptious.Just love the colours and layout.
Such talent. Hugs Jan. In a cold and miserable U.K.
ABSOLUTELY GORGEOUS BECCA!!!!!!!!!!!!!:) LOOOOOOOOOOOOVE ALL THOSE SWIRLY DIES & SWEET SENTIMENTS!!!!!!!!!!!:) ANNNNND, YOUR PROFESSIONAL TOUCH!!!!!!!!!!!!:) sigh! :)
Really beautiful, pink flowers add a nice touch!
such pretty swirls and colors in your first card and the second is so elegant, just love the way you used the curved border dies to frame the sentiment!!
Beautiful cards as always Becca. I always admire your layering and your love of pearls and bows.
LOL Eileen UK
I love your card, and your new die cut. I just ordered it, so can’t wait to begin. Thank you for all the wonderful ideas you share!
Love the cards… the first one is like a burst of fresh air and the second one is so elegant. Can’t wait to check out your new dies at JustRite…
YOU MAKE EVERYTHING BEAUTIFUL! Thanks for sharing. GOD BLESS.
Wow! Your new die is spectacular! I love your cards too (I always do)!
Hello Becca!
I hope all is well with you and yours !
I have just managed to track down an advanced order of your Die ..my sons are buying me lots of crafty goodies for Christmas..I think I will tell them soon lol!
You always manage to make me look through my stash… which is good!… I think I forget some of the older Dies, but its nice when you take a different slant on things, and show them in a different light.
Your cards are always so beautiful Becca!
LoveMarg
Oh my goodness Beecca, both cads here today are soooooo beautiful. You just never disappoint, but deliver something really gorgeous. And these are truely amazing project both of them. I absolutely love both cards here.
Love your new die – thinks that’s a must buy! great cards as usual – really lovely. Hvae just finished decorating my first MDF bird house for a local comp – have really enjoyed doing it – nice to do something completely different. Still got 2 special C Cards to do but the others are all done now – just got to write them and post them. Thanks for sharing and inspiring.
2 beautiful cards, thank you for your inspiration
Gorgeous cards, I love the silver frame on the second one!
Two cards!! What a treat! They are both gorgeous, I just love all the layers and the creative use of the dies. Wonderful!!! Thanks, Becca! You are amazing!!
Hi Becca,
Beautiful cards – you’ve done it again. And it also answers my question about the size of the heirloom flourish – it will look good wherever you put it. I shall have to add this to my collection.
Have a lovely Sunday
Hugs, Rose
Have to have that die!!!!!!!!!!!! Awesome cards but then WHO is surprised with Becca, not me!!!! I am always so excited when I see you have a new product you designed.
Hugs,
Mstgane
Ann
Both creations are lovely! Thank you, for inspiring us!
I have had no luck finding the stamp on the link you provided for the first card, the “Have a lovely day” one. Am I looking in the wrong place? Regardless, the cards are beautiful!
These two cards rendered me speechless. You’re just amazing with your brilliant ideas, Becca.
Becca once more you astonish me with the level of your creativity. You are amazing. Once more you have ‘enabled’ a few more must haves for my stash :) thanks for sharing
How fabulous.
I think your second card appeals to me a little more, but both are beautiful.
I love both these cards, as always sooo inspiring.
Linda F asked about the stamp, I have just purchased this stamp set call “Birthday vintage labels four” clear stamp set. So beautiful. I only hope that I can make cards slightly as good as you Becca. Hugs from down under.
Lorraine
Hi Becca. I love both of the cards and the sentiments are so sweet. The “Have a lovely day” one is going to become a firm favourite I think. Take care.
Your ability to produce such beautiful cards on such a regular basis is a testament to your creative flair and talent. You truly are amazing!
Hugs
Anne (UK) x
Oh Becca is there no end to your talent. I love both cards and the soft green colour on the first card is gorgeous. I saw your new dies in an internet shop the other day and I didn’t quite understand how they worked but now I have seen them “in action” I realise how useful and versatile they are not to mention how pretty too. I am collecting your dies slowly and will add to this to my ever growing wish list along with the rose die. Thank you for your inspiration. xx
Hi Becca
Im sending big hugs straight back to you , And a big thank you for your beautiful cards and inspiration,
Todays cards are as beautiful as ever i like them both equally,
God Bless
Elaine H X
two great cards ,Laura O
I love the dramatic ! The anniversary card here is just that; and I guess its really bold contrasting colors that grab my attention first off. You have certainly entered and are camping in your perfect domain of creativity with dies and bows and new ideas. We all love these cards and all your effort in presenting new creations week in an week out. Have a wonderful Christmas Season Becca!
So pretty Becca!
Becca, this is lovely! I especially like the way that you used curved borders two–so creative, must try that!
Just gorgeous, Becca, I love the color combo.
A lovely card to wish a lovely day, and such an elegant wedding card! Inspiration abounds here, Becca!
Many thanks to Lorraine Gould for providing the name of the stamp set!! I love it’s sweet simplicity and the actual greeting is so different to what is usually seen around. fantastic!!
beautiful layering techniques in both cards. And I really love the silver and white palette in the second.
Absolutely wonderful!!!! Especially the first one – gorgeous!!!
Hi, Becca. I just received Radiant Rectangles and Enhancing Elements Rectangles One. I was wondering if there was anywhere on your site where you show combinations of dies to layer. I know I can pore over every Crafts I Used section of your entry, but thought I could ask if there is a faster way to find out what layers well together. I know that I can cut a sample of every rectangle die I own and play with layering, but then I don’t know what to add to fill in the gaps. Is my question clear? Am I making any sense?
Your crafty friend,
kReN
Your work is stunning!