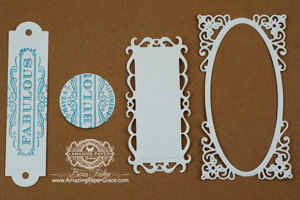
Sweet blog friends, would you be surprised if I had a little Becca Bit to share today? We’ll I do :-) It’s just a little tip that I’d love to pass on about stacking dies together to get the shape that you want. I loved the shape of the sentiment in this new set called Birthday Wishes to You from Justrite Papercrafts and looked for just the right shape to stamp it on. Not finding what I wanted, I created my own shape and I’ll show you the step by step at the bottom of my post.
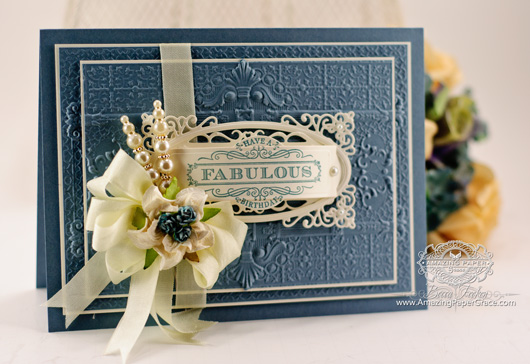
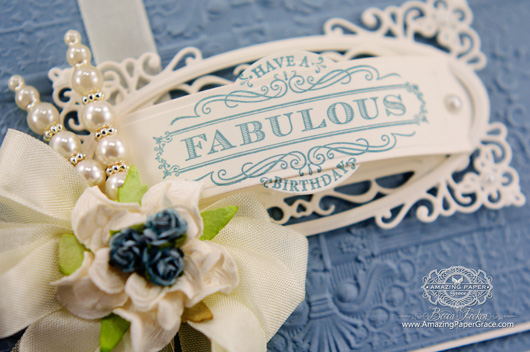
In the meantime, I was in the mood for a textured card so I reached for Spellbinders Persian Splendor and created a card that let most of that wonderful background show. The focal point is the sentiment which is made up of Spellbinders Resplendent Rectangles, Spellbinders Radiant Rectangles, Spellbinders Back to Basics Tags and Spellbinders Standard Circles LG.
Here’s your Step By Step recap of die cuts and layers, from the bottom up: Start out with a Card Base – 5-3/4″ x 7-3/4″, foam tape, mat layer in cream cut to 5-1/8″ x 7-1/8″, blue layer embossed with Persian Splendor cut to 5″ x 7″, foam tape, mat layer in cream cut to 4-1/2″ x 6-1/2“, blue layer embossed with Persian Splendor cut to 4-3/8″ x 6-3/8″, foam tape, die cut layer using Radiant Rectangles, die cut layer using Resplendent Rectangles, die cut layer using Standard Circles LG, die cut layer using Back to Basic Tags.
So here is little tip and card making idea – take a look at your dies carefully because you can combine them to make the shape you want. I’m not a good fussy cutter and for this sentiment I wanted it to be small enough to see the decorative die layered behind and I wanted to accentuate the round. So I found a long die to accommodate the length and a round die to accommodate the height and I did some test stamping and my first choice worked out. I picked some other pretty dies that were slightly incrementally larger and would stack up well. Starting on the left from smallest to largest I made sure that when I stacked them it would allow the pretty parts of the dies behind to show. Here’s how I layered things up!

Start out with four die cuts. Stamp sentiment on both circle and long tag

Stack tag on top of circle.
Secure with your glue runner.

Stack tag and circle on top of
Replendent Rectangle

Stack grouping on top of
Radiant Rectangle

Tuck round end of tag inside of oval
so that it gives you an arched, dimensional sentiment!
| CRAFT SUPPLIES I USED |
| Rubber Stamps: Justrite Papercrafts – Birthday Wishes to You Craft Paper: Neenah Classic Crest – Natural White, EKSuccess Sea Spray (retired) Ink: Amuse Studio – Eucalyptus Accessories: Spellbinders Persian Splendor, Spellbinders Resplendent Rectangles, Spellbinders Radiant Rectangles, Spellbinders Back to Basics Tags, Spellbinders Standard Circles LG, Seam Binding, Recollection Pearls, Mulberry Flowers, Becca’s Peg Bow Maker, Grand Calibur Die Cut Machine |
Happy Friday to you all!! I hope you have a wonderful weekend planned. Not sure what I’ll be doing but I know that whatever it is, it will be outdoors (grin). See you soon!!


Gorgeous Birthday card, and I love how you stacked the sentiment.
fantastic thanks for sharing Melanie UK
Thanks for the tip… can’t wait to try it on my next card… And I really like how you did the embossing on the two layers and how they match up… another good idea to try out !! Thank You, Thank You, Thank you !!!
Love this, thanks so much for the tip, My spellbinders collection is quite small but this tip will enable me to do so much more. Thank you!
Another stunner here again Becca. I really don´t think, you´ll ever be out for answwers to anything do you? it´s awesome and I absolutely love this card here too. So beautiful work again.
Have a wonderful week-end ahead hun.
What a great tip! Becca, you are definitely “amazing!”
Hugs,
Mstgane
Ann
Just beautiful,! love love love this! Hugs
Thank you for tutorial. I love it!
Your card is gorgeous and I wondered how you stamped the sentiment without a ‘ghost space’ on the underlying circle portion. Your solution is so simple! If I’d thought of it I’d probably pooh-pooh the notion figuring I’d never get it lined up correctly! Does diecutting the circle make it easier and more accurate than punching a circle? Anyway, as always, your ingenuity and design sense are greatly appreciated.
You ‘see’ things that most of us do not… your right half of your brain is so advanced… your creativity is marvelous! Two questions: where do you buy the Neenah Classic Crest and what weight is it? I’d love to try it–read a lot about it but unsure of the weight… thanks
Fabulous card and a great tip about stamping the sentiment and layering the tag!
SOOO GORGEOUS!!!!!!!! ANYONE receiving this Birthday Card will feel SOOO SPECIAL!!!!!!! :)
Hi Becca,
I love the card, as usual! I have been trying to look at my spellbinders dies to see how I can use them in different ways (like using only portions f them). I would never have thought of something like this, though. Ingenious! Thanks you also for laying out the pieces of the label because it makes it so much easier to understand how you did it. I am amazed at the things to see when you look at these items. Thanks for the ideas.
Hi Becca
Just love this card, and how you ‘ think out of the box’! Do you have a tutorial on THINKING OUT OF THE BOX ? If only…………… thanks again for sharing.
Regards
Margaret (Scotland)
Becca, I just gasp with amazement every time I open your blog and see your beautiful creations. You are so talented. Thanks for sharing your gorgeous work with us.
I love how you demonstrate on how to use the different dies together to make a beautiful new creation! Your card is beautiful Becca.
Ter ;)
Lovely Becca. I just bought SB’s Resplendent Rectangles. I now have inspiration to create this card with it. TSS
Enjoy Your Day!????
Sensational design! Thank you, for the see and do tutorial. I am going to create this card. Blessings!
Some serious and ingenious stacking going on there! Brilliant idea and fabulous card.
Hugs
Anne (UK) x
Wonderful directions to a beautiful card. I noticed a lot of your cards are now 7 1/2 inches x 5 3/4. Do you have special envelopes to mail these in or do you use clear plastic boxes to mail them? I can see hand delivering some but this is an odd sized card for any envelope I have currently. Thanks for your advice.
Everyone else sees it and I have to add my two cents worth on the subject… You are amazing! How you see these “stacks” of die cuts in your head and then put them on paper is beyond me. I have to copy you because I just don’t see them the way you do… and I don’t think I am alone! Do you keep samples of die cuts around and just play with them ’til something clicks?
How fabulous to see how you stacked all of those elements!! Beautiful card!!
Greatcard & good directions. Thank for the idea to put dies together & showingf us how to put them together. Have a great weekend.
Such a lovely card!! Thank you for the “Becca Tip”. Very helpful!
Becca, I love the way you showed in each picture how to put it together,
I hope you will do this more often with your beautiful cards,
This helps a lot, I look forewards to your blog each day, Keep up the good work! Thank you SO Much.
TFS, you are always coming up with the most ingenious ideas for using those wonder Spellbinders dies. This one would be good for a “man card.”
Thanks so much for sharing. It’s sometimes difficult for me to think out of the box, but you have that down packed!! What a great tip, now I will be looking at my Spellbinders in a new light! I have many dies and your tip has inspired me to pull them all out and play. Thanks again!!!
WOW, what a stunning card! Thank you so for the tutorial!
Very pretty sentiment. Makes me want to get all those dies. :)
That is such a beautiful card Becca. I love the combination of stacked dies, I’ve done something like this with Elegant Lables 4 and Timeless Rectangles.
The more I see that Persian Splendor folder, the more I feel I “need” it.
It’s just so beautiful.
Have a great weekend.
Hugs, Rose
Love it – soo effective – thinking about it, often we use lots of layers in the base etc.. yet the sentiment is on a single layer and can be quite plain – can’t call this sentiment plain though! must try this idea – thanks.
Good morning Becca from “across the pond”. Such a clever idea and so effective. The card is just beautiful and I love it! – you always start my day off right. Thanks for sharing this tip with us. Enjoy your day.
What a fabulous card!! I just love it. The colour combination is great and I like your tip for layering, so clever. Hope your day is warmer than it is here in the UK!!
You are so clever Becca, thinking outside – and inside – the box. This is beautiful!
Becca, you are the Queen of Spellbinders dies! I just love how you pair so many different designs. It helps me get so much more millage out of all the dies that I own. Sending hugs, Diana
BTW/ this EF Persian Splendor is soooo beautiful in person. I am finding myself reaching for it more and more…and I make 5 1/2 x 4 1/4 cards.
I love your card today Becca, the tutorial is very helpful thank you. I adore all your embellishments, you have a very pretty way of putting them all together.
Kind regards :-)
Tina X
Good Morning Becca!
Love the tutorial …….you are so clever to think that way when designing your card!
Thank you, I will use that tip in my crafting!
Lovely card as always!
LoveMarg
Morning Becca, ‘Fabulous’ is definitely the right word !! This card is fabulous, and the tip for the stamping and layering is genius, they work so well together, and beautiful bow and flowers. Fabulous !!
Lots of love from Patricia xx
Another inspiring creation ,i love it all and thank you for the tip ,i will certainly be trying it
Elaine H X
Oh Becca- thank you thank you…. you are indeed AMAZING…… You always come up with really interesting tips. Your card is gorgeous and the step by step is so obvious now you’ve shared it with us – the finished effect has in effect ‘created’ a new die shape.
Enjoy your weekend.
Hugs
Heather (UK)
x
Hi Becca. Another stunning card, and in my favourite colour too : ) Have a good weekend. Take care.
A stunning card Becca lovely colour combo Lynda xx
love this card, the blue and cream together is gorgeous
Gorgeous work, Becca! Can you tell me which photo-editing program you use? Thanks!
Hi Clare, you asked what photoediting software I use….I use photoshop and on occasion I use Photoshop Elements. Both work just as well :-)
Love all the dimension your brought to the sentiment tag and the pins and flower/bow are arranged so pretty
Your card is just Fabulous and so is the tip !!
What a great idea! I’m just getting into embossing and everytime I see one of your cards I want to buy the folders or dies. Your cards are amazing! Thanks for sharing.
Great tip and as always beautiful card.
Thanks for another fabulous card, Becca. This is just beautiful! And thank you also for the tips on combining dies! I found that very helpful and know I will try it out in the near future!
Becca, you rule the land of fancy cards. Gorgeous. Thanks so much for the layering tip.
wow ,would never have seen 4 dies in this tag but its fantastic.love the card .Laura O
Beautiful card Becca, thank you for showing us how you layered the tag.
Becca your cards are fantastic .
Just full of class……
What a great Becca bit. Thanks so much for sharing your wonderful ideas and your talents Becca.
You come up with the most wonderful ideas! Thank-you for sharing them with us.
Thank you from the bottom of my heart for showing exactly how you stacked things!!!!! That was a huge eye opener for me! Thank you Becca for all your fabulous ideas and designs!!! I love them!
Hi Becca,
Absolutely gorgeous card. Love everything about it.
Much love,
Shirley T. (U.K.) xxx
So creative! How DO you think of all this, Becca?
Becca, I have followed you for several years now in awe of your stacks and finally figured out a way to actually be able to create my own. I finally learned for me that when I get a new set of dies I cut out each shape and keep them with the die set. That way when I am trying to mix and match the sets to get the perfect combination I can actually see what they will look like together and that the size is correct. It has been working nicely for me, but my eye is not always as clever as yours and I still love to recreate your stacks as well. I love all spellbinder dies and am a huge fan of JR stamps as well. They mix and match so pleasingly together. As I not only make cards, but have been doing alot of mini albums lately, I also find that the Spellbinder dies often work beautifully in them as well. Thank you dear friend for taking the guess work out of so many gorgeous designs and always providing us with step by step tutorials and product listings. You share so much with us and we really do appreciate your creativity and talents.
Marcie
Wow! Pretty fabulous how you made your focal point stack!! Love it and thanks for sharing your lovely talent with us.
Lovely and so easy ! I might even give this one a try!
Fantastic!!! I love it when I get to follow along on your photo tutorial. It makes is so much easier!!! Thanks for sharing. Hugs Linda
Love it! Thanks so much for the tutorial Becca xxx
ThAnk you for your clear instructions. I especially like the step building illustrations they really help to understand how it all goes together.
Kind wishes from Scotland , enjoy the sun shine.