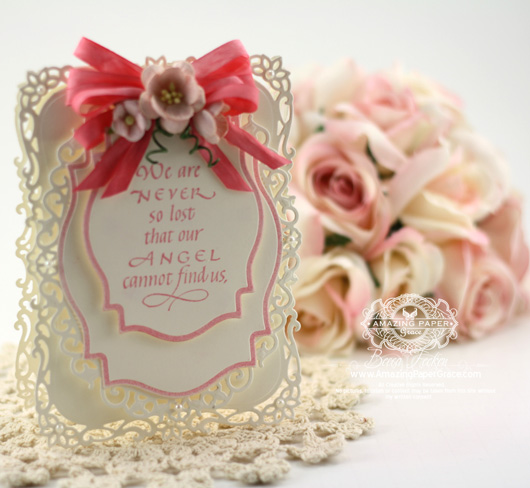
Hello there my crafty friends. I’m busy behind the scenes with CHA samples and some catalog samples so although I’ve been creative, I haven’t had anything to show for it. That’s okay though, because I made something from the left overs :-) Seriously, I started my last creative session by cutting everything in sight, just in case I might need it. Cut, cut, cut . . . toss, toss, toss . . . but never into the garbage. I toss all those extras into a bin and the bin lives in a cubby near my feet. I had to be on hold with my insurance company today and while I waited, I played with the leftovers. It’s rare that I can say I made a 20 minute card, and kept my patience intact. I feel so blessed with the latter of the two — all in all, I’ll have to say it was a good day :-)
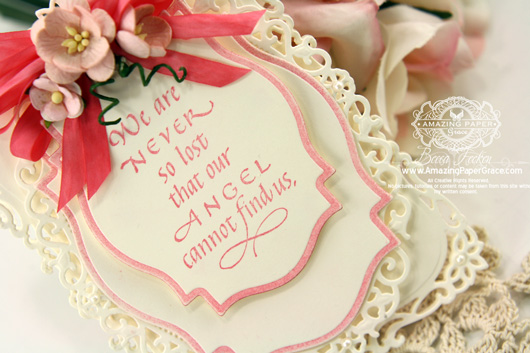
Yes, simple – really! Actually, I didn’t even need a paper cutter because the card is all die templates. Using Spellbinders Decorative Labels Eight I cut a card base using the technique I show in this video —–> HERE. My focal template begins with Spellbinders Floral Ovals and ends with Spellbinders Labels Eighteen. I used a sweet sentiment from Quietfire Design called We Are Never So Lost.
To recap the layers I used from the bottom up, I started with a Decorative Labels Eight card base 4″ x 5-1/2″, foam tape, die cut layer from Floral Ovals, die cut layer from Labels Eighteen, foam tape, another die cut layer from Labels Eighteen. See what I mean? This one will go into my quick card idea file for the next time I’m empty handed and need a quick card.
| SUPPLIES I USED |
| Stamps: Quietfire Design – We Are Never So Lost Paper: Neenah Classic Crest Smooth Natural White 80 lb paper Ink: Amuse – Grapefruit Accessories: Spellbinders Decorative Labels Eight, Spellbinders Floral Ovals , Spellbinders Labels Eighteen, May Arts Silk Ribbon, Mulberry flowers, Recollections Pearls, Becca’s Bow Maker |
Thank you so much for stopping by friends!! Hope you’re off to a spectacular summer!


Oh, Becca! What a delightful surprise! Thank you so much for using the rubber stamp to make such a beautiful card! You made excellent use of your “on hold” time. When they came back on the line, did you remember who you were talking to? ;-)
Gorgeous card! I love all the lacy layers!
Oh my to be so creative while on hold. \(oo)/
Now please tell me, how did you edge the labels with pink so perfectly?
exquisite
Very, very pretty! Love the layers.
Beautiful card; and I LOVE the sentiment.
I love that you keep all the extras and use them. By sharing this beautiful card, you again inspire us to use our extras to create. Thank you for the continued sharing of your creative gifts.
So pretty as always! And just how did you do that perfect pink edging on the label dies? Thanks for sharing with us :)
FABULOUS BECCA!!!!!!! :) YOU ALWAYS ARE!!!!!!!!!! ;)
Beautiful! How did you make that perfect lining around the layers? I do so wish you could make a DVD to sell to us who live in the boonies and download time is sooooo slow. I get maybe 4 or 5 words and then wait 5 minutes for the next 4 or 5, lol, gets exasperating. You could sell them to all us who have sloooowww download.
I love your style and all of your work. Been a fan for a long time!
very pretty! tfs
Love it! Although a simple design, it sure doesn’t give that impression. The use of the SB dies and the QUALITY supplies always makes such a big difference. I’m so design lifting this one for that next time I’m stumped for a quick card. You’re blog has saved me many times when I needed a nice card. Thanks again Becca for another great idea. Here’s to loving what you do! You rock
Your card is so beautiful. How and what did you use to go around the edges of the dies. It is so neat.
Thanks, Juanita from Rockville.
WOW….Love, love and love it. This has got to be my ultimate FAVE. I love how you offset the labels with the sentiment on top. Brilliant! The ribbon color is fabulous. I love May Arts ribbon. The flowers match perfectly and I love the green curls. That little bit of green is awesome! The pearl placement is perfect too! I love that spellbinders die. I wish, I wish. Clicking my heels together. Thank you so much for sharing! Love it.
Beaufiful card as always Becca do you use Neena 80 on everything? I have a hard time getting the fancy dies to cut good Any suggestions Thanks Blessings Linda
Beautiful card, Becca. I love all the die cuts. so elegant. Can you tell me how you got the pink edged around the die cuts? It adds just the perfect touch .
Beautiful, as always! I so appreciate you sharing your takent!
Wonderful”quick” card.
thanks for using the Quietfire Stamp.
So elegant!
I watched your technique again and have to try this. You make it look so easy in your video. I just love you showing us your little “trade” secrets!!! LOL! Yes, very easy but absolutely elegant!! Love the quietfire verse.
Hugs,
Mstgane
Ann
Wish my scraps were as good as yours! :)
I wish my scraps turned out this gorgeous too! :)
Love all your creations Becca, and thanks for the tutorial. I have tried the tutorial but it it leaves a line where it’s doubled, I have the big shot what ‘sandwich’ do you recommend?
Cheers
Sue
Gorgeous!!!! So lacy and elegant! This is a card that will work for many occasions, and I thank you for sharing it so we may all put this idea into play when we run out of ideas for a quick beautiful card. Thank you, Becca!
I wish my simple cards turned out this beautiful.
Really lovely – how do you get the edged pink and so perfect? please tell – it looks sooo effective.
Sooo beautiful as always Becca. It´s always such a pleasure to watch your stunning creations, as you can always get something beautiful out of anything, so even the smallest leftover will turn into beauty somehow, and I just love to see that. Can´t wait to see all your grogeous CHA project sometime soon.
Have a wonderful day and time ahead, and take care.
Such a beautiful card! I would also like to ask how you got that perfect pink edging?
What beautiful card! How could you get such a perfect rim around your diecuts? Love to follow your blog!
Just sooooo beautiful!
Hugs
Anne (UK) x
Morning Becca, Such a stunning, really easy card, but so elegant, I love it.
Lots of love from Patricia xx
Ok, for the perfect pink edge, my idea is that she must have traced around the “inside” of the die and cut that out and used it as a masking piece…any other ideas? By the way Becca, I get so much enjoyment from your cards. I just wait for them each day.
I heard/read that you use ink on the edge before you cut it. I tried it once. Must not have had the right ink. I really could use that technique a lot with the difference in die sizes. I’ve been cutting the same die and then cutting it in half and spreading it apart to just barely show the edge. It’s not perfect, but the best way I know.
Becca just love love this card, but could you please explain how you got the perfect pink around the outside. But love it.
hugs Trish.
Its just so lovely. Such a easy card so easy on the eye
very pretty, love all of the dies that you put together
We are all enthralled with this card not just because it is beautiful but all of us caught the pink edging which makes the whole card pop! We have tried cutting out the original ivory then cut one whole die with pink paper, but your ivory part, if trimmed, is so perfect. How’d ya do it???? See we’re all sitting on the edge of our seats…..
AMAZING. I DO THIS SOMETIMES WHEN I CUT OUT TO SEE WHAT IT LOOKS LIKE. iT ALL PILES UP ON THE DESK . SO USE THEM UP AND SOME OF MY BEST CARDS ARE MADE THIS WAY, LOL
Oh that is BEAUTIFUL!!!!
I wish I had your talent but I don’t. Thanks for sharing with us and instructions on how you make everything look the way it does. God bless.
This is gorgeous and just to think it was therapy! I laughed when I read it was stuff you had already cut out on hand “just in case” because it is so beautiful that only you could come up with this!! I love the saying.
Very nice. I wonder if you ink up the cutting side of the die the die before cutting out the card you would get that perfect edge? Would need to use something sticky like pigment ink?
Becky this is a great video and a beautiful card. Can you please tell me what scoreboard you are using in this video.
Again. . . beautiful!! Thank you for sharing! My first thought was – how in the world did she do those fabulous pink edges on the dies??
ohhhhhhhhhhhhhhhhhhhhhhhhhhhhhhhhhhhh myyyyyyy gosh……LOVEEEEE!! So beautiful and simple….but looks like you spent a lot of time with it, I love now simple, elegant and gorgeous, you inspire me…you are the reason I own over 100 spellbinders sets and my wish list is at 140 new die sets and counting…..now if I just had the money…they need to put production on hold so I can catch up….lmbo!!! If I ever win the lottery…..I’d have to get a bigger craft space….LOL ty so much for sharing with us Becca, your “amaZING”
Beautiful card! Love your colors.
I love this card. It is just the size I usually make my cards. It is beautiful and graceful just like you!
Well JO JO you must have the right answer!! I tried inking the edge of the die before cutting and “YEA!” it worked. Looks great and I learned something new.
Kay and JoJo
If you ink the edge of the die before cutting how do you know how far to go in with the ink so it is where it belongs?
Juanita from Rockville
Thanks for the video, Now I understand.
This must have taken a long time to film but it is wonderful watching you work. Thank you so much!
fantastico
Oh my! What a beautiful card! I really like the layering, the delicateness, your bow of course, the sentiment and it’s white and pink – always a winner in my book.
You are so clever…and this card is so gorgeous. It looks anything but easy to make!
I love your tutorials! They are always easy to understand and informative.Thank you for sharing all of your wonderful ideas. You inspire me.
Karen
So lusciously beautiful, as always. You are truly an inspiration to all of us. Go bless you!
Lovely card. Thanks for the inspiration!
~Shawnie B.
Thank you for the perfect inked border video. That is a great technique.
Linda
your work inspires me so much …thank you for sharing what you do with me as I have been stamping for a bit but need all the help i can get with instruction etc ….can’t wait to see what you show us next …love your blog !