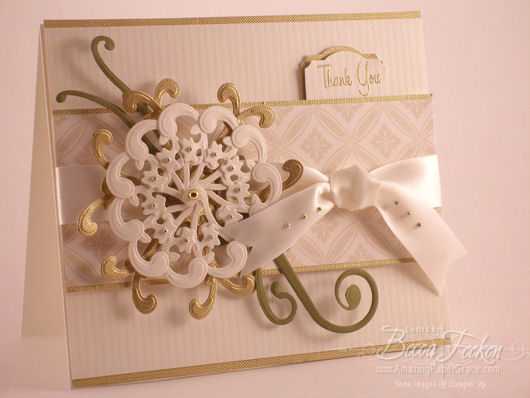
I received quite a few requests to show you how I made the flower HERE. You were also curious about which Spellbinder die I used. The die is called Floral Accents and can be seen HERE; it is one of the new dies being shown this week at CHA and at last report they will be available some time in March. So as promised, today I’m back with a very quick tutorial to show you how I made the Spellbinder Filigree Flower. The most perceptive of you will notice that I used the exact same materials as I used for the last card. I intended to publish this the other night and hit a roadblock after I got the flower done. I put it down and in a matter of an hour or so, created the I Am The Way card. When I sat back down with this a day later everything clicked.
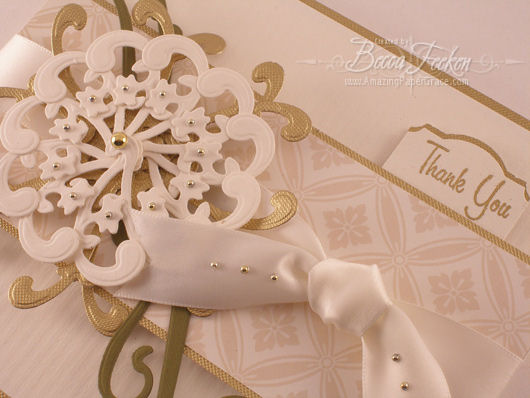
Below is the flower again – a little closer.
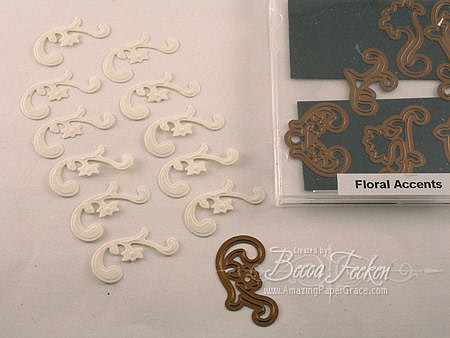
To start, grab your Spellbinders and pick one of the floral accents. If you look on the website here, I chose the green element and cut eleven of them, as shown below.

Place a glue dot on the end of the accent that you want to be at the center pivot point of the flower.

Below you see that I have placed all of my glue dots.

Taking each die cut, one by one, stack them on top of each other, as I have started to do below.

Create enough space between each die cut (petal) to keep the flower visually interesting and follow that spacing for each consistently.

My glue glue dots were flexible enough that I could continue to move the shapes for a while. Once I had them where I wanted, I flipped the entire medallion and placed additional glue dots to keep things from shifting.

Pictured above is the finished medallion. I adjusted each petal so that the little flower at the midpoint was on top of each preceding petal. On each of those little flowers, I placed a gold pearl. At this point you can embellish as you please. As you can see in my sample, I selected another floral accent and created a gold layer for additional embellishment.
I’m sure you’re gonna make some of these beauties yourself!! Now for some other news, if you remember a week or so ago, Stacey Caron with Spellbinders invited you back to the Spellbinders blog on Sunday, January 25th for a little surprise? Ya need to go here and have a look see – I’m just sayin’!


OH THANK YOU! THANK YOU! THANK YOU! I so get it now!
TFS!
Becca ~ That is a very sweet ‘thank you’ card!
That is SO cool! Thanks so much for sharing this project!
Rene’ Mewes
RM3116@charter.net
This so beautiful as always you are awesome. Thank you for sharing your talent and God Bless.
Beautiful card! Thanks for the instructions and letting us know that this will be available in March. It’s definitely on my list to buy!
That was great ! Tell me, how do you come up with these ideas. I look at a die cut and all I see is what’s there! I must have a very lazy brain. Thank goodness there are people like you who have the vision to see other than what is there. Thanks again for a very informative blog.
Thank you so very Becca. I would never have figured this out on my own. I love your works, inspiration, and dedication to helping those of us less talented. You are blessed!
Wow! That is stunning. Thank you so much for the tutorial!
Great job! I never figured that it was 8 separate pieces put together to form a flower. Very creative of you!
TFS
Rita
Oops! Re-read your instructions and see that it is 11 of them!!
These old eyes are tired!
Rita
Thank you so much for sharing! From the first time I saw the other card, I loved it, but this one… It´s gorgeous!!!
I am so impressed with your work. You are a God send for me an amateur in card making. Thanks.
Love, Love, Love it! How can I wait until these are available?!
Becca: Thank you for sharing your beautiful work. You are a blessing to the papercraft world.
As per usual, an extremely beautiful card. What about the larger flourishes? Thanks for sharing.
Sue
Becca, thank you so much for sharing your talent with us. Your instructions are always simple to follow.
WOW!!!!!
Wow! Who would have been able to put that filigree into a shape that is a flower except you?? Beautiful!
Oh my gosh, that is such a gorgeous card. What a great tutorial, it is easier than the finished product looks. I have got to save my pennies and get these dies when they come out. Thanks so much for sharing this tutorial with us.
Lisa A.
Thanks for the wonderful tutorial. I can’t wait to get my hands on this die!
Wow,
you’ve done it again, beautiful colours and lovely design.
i have my new bilities on order and its killing me waiting till march.
could you please show how to colour the inside of the nestabilites and tell me what brand you use.
i have tried sakura glitter and sakura glaze pens, my marvy le plume II pens and my new copic ciao markers, but these do not work, i dont have any other brand. could you tell me what you use and how to do that very fine black line PLEASSSSSE?
cant wait for your next card
lots of love
margaret uk
Holy smokes girlie! You are amazing! Hugs,
Gorgeous!!!! Pat
I love the colour combination in this card. It’s absolutley stunning.
Thanks for sharing that Becca – I was going to email you personally and ask how you did it, but I’m glad you posted it for all us all to enjoy. I just ordered the die and other than using them seperately to embellish a card or scrapbook page, I never thought about putting them together as you have. If you come up with additional ideas, please let us all know. Sometimes, our creativity levels are a -1 — LOL. Hugs, and prayers, Debi E. Rittman, OH
Becca – It’s so good of you to show us how you created this wonderful card, you are so talented and I love visiting your blog to see all your lovely creations. Thank you.
H xx
You are somethin’ else. Wow.
I love the way your brain works.
Thank you so much. You are such an inspiration.
Yours in Harmony,
Janet
WOW!!! Is about all I can say, you have so many amazing ideas…..how do you manage to come up with so many!!!! I really love your cards and tutorials. Keep it up!!!
Becca,
FABULOUS!!!!!!
As Alawys…… Thanks for sharing with us,
~~Diane~~
Wow, Wow, Wow!! Your stuff is amazing!!! I always think of you as the QUEEN of bows…I love bows too! Thought you might get a kick out of my recent post on a particular bow! :)
Dear Becca,
Thank you for the tutorial. As always, your card is spectacular and beautiful!
Thanks for sharing,
Cindy
That is awesome! I’ve made a flower out of paisleys before too. It was the same process! That makes a beautiful medallion!
Becca
How sweet of you to go to all the time and trouble to post these directions! Thanks so much!
Your work continues to amaze me–so beautiful. There is always something wonderful to see on your blog.
hugs,
Beverly
Awesome! Thanks for the tutorial…it’s great!
Becca,
You are, as always, such an inspiration to me. I just love visiting your blog to see what you are up to. You have such original ideas. Thanks so much for sharing your talents with us!
Blessings,
Linda
Wow! So simple yet so elegant! Thank you for the detailed
explanation! I can hardly wait to get the new dies and play!
Many thanks to you Becca….please know how very much we all appreciate you sharing your talent so freely!
Blessings,
Jan
Becca,
I check your blog everyday to see what wonderful creation you have come up with. You are so blessed to have such talent – and thank you for sharing it with all of us. You new card is beautiful and thank you for the tutorial. This particular die was not on my priority list til I saw your cards – now it is a must have.
Karen
Awesome!!!! This is so beautiful!! My spellbinders wish list is a mile long with all the new releases!
hugs, Jami
wowee!! fancy shmancy!
wow….you make it look so simple…….if i master this one…..I will be amazed. THANK YOU …..THANK YOU
Wow!! beautiful, just like all your cards. Thank you for the tutorial.
Blessings
Becca,
As always your cards are elegant and awe inspiring. Thank you so much for the tutorial. You make it look easy!
This is absolutely gorgeous, Becca!! Thanks for the tutorial!!
Thank you so much for sharing this with us. Your card is gorgeous as always.
Bec that is so beautiful.. I would never think to do anything like that .. ohhhhhhhhh for some of your creativeness..
thanks for sharing the tutorial with us
Oh my gosh Becca! Once again you leave me in awe!! Wowzers! Thank you so much for sharing that!! I’ve now added that set to my wish list!!
Hugs
~Spike
Thank you for showing us how to make this. Your creativity amazes me and you are always so willing to share. I look forward to your next creation. By the way I have also added this set to my wish list.
Thanks again
Wendy
Becca: Thanks ever-so-much for this and all your other tutorials. I’m on dial-up and it’s ALWAYS worth the, sometimes agonizing, wait to see your amazing and breath-taking works of art. ……ash
Ooops! Forgot my question. Are the pearls you use adhesive-backed or hot fix? ……..ash
WOW!! Thanks so much for publishing this – I am soooooo looking forward to getting that die set!! :)
Becca, thank you so much for making such a great tutorial about your amazing floral piece. It is always such a blessing to come to your blog and see what you have to share. You have been truly blessed with a wonderful talent for creating such beautiful projects and then you are gracious enough to share it with the rest of the world. I sincerely get such a pleasure out of looking at your blog each day. Thank you so much!!!
Becca….you are so smart and full of such creative ideas. I love reading what you have been up to and seeing your beautiful cards. Thanks for sharing your inspirations with all of us.
Oh my……..all your cards are the most amazing cards I see on the web. The layout, colours you choose to the little added touch. Just love your cards. This is a great tutorial and plan to give this a try. I am so glad I found your blog. You can do it all!!!!
Becca, this is beautiful!!!!! I guess I will need this set as well!!!! Thanks for the tutorial!!!!
So clever and elegant Becca.
You are such an amazing artist, I never would have thought to put those together like that, the tiny pearls are so sweet, Beautiful card!
Thank you for sharing your talent with us!
These are so pretty!! Thank you for the tutorial.
OMGosh Becca!
You are soooo amazing & talented!
What a gorgeous flower!
Thank you so much for sharing the how-to!
Becca thank you so very much for the tutorial! I can’t wait to get my hands on these dies so that I can make one of these! :)
Hugs~ Kim
The card is breath taking beautiful. I am excited to try such a beautiful card. Thanks for the detailed pattern.
lovely card. Love the website
This is truly so beautiful I can’t quit staring at it. I’ve passed it along to my Yahoo stamping group so they can admire it as much as I do! Thank you for the wonderful tutorial!
Frances Naeve, Hearts In Touch Rubber Stamps.
WOW, you have to be the QUEEN of these spellbinders! Your idea’s are just endless! This is GORGEOUS!
hugz
Stunning and thank you for sharing – you are so generous.
xxxxxxxxxx
Becca, this is one of the prettiest things I have ever seen. Thank you for the step-by-step tutuorial on doing it, and for introducing me to the newest Spellbinders. No one in my area sells these, so it is very frustrating to know they are available, but have no concept of what to do with them—thank goodness for you!
Very creative Becca, gorgeous card.
Becca this card is so beautiful and so creative. I think I left a comment the other day, but don’t remember for sure, but I must say that your creativity never ceases to amaze me. I do not know how you consistently look at these dies or punches and use them in a completely unusual way, but always so beautiful and elegant. Love your work!
Becca you are truly an ispiration to me. You are like the energizer bunny you just keep sharing your talent with us. I know you are very busy but you keep going.
All your work is so beautiful. Thanks so much for sharing with me.
Jesus Lives!!!
Peggy
oh my goodness! Now I know why your blog is called Amazing Paper Grace… you’re so amazing! I’d love to take paper classes and do neat things like this. thank you for sharing. wow!!
Wow that is gorgous!!-Barbara
hi becca, i am a fan of you that lives in holland, its greet to see the wonderful things you make!! you give me a lot of inspiration and i will thank you for it!
thanks a lot and many greetings, hilde
Magnifique. Votre carte est splendide.
Les couleurs et la combinaison avec le die spellbinder est tout simplement fabuleuse. Mais où trouvez-vous toutes vos idées.
Surtout, continuez à nous surprendre.
Merci de tout coeur.
[…] in seeing how the filigree flower works I did a tutorial quite some time ago that you can find HERE. To finish off the card I stamped Believe from the Santa I Believe set and cut it out using […]
Gorgeous!!! Thanks for the easy to follow directions!
Hi Becca,
This is absolutely GORGEOUS! Thanks for the spellbinding inspiration! Be Blessed.
HOW BEEUTEFWUL! I LOVE YOUR DESIGNS BECCA
THANK YOU FOR SHARING I CAN’T WAIT TO SEE MORE.
CEWPIE